Ever found yourself staring into the abyss of your fridge, wondering if takeout is your only friend tonight? Nah, not today, chief! We’re making cake. And not just any cake, we’re whipping up a fancy-pants surprisingly easy Chocolate Pear Cake that tastes like you spent hours slaving away, but actually takes like, a hot minute (ish) to put together. Get ready to impress yourself, your significant other, or just your cat. You deserve it!
Why This Recipe is Awesome
Okay, let’s be real. We all want to look like we’ve got our culinary lives together, even when our kitchen is perpetually one crumb away from a disaster zone. This chocolate pear cake? It’s your secret weapon. Here’s why it’s about to become your new best friend:
- **It’s shockingly easy.** Seriously, if I, a person who once set off the smoke alarm making toast, can nail this, you’re golden. It’s practically idiot-proof.
- **The chocolate and pear combo is pure magic.** Think rich, dark chocolate meeting sweet, juicy pears. It’s a sophisticated tango for your taste buds, without any of the high-maintenance drama.
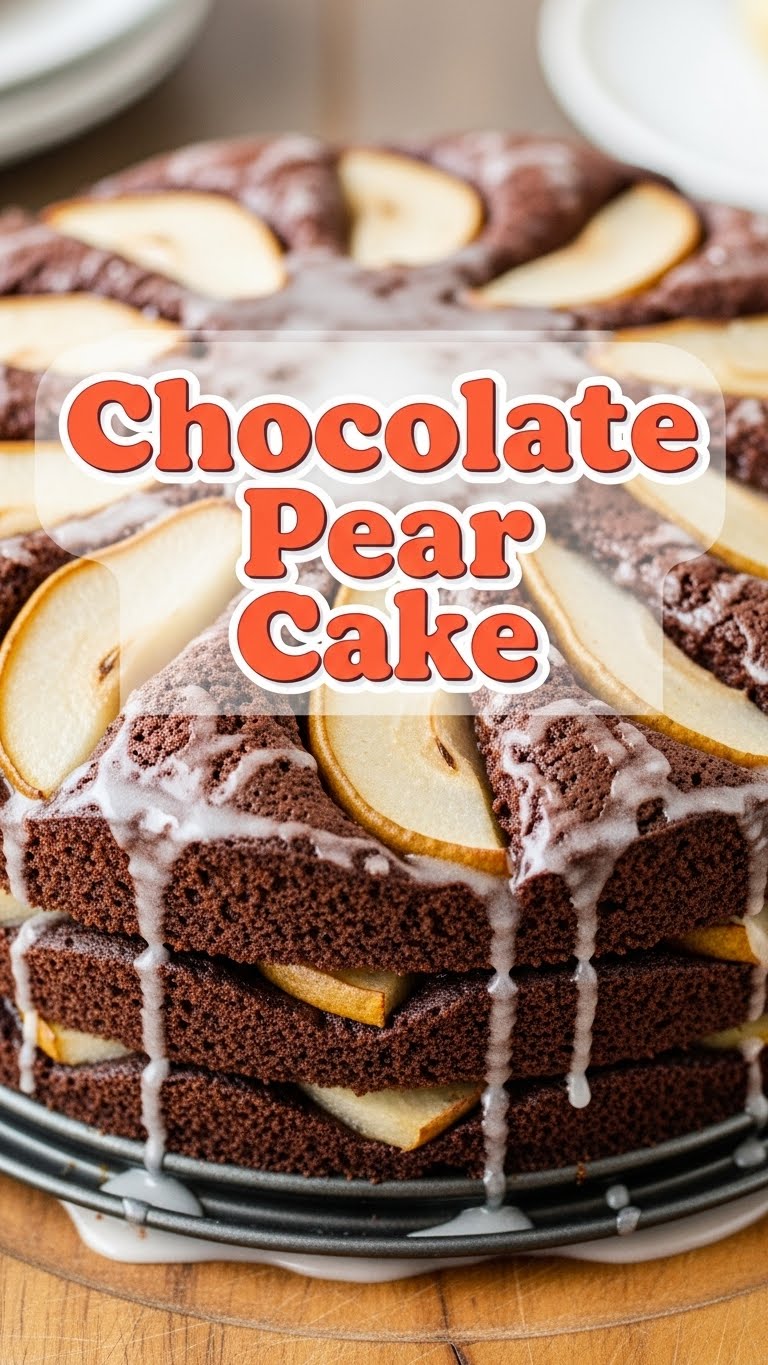
- **Looks totally impressive.** You’ll bake this beauty, sprinkle a little powdered sugar (or not, if you’re a rebel), and boom! Instant gourmet vibes. Your friends will think you’ve been secretly attending baking school.
- **Perfect for any occasion.** Brunch, dessert, a random Tuesday afternoon because, well, cake. This bad boy fits right in.
Ingredients You’ll Need
Time to gather your edible arsenal! No need for a grocery store scavenger hunt, these are pretty basic goodies. Don’t stress, just grab ’em:
- **1 ½ cups all-purpose flour:** The backbone of our operation. Nothing fancy needed here, unless you’re feeling particularly bougie.
- **½ cup unsweetened cocoa powder:** For that deep, chocolatey hug. Unsweetened, unless you’re aiming for a sugar coma (no judgment!).
- **1 teaspoon baking soda:** Our first lift-off agent.
- **½ teaspoon baking powder:** Its trusty sidekick. Don’t mix ’em up, folks!
- **¼ teaspoon salt:** Just a pinch, to make all the other flavors sing.
- **1 cup granulated sugar:** Sweetness! Because life’s too short for unsweetened cake.
- **2 large eggs:** The glue that holds it all together. Room temp is ideal, but if you forgot, a quick warm water bath for a few mins works.
- **½ cup vegetable oil:** Or any neutral oil. Keeps things super moist and happy.
- **½ cup buttermilk:** Adds tang and tenderness. (Don’t have it? See Alternatives!)
- **1 teaspoon vanilla extract:** A big ol’ hug for your taste buds.
- **2 medium pears, firm but ripe:** Peeled, cored, and chopped into bite-sized pieces. Fresh is best, but we’re not judging if you go canned (just drain well!).
- **¾ cup semi-sweet chocolate chips:** Because… chocolate. Dark chocolate if you’re feeling moody, milk if you’re feeling extra sweet.
Step-by-Step Instructions
Alright, apron on (or not, we don’t judge). Let’s get this show on the road! Remember, short and sweet steps – just like this cake will be.
- **Preheat & Prep:** First things first, get that oven fired up to **350°F (175°C)**. Grab a 9-inch round cake pan. Grease it like you mean it, then dust with a little flour. If you’re feeling fancy (or paranoid), line the bottom with parchment paper.
- **Dry Team Assemble!** In a large bowl, whisk together your flour, cocoa powder, baking soda, baking powder, and salt. Make sure there are no lumpy surprises!
- **Wet Team Power Up!** In a separate, medium-sized bowl, beat the granulated sugar, eggs, vegetable oil, buttermilk, and vanilla extract until everything is smooth and well combined.
- **The Grand Unification:** Gradually add the dry ingredients to the wet ingredients. Mix on low speed, or by hand, until *just* combined. **Important: Do not overmix!** A few small lumps are totally fine. Overmixing leads to tough cake, and nobody wants that.
- **The Good Stuff Goes In:** Gently fold in your chopped pears and chocolate chips. Make sure they’re evenly distributed, like little delicious surprises in every bite.
- **Into the Pan:** Pour the glorious batter into your prepared cake pan. Give it a gentle tap or two on the counter to settle any air bubbles.
- **Bake Off!** Pop that pan into your preheated oven. Bake for **30-35 minutes**, or until a wooden skewer or toothpick inserted into the center comes out mostly clean. If it’s gooey, give it a few more minutes.
- **Cool Down:** Let the cake cool in the pan for about 10-15 minutes. This helps it firm up. Then, carefully invert it onto a wire rack to cool completely. Patience, young padawan. **Seriously, don’t cut it hot.**
Common Mistakes to Avoid
We’ve all been there. The cake that looks like a deflated pancake, or sticks to the pan with the tenacity of super glue. Here’s how to sidestep those common pitfalls, with a dash of humor, of course:
- **Overmixing the Batter:** This is probably the number one cake killer. You want a light, tender crumb, not a dense, rubbery hockey puck. Mix until *just* combined. When in doubt, stop mixing!
- **Not Greasing Your Pan Properly:** Thinking you can just lightly swipe some oil? Rookie mistake! Grease and flour that pan thoroughly, or line it with parchment paper, unless you enjoy a challenging archeological dig to unearth your cake.
- **Opening the Oven Door Too Early:** I know it’s tempting to peek, but resist! A sudden drop in temperature can make your cake sink in the middle. Give it at least 25 minutes before you even think about looking.
- **Using Mushy Pears:** If your pears are too soft, they’ll just turn into sad, watery mush in the cake. Firm but ripe is the sweet spot.
- **Cutting the Cake While It’s Still Warm:** I get it, the smell is intoxicating. But warm cake is crumbly and hard to slice neatly. **Let it cool completely!** Your patience will be rewarded with perfect slices.
Alternatives & Substitutions
Life’s about options, right? This recipe is super flexible, so feel free to play around. Think of these as suggestions from your slightly chaotic, but well-meaning, recipe fairy godmother.
- **No Buttermilk? No Problem!** Seriously, don’t run to the store. Just add **1 tablespoon of white vinegar or lemon juice** to regular milk (any kind!) and let it sit for 5-10 minutes. Voila! Instant DIY buttermilk.
- **Pear Swap-Out:** Not a pear person? You could totally use apples (like Honeycrisp or Granny Smith), or even peaches (fresh or well-drained canned) in a pinch. Heck, skip the fruit entirely for a fantastic pure chocolate cake. You do you!
- **Oil vs. Butter:** Vegetable oil keeps the cake incredibly moist, but if you prefer the richness of butter, you can use **½ cup melted unsalted butter** instead. Just know it might alter the texture slightly.
- **Chocolate Chip Varieties:** Semi-sweet is classic, but feel free to go rogue! Dark chocolate chips, white chocolate chunks, or even a swirl of hazelnut spread (like Nutella, IMO) would be amazing. YOLO!
- **Gluten-Free Version:** Want to make it GF? Swap out the all-purpose flour for a 1:1 gluten-free baking blend. The results are usually fantastic.
FAQ (Frequently Asked Questions)
Got questions? I’ve got (casual and hopefully helpful) answers!
- **My cake sank in the middle! What went wrong?** Oh, the dreaded crater! Usually, this means overmixing the batter, opening the oven door too early, or your oven temperature isn’t quite accurate. Next time, be gentle with the mixing and trust the baking process!
- **Can I use canned pears instead of fresh?** Absolutely! Just make sure to drain them *really* well and pat them dry with paper towels. Extra moisture is not our friend here and can make the cake soggy.
- **How long does this chocolate pear cake last?** Covered tightly at room temperature, it’s typically good for 3-4 days. In the fridge, it’ll happily last about a week. (If it even makes it that long, that is!)
- **Can I make this into cupcakes?** You betcha! Just reduce the baking time significantly, probably to around 20-25 minutes. Keep an eye on them!
- **Do I *have* to chill the cake completely before cutting?** Look, I’m not your mom, but for cleaner slices and better flavor (the flavors meld beautifully as it cools), **yes, please!** Warm cake tends to crumble and squish.
- **Can I add nuts to this recipe?** For sure! Walnuts or pecans would be an amazing addition. Add about ½ cup along with the pears and chocolate chips. More crunch, more fun!
- **Is this cake freezable?** Yes! Wrap individual slices or the whole cooled cake tightly in plastic wrap, then foil. It’ll keep well for up to 2-3 months. Thaw at room temperature.
Final Thoughts
So there you have it, folks! Your new go-to, fancy-but-foolproof chocolate pear cake recipe. You’ve officially leveled up your baking game without breaking a sweat (or a significant amount of dishes). Now go forth and conquer that kitchen! Or at least make something delicious that everyone will rave about. Don’t forget to send me a slice (or, you know, just a pic). You’re practically a pastry chef now. High five!


