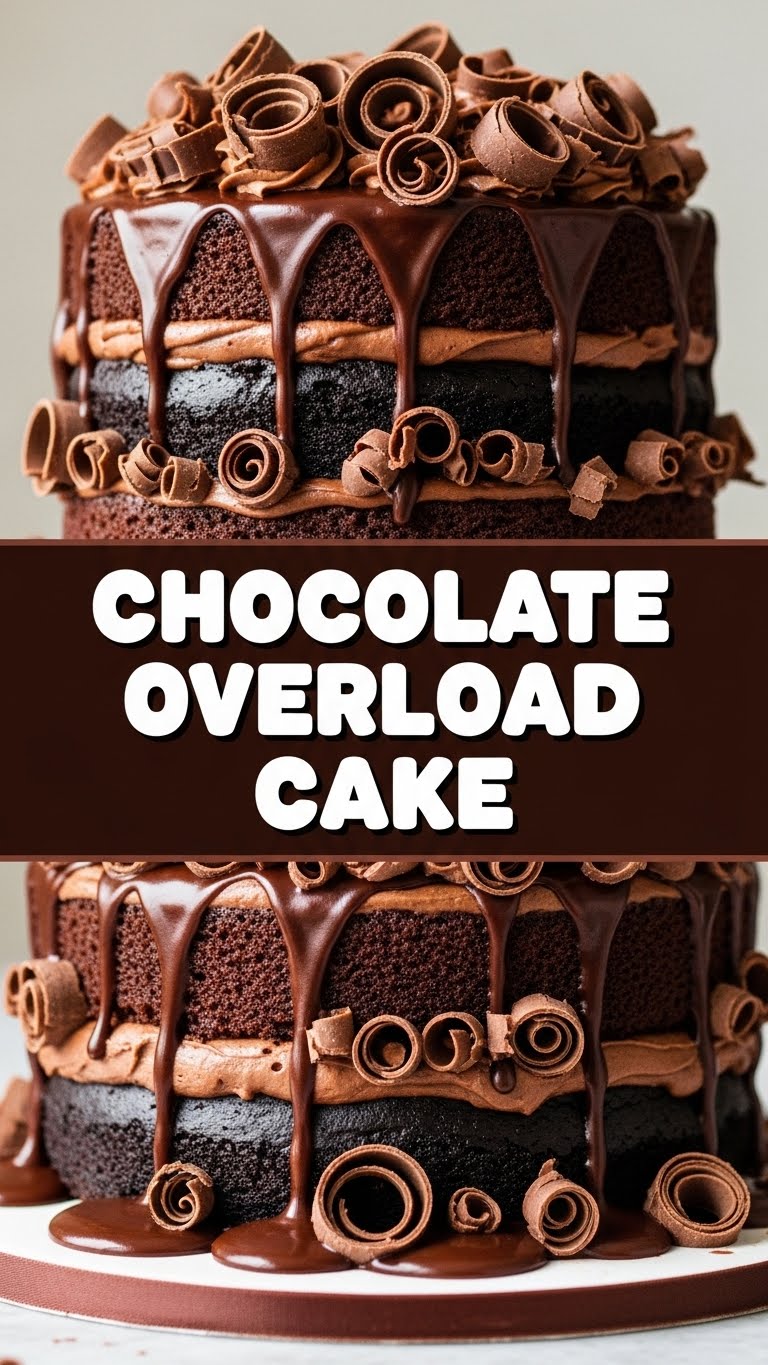
Okay, friend, let’s be real. Sometimes you just need a chocolate hug in cake form, and you need it STAT. Not a polite little chocolate pat, but a full-on, face-first dive into cocoa goodness that screams, “I am here, I am chocolate, and I regret nothing.” Am I right? If your answer is a resounding “HECK YES!” then you, my friend, are in the right place. Welcome to the Chocolate Overload Cake experience!
Why This Recipe is Awesome
Because it’s called “Chocolate Overload Cake,” for starters. The name pretty much says it all. But beyond the obvious, this recipe is your secret weapon for looking like a baking genius without actually needing a culinary degree. Seriously, it’s so easy even your pet rock could probably supervise you through it. It’s practically idiot-proof. Plus, it’s fudgy, moist, and ridiculously rich – everything a chocolate cake should be, and then some. You’ll impress everyone, including yourself, and that’s a win-win, IMO.
Ingredients You’ll Need
Gather your chocolatey arsenal! Here’s what you’ll need to make this glorious beast:
- For the Cake:
- 2 cups all-purpose flour (the one that shows up to every party)
- 2 cups granulated sugar (because sweetness is key)
- ¾ cup good quality cocoa powder (none of that dusty stuff from the back of the pantry, please!)
- 2 teaspoons baking soda (our cake-lifting hero)
- 1 teaspoon baking powder (its trusty sidekick)
- 1 teaspoon salt (to balance all that sweetness)
- 1 cup buttermilk (or regular milk + 1 tbsp vinegar/lemon juice, let it sit for 5 mins – ta-da!)
- ½ cup vegetable oil (or any neutral oil)
- 2 large eggs (straight from the fridge is fine, we’re not fancy today)
- 1 teaspoon vanilla extract (the secret whisper of flavor)
- 1 cup hot water (or hot coffee for a deeper, mysterious chocolate flavor – recommended!)
- For the Ridiculously Fudgy Frosting:
- 1 cup unsalted butter, softened (don’t rush it, butter needs its beauty sleep)
- 3 cups powdered sugar (sifted, unless you like lumpy frosting, you rebel)
- ¾ cup good quality cocoa powder (again, quality matters!)
- ½ cup milk or heavy cream (for creaminess, baby!)
- 1 teaspoon vanilla extract (because it just works)
- A pinch of salt (always a pinch!)
- For the Overload (Optional, but highly encouraged!):
- 1 cup chocolate chips (milk, dark, semi-sweet – choose your fighter!)
- Chocolate shavings, mini chocolate bars, chocolate candies – go wild!
Step-by-Step Instructions
- Get Prepped: Preheat your oven to 350°F (175°C). Grease and flour two 9-inch round cake pans. Don’t skip this, unless you want your cake to stage a protest and stick to the pan forever.
- Whisk Dry Ingredients: In a large bowl, whisk together the flour, sugar, cocoa powder, baking soda, baking powder, and salt. Make sure there are no lumpy bits trying to hide.
- Combine Wet Ingredients: In a separate medium bowl, whisk together the buttermilk, oil, eggs, and vanilla extract until well combined.
- Mix it Up: Pour the wet ingredients into the dry ingredients. Mix on low speed with an electric mixer (or by hand with a whisk) until just combined. Don’t overmix; we want a tender crumb, not rubber!
- Add the Hot Stuff: Carefully pour in the hot water (or coffee) and mix until the batter is smooth. The batter will be thin, and that’s perfectly normal, **FYI**.
- Bake Time: Divide the batter evenly between your two prepared cake pans. Bake for 30-35 minutes, or until a wooden skewer inserted into the center comes out clean.
- Cool Down: Let the cakes cool in the pans for about 10-15 minutes before inverting them onto a wire rack to cool completely. This is crucial! If you try to frost a warm cake, you’ll have a melty chocolate disaster.
- Make the Frosting: While the cakes are cooling, beat the softened butter in a large bowl until light and fluffy. Gradually add the sifted powdered sugar and cocoa powder, alternating with the milk/cream, beating until smooth and creamy. Stir in the vanilla extract and salt.
- Assemble Your Masterpiece: Once the cakes are completely cool, place one layer on your serving plate. Spread a generous amount of frosting on top. Place the second cake layer on top and frost the top and sides of the entire cake.
- Overload It!: Now for the fun part! Press chocolate chips around the sides, sprinkle chocolate shavings on top, or arrange any other chocolatey delights you’ve got. This is your cake; make it extra!
Common Mistakes to Avoid
- Not Preheating the Oven: Rookie mistake! Your oven needs to be at the right temperature from the start for even baking. Think of it as warming up before a workout.
- Overmixing the Batter: Once you see no more dry streaks, STOP. Overmixing develops gluten, leading to a tough, dry cake. Nobody wants that.
- Opening the Oven Door Too Early: Patience, young padawan! Opening the door before the cake is set can make it sink in the middle. Resist the urge to peek!
- Frosting a Warm Cake: Unless you’re aiming for a lava cake look (which isn’t bad, but not the goal here), wait until your cake layers are completely, utterly, stone-cold cool.
- Skipping the Quality Cocoa: Cheap cocoa equals a flat, uninspired chocolate flavor. Invest in good stuff; your taste buds will thank you.
Alternatives & Substitutions
Feel free to get creative! This recipe is forgiving.
- Coffee vs. Water: Seriously, use hot coffee instead of hot water in the cake batter. It deepens the chocolate flavor without making the cake taste like coffee. It’s magic!
- Buttermilk Boost: No buttermilk? Mix regular milk with a tablespoon of white vinegar or lemon juice, let it sit for 5 minutes, and boom – instant buttermilk.
- Different Chocolates: Mix up your chocolate chips! Use dark chocolate for a more intense flavor, or white chocolate for a pretty contrast. Or, you know, all three!
- Add a Boozy Kick: A splash of Kahlúa or chocolate liqueur in the frosting can elevate this cake to adult-dessert status. Just a splash, though!
- Nutty About Chocolate: Toast some chopped pecans or walnuts and sprinkle them between layers or on top for some crunch.
FAQ (Frequently Asked Questions)
Got questions? I’ve got answers!
- Can I make this cake ahead of time? Absolutely! The cake layers can be baked a day or two in advance, wrapped tightly in plastic wrap, and stored at room temperature. The frosting can also be made ahead and stored in the fridge for up to a week.
- Is this cake *too* rich? Is the sky too blue? Is Beyoncé too talented? I think not! But seriously, if you find it super rich, a small slice goes a long way. Or just embrace the richness!
- My cake sank in the middle, what happened? Usually, this means one of two things: either your oven temperature was off (too hot often causes this) or you opened the oven door too early. Always trust a good oven thermometer!
- Can I use margarine instead of butter in the frosting? Well, technically yes, but why hurt your soul like that? Butter just tastes better and gives a superior texture. For this cake, splurge on the real deal.
- How do I store leftovers? If there are any! Cover it tightly and store at room temperature for up to 3 days, or in the fridge for up to a week. It also freezes beautifully for longer storage.
- What if I only have one cake pan? You can totally bake them one at a time. Just leave the rest of the batter at room temperature while the first one bakes. It might affect the rise ever so slightly, but it’ll still be delicious!
Final Thoughts
There you have it! Your very own guide to creating a Chocolate Overload Cake that will make jaws drop and taste buds sing. This isn’t just a cake; it’s an experience, a declaration of your love for all things chocolate. So go forth and conquer that chocolate craving! You’re basically a dessert superhero now. Now go impress someone—or yourself—with your new culinary skills. You’ve earned it!

