So, you’ve baked a glorious chocolate cake, probably from a box mix (shhh, your secret’s safe with me!). Or maybe you got a plain one from the bakery. Either way, it’s sitting there looking a bit… well, plain. A blank canvas just begging for some pizzazz, some flair, some *oomph*! And what better way to jazz it up than with the ultimate power couple: chocolate and orange? Get ready to turn that humble cake into a showstopper, without breaking a sweat (or a culinary school budget). We’re talking maximum impact, minimum effort, and a whole lotta deliciousness. Let’s do this!
Why This Recipe is Awesome
Because it’s practically magic, that’s why! This isn’t some fussy, Gordon Ramsay-level decoration; it’s the kind of impressive yet ridiculously easy technique that’ll have everyone thinking you spent hours slaving away. You’ll literally be able to whip up a stunning design that looks professional, but in reality, it’s so idiot-proof even I didn’t mess it up (and trust me, my kitchen has seen some things). Plus, chocolate and orange together? It’s like a flavor party in your mouth, and your cake is the VIP guest. It’s a guaranteed crowd-pleaser, a mood lifter, and frankly, just plain delicious. So, put on your favorite tunes, grab a snack, and let’s make some cake art!
Ingredients You’ll Need
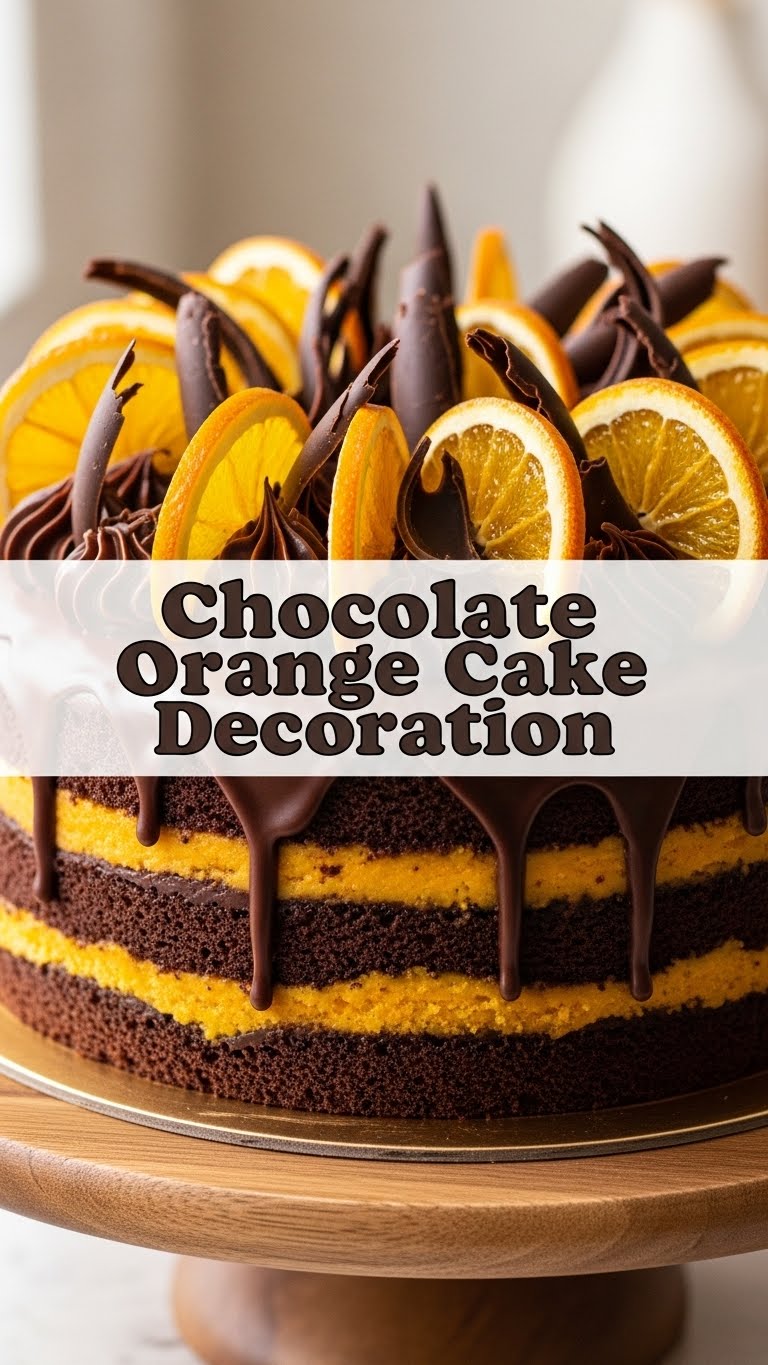
- A cooled chocolate cake: Your beautiful canvas! Make sure it’s completely cool, otherwise, we’re making soup, not art.
- 200g good quality dark chocolate (or milk chocolate, if that’s your jam): Chopped into small pieces. The better the chocolate, the better your ganache, my friend. Don’t skimp here!
- 200ml heavy cream (whipping cream): The silky smooth partner to our chocolate.
- 2-3 fresh oranges: For zest, segments, and maybe even some fancy candied slices if you’re feeling extra bougie. Navel or Valencia work great.
- Optional: Powdered sugar: For dusting, or to make a quick orange glaze if you’re feeling fancy.
- Optional: Extra chocolate (e.g., a bar of baking chocolate): For elegant chocolate shavings or curls. Because more chocolate is always a good idea.
Step-by-Step Instructions
Whip up that Ganache:
First things first, get your ganache going. Place your chopped chocolate in a heatproof bowl. In a small saucepan, gently heat the heavy cream until it just starts to simmer around the edges – don’t let it boil! Pour the hot cream over the chocolate. Let it sit for about 5 minutes to melt the chocolate, then stir gently from the center outwards until it’s super smooth and glossy. This is the foundation of our masterpiece.
Chill it out:
Let your ganache cool down a bit. You want it to be pourable but thick enough to coat your cake without running off like a waterfall. If you’re doing a drip effect, let it cool until it’s slightly thicker, like a warm honey. If you want full coverage, let it thicken even more, almost like a soft frosting. Patience is key here!
Prep Your Oranges:
While the ganache is cooling, let’s get zesty! Grate the zest from one orange – try to get just the bright orange part, avoiding the bitter white pith. Set aside. For segments, carefully peel your oranges, removing all white pith. Then, slice between the membranes to get those perfect, juicy segments. You can also slice a few thin rounds for extra visual appeal. If you’re going for candied slices, now’s the time to make them (but that’s a whole other mini-project!).
The Drip or Coat:
Place your cooled cake on a wire rack over some parchment paper (to catch drips, you savvy baker, you!). If you’re doing a drip, spoon some ganache onto the top edge of the cake and gently push it over the side with the back of the spoon, letting it drip artfully. For a fully coated cake, just pour the ganache over the top and spread it evenly with an offset spatula, letting it cascade down the sides. Don’t overthink it; rustic charm is totally in!
Decorate with Zest and Segments:
Once your ganache is set (or mostly set, for a slightly embedded look), it’s playtime! Sprinkle your orange zest generously over the top of the cake. Then, artfully arrange your orange segments and slices. You can create a spiral pattern, a clustered look, or just scatter them haphazardly – remember, it’s *your* cake, *your* rules! Don’t be afraid to experiment with placement.
Optional Chocolate Shavings:
For an extra touch of fancy, take a bar of room-temperature chocolate and use a vegetable peeler or a sharp knife to create delicate chocolate curls or shavings. Sprinkle these over and around your orange elements. Voilà! You’ve just created a masterpiece.
Common Mistakes to Avoid
- Applying ganache to a warm cake: Seriously, don’t do it. It will melt, slide off, and you’ll have a puddle of disappointment instead of a beautiful cake. Always ensure your cake is completely cool.
- Not letting ganache cool enough: If it’s too hot, it’ll be too thin and won’t cling to your cake or create those perfect drips. If it’s too cold, it’ll be too thick and hard to spread. Finding that sweet spot takes a minute, but it’s worth it.
- Over-zesting: You want the bright orange part of the peel, not the bitter white pith underneath. Go gentle!
- Thinking you need to be a perfectionist: This is supposed to be fun! Imperfections add character. Embrace the rustic chic vibe.
- Eating all the chocolate and then realizing you have none left for the ganache: Rookie mistake, but one I’ve personally made many times. Buy extra!
Alternatives & Substitutions
Feeling adventurous or missing an ingredient? No worries, we’ve got options!
- Chocolate Type: If dark chocolate isn’t your jam, go with milk chocolate for a sweeter ganache. Or mix dark and milk for a happy medium. White chocolate ganache could also be super pretty, but it’s a different vibe entirely!
- Orange Extract: No fresh oranges? You can add a few drops of food-grade orange extract to your ganache for that citrusy kick, and then decorate with some store-bought candied orange peel or even chocolate-covered orange slices. Fresh is always best for zest and segments, though, IMO.
- Other Citrus: Lemon or lime zest and segments could also be delicious and visually striking with chocolate, if you’re feeling a different citrusy twist.
- Store-Bought Frosting: If making ganache feels like too much work today (we all have those days, no judgment!), you could use a good quality store-bought chocolate frosting as your base. Just warm it slightly to make it spreadable/drip-able.
- Fancy Garnishes: Want to elevate it further? A sprig of fresh mint, some edible gold leaf (if you’re feeling extra bougie), or even some crushed candied hazelnuts could add a lovely touch.
FAQ (Frequently Asked Questions)
Got questions? I’ve got (casual) answers!
- “Can I use chocolate chips for the ganache?”
Technically yes, but for the best, smoothest ganache, a good quality chocolate bar chopped into pieces melts much more evenly and gives a superior texture. Chocolate chips often have stabilizers that can make ganache a bit grainy. So, for maximum deliciousness, reach for the bar!
- “My ganache is too thin! What do I do?”
Don’t panic! Simply let it sit at room temperature for a bit longer, stirring occasionally, until it thickens to your desired consistency. You can even pop it in the fridge for 5-10 minute intervals, stirring after each, but be careful not to let it get too solid.
- “And if it’s too thick?”
Easy fix! Gently warm it over a double boiler or in the microwave for very short bursts (5-10 seconds), stirring well in between, until it’s loosened up. Add a tiny splash of hot cream if needed, but go slow!
- “How do I get those perfect chocolate curls?”
Grab a bar of chocolate that’s at room temperature (not too cold, not too warm). Use a vegetable peeler or a sharp, flat knife held at an angle and shave along the edge of the chocolate. Practice makes perfect, and the ‘mistakes’ are delicious!
- “Can I prepare the orange segments ahead of time?”
Absolutely! You can segment and zest your oranges a few hours in advance and store them in an airtight container in the fridge. Just make sure to drain any excess juice from the segments before placing them on the cake so they don’t make your ganache watery.
- “How far in advance can I decorate the cake?”
You can decorate a few hours before serving. If you’re adding fresh fruit, it’s best to do it no more than 1-2 days in advance, as the fruit can dry out or weep. Store the decorated cake in an airtight container in a cool place or the fridge.
Final Thoughts
See? That wasn’t so scary, was it? You just took a plain old cake and transformed it into a work of art that not only looks stunning but tastes absolutely divine. You’ve basically earned bragging rights for the next week, so go ahead and tell everyone you’re a professional pastry chef now. Or just enjoy the fruits of your labor (literally!) all by yourself. Either way, you’ve done good. Now go impress someone – or yourself – with your new culinary skills. You’ve earned it!


