So, you’ve got that irresistible chocolate craving hitting hard, but the thought of a complicated recipe makes you want to just order takeout, right? Been there, done that. But what if I told you there’s a chocolate mud cake so ridiculously easy, so utterly delicious, it’ll make you feel like a Michelin-star chef without breaking a sweat (or a single expensive ingredient)? Yeah, I thought that’d get your attention! Let’s get muddy.
Why This Recipe is Awesome
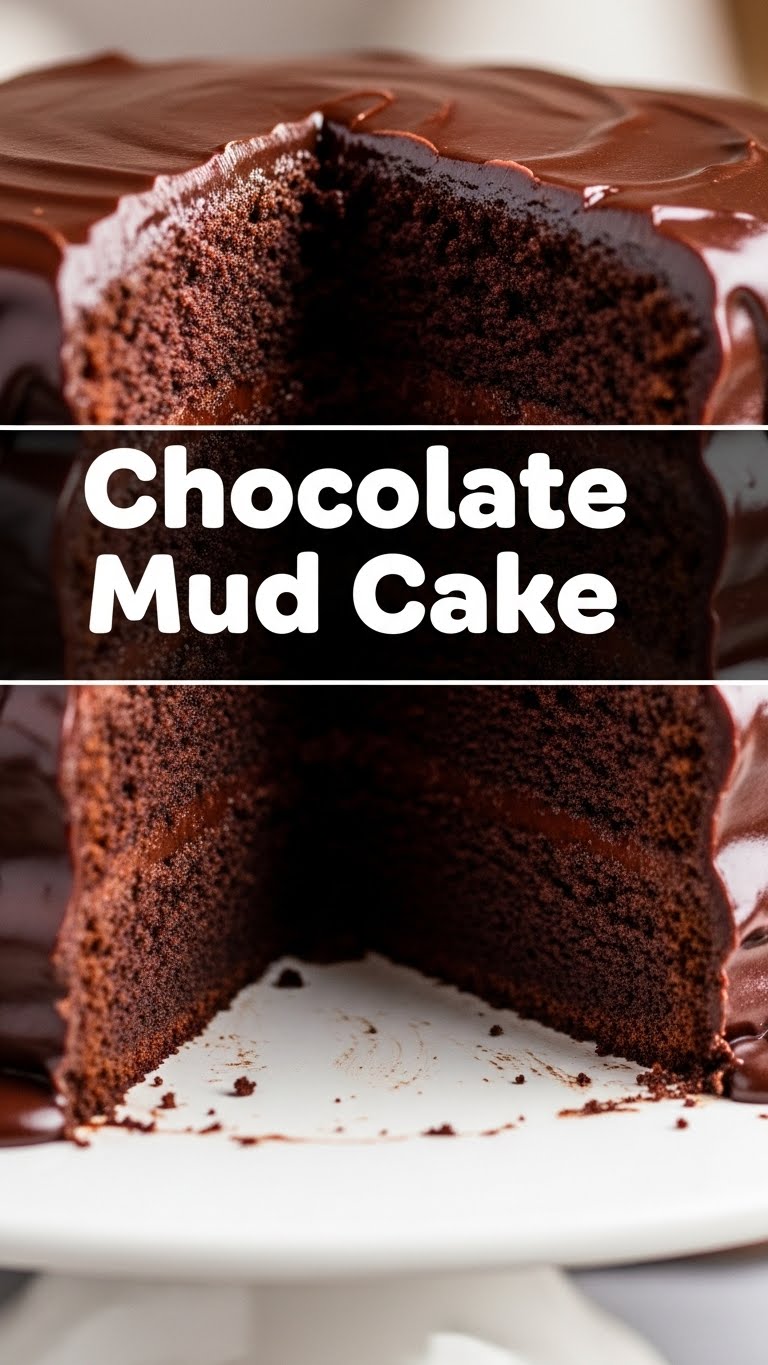
Okay, let’s be real. This isn’t just any chocolate cake. This is THE chocolate mud cake. It’s so moist, so rich, so deeply chocolatey, it basically redefines your concept of dessert. Plus, it’s pretty much **idiot-proof**. Seriously, if I, a person who once set off the smoke alarm making toast, can nail this, so can you. It’s perfect for impressing guests, bribing significant others, or just shoveling into your face after a long Tuesday. No fancy equipment, no obscure ingredients, just pure chocolate bliss. You’re welcome.
Ingredients You’ll Need
Gather ’round, my fellow dessert enthusiasts. Here’s what you’ll need to conjure up this masterpiece. Most of these are probably chilling in your pantry already, so no frantic grocery store runs, promise!
- **All-Purpose Flour:** About 1 ½ cups. The backbone of our muddy creation. Don’t worry, we’ll make it exciting.
- **Granulated Sugar:** 1 ½ cups. Because sweetness is not a crime.
- **Unsweetened Cocoa Powder:** ¾ cup. And I mean GOOD cocoa powder. This is a *chocolate* cake, after all. Don’t skimp!
- **Baking Soda:** 1 ½ teaspoons. Our little magic fluffy dust.
- **Salt:** 1 teaspoon. Just a pinch to make all those chocolatey flavors pop.
- **Eggs:** 2 large. Your binding agents.
- **Milk:** 1 cup. Any kind works, but whole milk makes it extra luscious.
- **Vegetable Oil:** ½ cup. For that incredible moistness. Trust me, it works wonders.
- **Vanilla Extract:** 2 teaspoons. Essential for depth of flavor. Don’t even think about skipping this!
- **Boiling Water:** 1 cup. Sounds weird, tastes amazing. This is the secret weapon for ultimate moisture.
- **Optional (but highly recommended) Chocolate Frosting:** Store-bought is totally fine, or whip up a simple ganache if you’re feeling extra fancy.
Step-by-Step Instructions
Alright, apron on (or not, I don’t judge!), let’s get baking! These steps are so easy, you’ll wonder why you ever bought a cake from a store.
- **Preheat Power-Up:** First things first, get that oven going. **Preheat your oven to 180°C (350°F)**. Grease and flour a 9×13 inch baking pan, or line with parchment paper. Trust me, future you will thank you when the cake slides right out.
- **Dry Mix Magic:** In a large bowl, whisk together your flour, sugar, cocoa powder, baking soda, and salt. Make sure there are no lumps—we want smooth sailing here!
- **Wet Mix Wonder:** In a separate medium bowl, combine the eggs, milk, vegetable oil, and vanilla extract. Whisk them until they’re nice and blended.
- **Combine Forces:** Pour the wet ingredients into the dry ingredients. Mix on low speed with an electric mixer, or by hand with a spatula, until just combined. Don’t overmix, that’s a one-way ticket to dry cake town!
- **Hot Water Heroics:** Now, here’s the secret sauce (or water, rather). Carefully pour the boiling water into the batter. It’ll look super thin, but that’s exactly what we want. Stir until just combined. The batter will be quite runny, which is perfectly normal.
- **Bake It ‘Til You Make It:** Pour that glorious runny batter into your prepared pan. Pop it into the preheated oven and bake for **30-35 minutes**. You’ll know it’s done when a toothpick inserted into the center comes out clean.
- **Cool Down Crew:** Once baked, let the cake cool in the pan for about 10-15 minutes. Then, if you can resist, transfer it to a wire rack to cool completely. Patience, grasshopper!
- **Frosting Frenzy:** Once your cake is *completely* cool (this is key, otherwise you’ll have a melted frosting disaster), spread your favorite chocolate frosting all over it. Slice, serve, and bask in the glory!
Common Mistakes to Avoid
Nobody’s perfect, right? But with these tips, you can dodge some common mud cake blunders and ensure your creation is nothing short of legendary.
- **Overmixing:** This is probably the biggest cake killer. Overmixing develops the gluten in the flour, leading to a tough, dry cake. Mix until *just* combined, then stop!
- **Under-Greasing the Pan:** Ever had half your cake stuck to the bottom of the pan? Yeah, it’s a bummer. **Grease and flour (or use parchment!) generously.** BTW, you can totally use baking spray too.
- **Not Using Good Cocoa:** If you’re using cheap, lackluster cocoa powder, your cake will taste… well, cheap and lackluster. Invest in a decent quality cocoa for a truly deep chocolate flavor. It makes a HUGE difference.
- **Cutting While Hot:** I know, I know, the temptation is real. But if you cut the cake while it’s still warm, it can crumble and be a general mess. Let it cool!
- **Ignoring the Boiling Water:** That boiling water step isn’t just for show. It “blooms” the cocoa, intensifying the chocolate flavor, and helps create that signature moist, tender crumb. Don’t skip it!
Alternatives & Substitutions
Feeling adventurous? Or just realized you’re out of one tiny ingredient? No stress! Here are some ways to shake things up or swap stuff out:
- **Milk Swap:** Out of regular milk? Almond milk, soy milk, or even buttermilk (reduce baking soda by half a teaspoon if using buttermilk, then add a pinch more to balance) can work. The texture might be slightly different, but still delish.
- **Oil Alternatives:** While vegetable oil is king for moistness here, melted coconut oil or even unsalted butter (melted and cooled) could be used in a pinch. Just be aware butter might give a slightly denser crumb.
- **Spiced Mud:** Want to add a little something extra? A pinch of cinnamon, chili powder (trust me, a tiny bit of ancho chili powder with chocolate is divine!), or even instant espresso powder can deepen the chocolate flavor beautifully. **IMO, espresso powder is my personal fave for supercharging chocolate.**
- **Gluten-Free Flour:** You can totally make this GF! Just swap out the all-purpose flour for a good quality 1:1 gluten-free baking blend.
- **Frosting Fun:** If chocolate frosting isn’t your jam (or you ran out!), try a cream cheese frosting, a simple dusting of powdered sugar, or even just a dollop of whipped cream and some fresh berries.
FAQ (Frequently Asked Questions)
Got questions? I’ve got (mostly) sarcastic answers! Here are some common queries you might have.
- **Can I make this cake ahead of time?** Absolutely! This cake actually gets *better* the next day as the flavors meld. Just store it covered at room temperature.
- **My cake looks dry, what happened?** Did you overmix? Or maybe overbake? Both are common culprits. Next time, mix until *just* combined and pull it from the oven as soon as the toothpick comes out clean.
- **Can I bake this in different sized pans?** Yup! For cupcakes, reduce baking time to about 18-22 minutes. For two 8 or 9-inch round cakes, you’ll need to increase baking time slightly to around 35-40 minutes. Just keep an eye on it!
- **Why boiling water? Does it cook the batter?** Not exactly! The hot water “blooms” the cocoa powder, releasing its full flavor potential, and contributes to that super moist texture. It’s a game-changer!
- **Can I freeze slices of this cake?** Heck yeah! Wrap individual slices tightly in plastic wrap, then foil, and pop them in the freezer for up to 2-3 months. Thaw at room temperature for a quick chocolate fix.
- **Is it really idiot-proof?** Look, if I can do it without burning the house down, anyone can. It’s pretty darn forgiving, but don’t challenge fate by, say, substituting salt for sugar. Just sayin’.
Final Thoughts
See? That wasn’t so scary, was it? You’ve just whipped up a truly spectacular chocolate mud cake that’s going to make jaws drop and taste buds sing. Whether you’re sharing it (good luck with that, it’s addictive!) or devouring it solo, you totally crushed it.
Now go forth, my friend, and bask in your newfound baking glory. You’ve earned every single glorious, chocolatey bite. And hey, if you mess up, there’s always tomorrow to try again… or just eat the batter. No judgment here!


