So, you’ve got that sudden, urgent need for something *decadent*. Something rich, chocolatey, and utterly swoon-worthy, but also, let’s be real, you’d prefer to not spend your entire afternoon playing chef? Same, my friend, *same*. Good news: I’ve got your back with a recipe that’s about to become your new best friend: The Chocolate Mousse Pie with Cream Cheese Layer. Get ready to impress everyone (mostly yourself) with minimal effort!
Why This Recipe is Awesome
Listen, this isn’t just a pie; it’s a *statement*. It screams “I know what I’m doing in the kitchen” while secretly whispering “I watched Netflix while this chilled.” It’s one of those magical desserts that looks incredibly fancy, but is actually so simple, you’ll wonder if you missed a step (you didn’t). Here’s the lowdown on why you’re about to fall head over heels for it:
- It’s practically **idiot-proof**. Seriously, if I can make it without a major kitchen disaster, you’re golden.
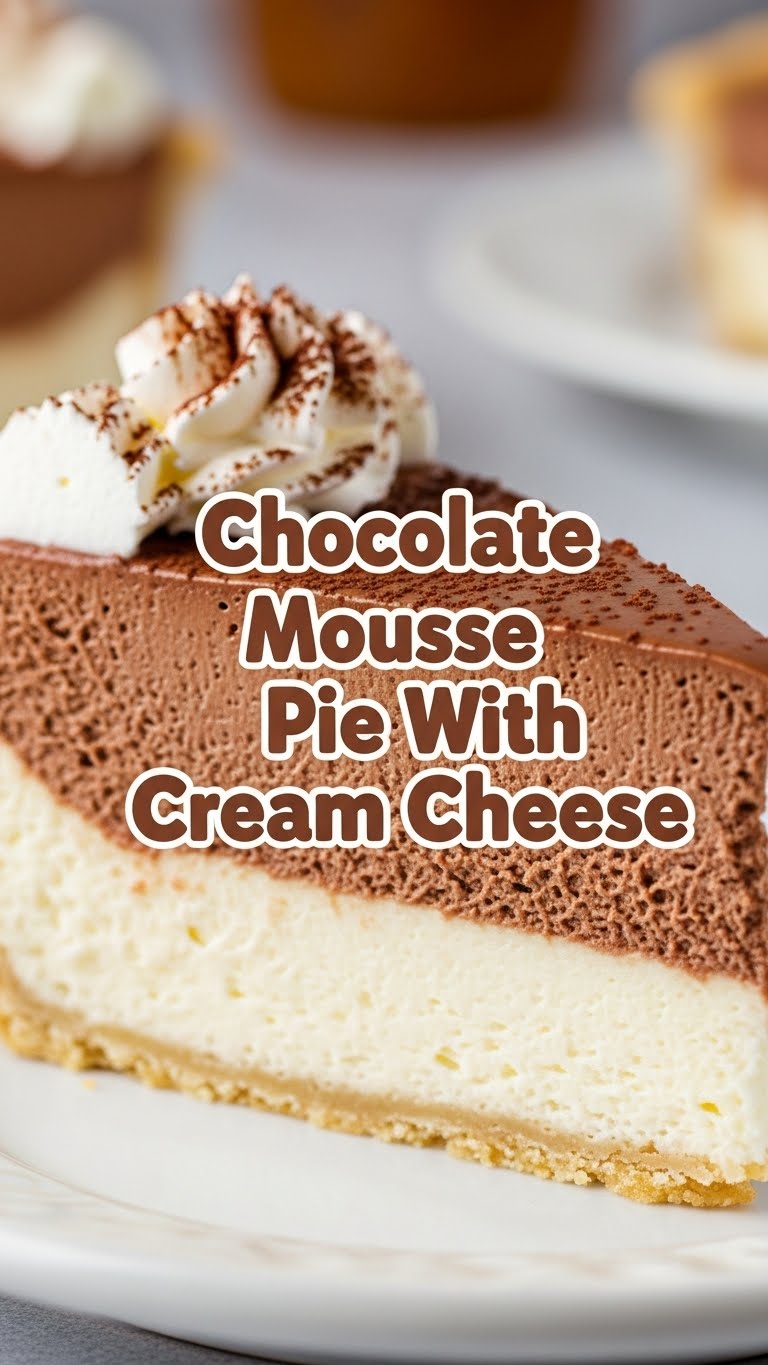
- That **cream cheese layer**? It’s the unsung hero, cutting through the rich chocolate with a delightful, tangy creaminess. It’s like a little palate cleanser built right into your dessert.
- **No-bake filling!** You heard that right. Minimal oven time means more chill time for you.
- It tastes like a fancy pâtisserie creation, but costs a fraction of the price. Your wallet and your taste buds will thank you.
- It’s a total **crowd-pleaser**. Watch jaws drop as you serve this beauty.
Ingredients You’ll Need
Gather your troops, folks! Here’s what you’ll need for this masterpiece. Don’t worry, nothing too exotic here.
For the Crust (or just buy one, no judgment)
- 1 ½ cups (about 18-20 cookies) chocolate cookie crumbs: Think Oreos (cream removed, if you’re feeling ambitious, or just buy the crumbs already made – smart move!).
- ¼ cup (½ stick) unsalted butter: Melted. This is the magical glue that holds dreams (and crumbs) together.
For the Cream Cheese Layer
- 8 oz (1 block) full-fat cream cheese: Softened! This is crucial. Don’t skip this step unless you like lumpy layers.
- ½ cup powdered sugar: For that sweet, silky smoothness.
- 1 teaspoon vanilla extract: A little hug for your taste buds.
- 1 cup cold heavy cream: We’re gonna whip this bad boy.
For the Chocolate Mousse Layer
- 1 cup (6 oz) semi-sweet chocolate chips: Or chopped chocolate. Go for good quality; it makes a difference.
- 1 ½ cups cold heavy cream: Yes, more whipping! This is where the magic happens.
- ¼ cup powdered sugar: Just a touch more sweetness.
- Optional: A tiny splash of strong brewed coffee or espresso (like, 1 tsp) to deepen the chocolate flavor. Trust me on this one.
For Garnish (Optional, but highly recommended)
- Chocolate shavings, a dollop of whipped cream, or some fresh berries. Make it pretty!
Step-by-Step Instructions
Alright, apron up, buttercup! Let’s get this deliciousness going. Keep it clean, keep it simple.
- **Crust Time!** If you’re making your own, crush those cookies until they’re fine crumbs. Mix them with the melted butter until everything is evenly moistened. Press this mixture firmly into the bottom and up the sides of a 9-inch pie plate. You can bake it for 8-10 minutes at 350°F (175°C) for a sturdier crust, or just **chill it in the fridge for at least 30 minutes** while you prep the fillings. Your call!
- **Whip the Cream Cheese Dream.** In a large bowl, using an electric mixer, beat the softened cream cheese, ½ cup powdered sugar, and vanilla extract until it’s super smooth and fluffy. Scrape down the sides of the bowl to make sure there are no lumps lurking.
- **Whip It Good (Part 1).** In a separate, clean bowl, whip 1 cup of cold heavy cream until you get stiff peaks. Gently fold this whipped cream into your cream cheese mixture until just combined. Don’t overmix! Spread this glorious cream cheese layer evenly over your chilled pie crust. Pop it back in the fridge while you make the chocolate layer.
- **Melt the Chocolate Magic.** Place your chocolate chips (or chopped chocolate) in a microwave-safe bowl. Microwave in 30-second intervals, stirring in between, until completely melted and smooth. Let it cool slightly, about 5-10 minutes. You don’t want it hot! (If you’re adding coffee, stir it in now.)
- **Whip It Good (Part 2).** In another clean bowl (or wash your first one, you pro!), whip the remaining 1 ½ cups cold heavy cream and ¼ cup powdered sugar until stiff peaks form. Again, **don’t over-whip** or you’ll end up with butter (tasty, but not for mousse).
- **Chocolate Mousse Assembly.** Take about a third of the whipped cream and gently fold it into your slightly cooled melted chocolate. This lightens the chocolate. Then, carefully fold in the remaining whipped cream until everything is just combined and no streaks of white remain. Again, be gentle! We want that airy mousse texture.
- **Layer it Up!** Pour and spread the chocolate mousse layer over your cream cheese layer. Smooth the top with a spatula.
- **The Hardest Part: Chill Out!** Cover the pie loosely with plastic wrap and **refrigerate for at least 4-6 hours**, or even better, overnight. This is crucial for the pie to set properly and for those flavors to truly meld. Patience, young Padawan.
- **Garnish and Conquer!** Once it’s firm and fabulous, remove from the fridge. Garnish with chocolate shavings, extra whipped cream, or berries, if you’re feeling fancy. Slice, serve, and accept all the compliments!
Common Mistakes to Avoid
Nobody’s perfect, but we can avoid some common culinary missteps, right? Learn from my past blunders, my friend!
- **Not Softening That Cream Cheese:** This is probably the number one culprit for lumpy layers. Take it out of the fridge at least an hour before you start, or gently microwave for 10-15 seconds. Trust me, it makes a world of difference.
- **Over-Whipping the Cream:** Whipped cream goes from fluffy to grainy to butter surprisingly fast. Watch it like a hawk! Stop beating as soon as those stiff peaks form.
- **Using Hot Chocolate:** Pouring warm melted chocolate into your delicate whipped cream will deflate it faster than a balloon at a porcupine party. Let it cool to room temperature!
- **Impatience with Chilling:** I get it, you want to eat it NOW. But pulling it out too early means a sad, droopy pie. **Chill time is non-negotiable!**
- **Forgetting to Scrape the Bowl:** Especially with the cream cheese, ingredients can hide on the bottom or sides. Scrape, scrape, scrape!
- **Not Having Fun:** This is dessert, not a science experiment (okay, maybe a little science). Relax, enjoy the process, and lick the spoon. You earned it.
Alternatives & Substitutions
Feeling adventurous? Or just missing an ingredient? No stress, we can totally tweak this bad boy.
- **Crust Swap:** Not an Oreo fan (gasp!)? Use Graham cracker crumbs, chocolate digestive biscuits, or even shortbread cookies. If you’re feeling really lazy, buy a pre-made crust – seriously, **no shame in that game.**
- **Chocolate Choices:** Semi-sweet is great, but you can go darker for a more intense flavor (my personal fave!). Or, if you have a sweet tooth, milk chocolate will work, but the mousse will be less rich.
- **Flavor Boosts:** Want to adultify your pie? Add a tablespoon of Kahlua, Bailey’s, or rum to your chocolate mousse layer for an extra kick. Orange zest in the cream cheese layer is also surprisingly delicious!
- **Topping Variations:** Drizzle with caramel, sprinkle with toasted nuts, or add a dusting of cocoa powder. Get creative!
- **Dairy-Free Dream?** It’s harder with mousse, but you can find dairy-free cream cheese and coconut cream that can be whipped. Just make sure your chocolate is also dairy-free.
FAQ (Frequently Asked Questions)
You’ve got questions, I’ve got (casual) answers!
“Can I make this pie ahead of time for a party?”
Oh heck yes! This pie is actually *better* made a day in advance. The flavors get to mingle and deepen, and it sets beautifully. So go ahead, be a culinary genius a day early!
“My cream cheese layer is lumpy! What happened?”
Ah, a classic rookie mistake! You probably didn’t let your cream cheese soften enough. Cold cream cheese just doesn’t want to get smooth. Next time, give it ample time at room temp, or a quick zap in the microwave.
“Do I *have* to chill the crust?”
If you’re not baking it, yes! Chilling helps the butter solidify and binds the crumbs together, preventing your crust from falling apart when you slice into your masterpiece. So, unless you like crumbly chaos, chill it.
“What if I don’t have an electric mixer?”
You can totally do this with a whisk and some serious arm strength! Your arms might get a workout, but it’s totally doable. Just prepare for a little extra elbow grease, especially with the heavy cream.
“How long does this pie last in the fridge?”
If it survives that long (which is a big “if” in my house!), it’ll be good for 3-4 days in the refrigerator, covered loosely. The texture is best in the first two days, though.
“Can I use store-bought whipped cream in a can?”
Technically, yes, but please don’t for the mousse layers! Canned whipped cream doesn’t have the structure needed to create that luscious, stable mousse. Save it for a quick topping only, okay?
“Is this pie really as easy as you say?”
Yes! And I wouldn’t lie to you about something as important as pie. Follow the steps, trust the process, and prepare to be amazed at your own baking prowess (or lack thereof, since it’s mostly no-bake!).
Final Thoughts
There you have it, folks! A chocolate mousse pie with a dreamy cream cheese layer that’s going to make you feel like a kitchen wizard without actually having to cast any complicated spells. This recipe is your secret weapon for dinner parties, lazy Sundays, or just those “I need chocolate NOW” emergencies.
So, go forth and conquer that dessert craving! Now go impress someone—or yourself—with your new culinary skills. You’ve earned it!


