So, you scrolled past another perfectly plated dessert on Insta and thought, “Yeah, I could totally make that… if I had 3 hours, 17 specialized tools, and a personal pastry chef?” Same, friend, same. But what if I told you we’re about to whip up a chocolate mousse cake that tastes like a dream but won’t make you want to throw your spatula across the kitchen? Buckle up, buttercup!
Why This Recipe is Awesome
Let’s be real, in the vast ocean of desserts, this one is a MVP. Why? Because it looks like you spent hours slaving away, but in reality, it’s mostly chilling time (for the cake, not you, though you deserve some chill time too!). It’s got that creamy, dreamy mousse, a crunchy base, and infinite possibilities for toppings. Seriously, it’s a showstopper that’s ridiculously simple to pull off. It’s practically fool-proof. If I, a person who once set off the smoke alarm boiling water, can make this, you absolutely can. No actual baking required, just assembly and patience. You’re basically a no-bake ninja!
Ingredients You’ll Need
Gather ’round your pantry warriors, here’s what we’re deploying:
- For the “Crust” (aka the delicious foundation):
- 1 ½ cups (about 18-20 cookies) Oreo cookies, crushed (or similar chocolate sandwich cookies). The backbone of all good lazy desserts. Don’t skimp!
- 6 tablespoons unsalted butter, melted. The glue that holds our dreams together.
- For the Mousse (the fluffy good stuff):
- 12 ounces good quality dark chocolate (60-70% cocoa), chopped. This isn’t the time for ‘mystery’ chocolate chips. Go for the good stuff!
- 2 cups heavy cream, well chilled. Your arms are gonna get a workout, or your stand mixer will. Obvs.
- ½ cup powdered sugar. Because gritty mousse is a crime.
- 1 teaspoon vanilla extract. A whisper of sophistication.
- 1 tablespoon unflavored gelatin powder. Our little secret weapon for stability. Don’t be scared!
- ¼ cup cold water. For our brave little gelatin.
- For the Toppings (where you get to be extra):
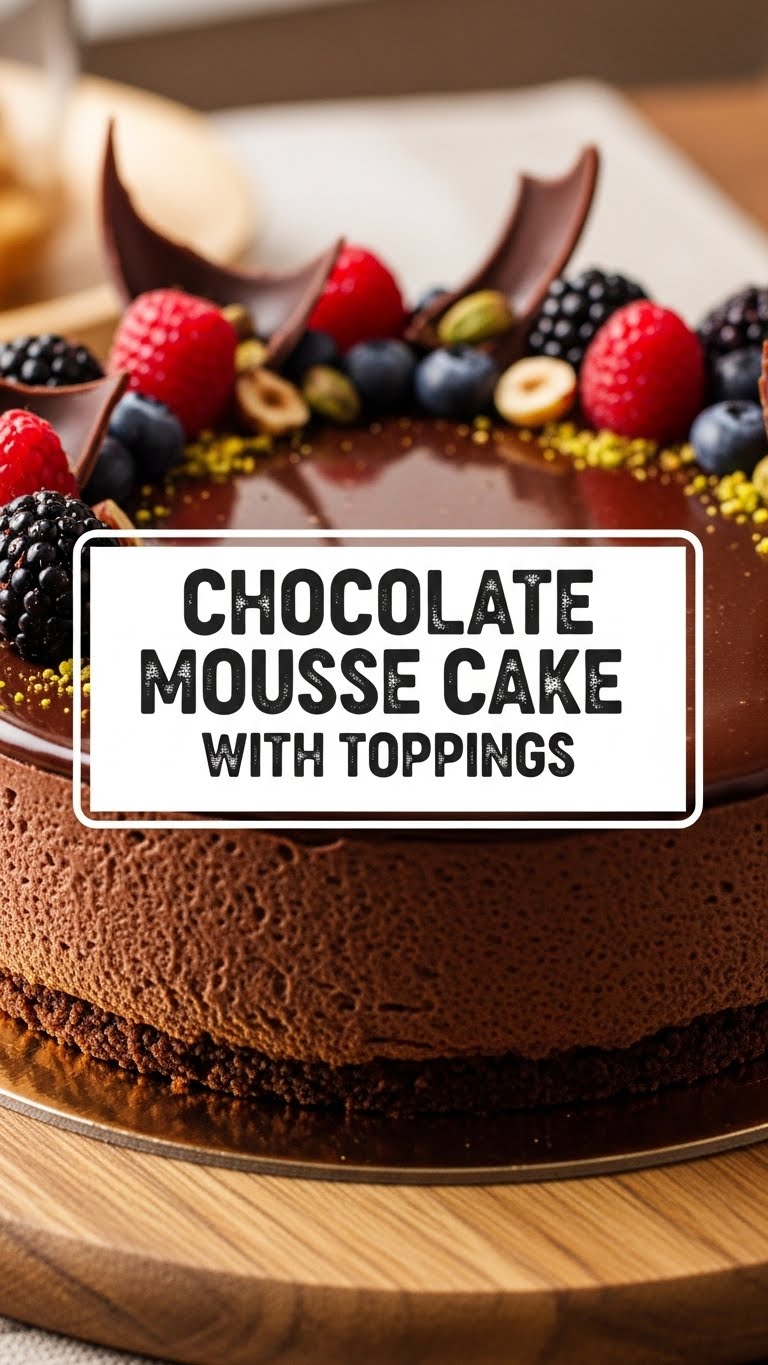
- Chocolate shavings or curls. Looks fancy, takes 2 seconds with a veggie peeler.
- Fresh berries (raspberries, strawberries, blueberries). A pop of color and tartness, to cut through all that glorious chocolate.
- Extra whipped cream. Because more cream is always the answer.
- A dusting of cocoa powder. The final flourish!
Step-by-Step Instructions
- Crush those cookies: Grab your Oreos and unleash your inner Hulk. Either pulse them in a food processor until fine crumbs, or put them in a zip-top bag and smash ’em with a rolling pin. Mix the crumbs with the melted butter until it all looks like wet sand. Press this mixture firmly into the bottom of a 9-inch springform pan. Stick it in the fridge to chill while you get on with the real magic.
- Melt the chocolate: Set up a double boiler (a heatproof bowl over a pot of simmering water) or use the microwave in 30-second bursts, stirring in between. Melt your chopped dark chocolate until smooth. Set it aside to cool down a bit – you don’t want it scorching hot when it meets the cream.
- Bloom the gelatin: Sprinkle the gelatin powder over ¼ cup of cold water in a small bowl. Let it sit for 5 minutes until it “blooms” and looks spongy. Then, gently warm it (microwave for 10-15 seconds or over hot water) until it’s completely dissolved and clear. Don’t let it boil!
- Whip the cream: In a large, chilled bowl, combine your cold heavy cream, powdered sugar, and vanilla extract. Beat with an electric mixer (or a whisk, if you’re feeling ambitious) on medium-high speed until medium-stiff peaks form. Be careful not to over-whip it – we’re making mousse, not butter!
- Fold it in: Now for the delicate dance. Gradually fold the slightly cooled melted chocolate and the dissolved gelatin into your whipped cream. Be gentle, we want to keep all that beautiful air in the mousse. You’re aiming for a uniform, light brown, fluffy cloud of deliciousness.
- Assemble: Pour this glorious mousse mixture over your chilled cookie crust in the springform pan. Use an offset spatula or the back of a spoon to smooth out the top.
- Chill, chill, chill: Cover the pan loosely with plastic wrap and pop it back into the fridge. This is the hardest part: waiting. Let it chill for at least 4 hours, but ideally, overnight. Seriously, patience is key here for a perfectly set mousse.
- Decorate & Devour: Once fully chilled, carefully run a thin knife around the edge of the pan before releasing the springform. Transfer the cake to a serving plate. Now, get creative with your toppings! Shave some chocolate, artfully place some fresh berries, add a dollop of extra whipped cream, and maybe a light dusting of cocoa powder. Slice with a hot knife (run it under hot water, wipe dry) for clean cuts and serve!
Common Mistakes to Avoid
- Not chilling the crust enough: It’ll crumble like your last diet. Give it at least 15-20 minutes in the fridge.
- Over-whipping the cream: Hello, butter! We’re making mousse, not churning dairy. Stop when it holds its shape but is still soft.
- Folding too aggressively: You’re trying to keep the air in, not beat it out. Be gentle, like petting a very fluffy cat.
- Not cooling the chocolate: Hot chocolate + cold whipped cream = soupy, sad disaster. Let that melted chocolate chill out a bit before folding it in.
- Skimping on chill time: This isn’t a race! Give it time to firm up, or you’ll have a puddle of deliciousness instead of a cake. Overnight is best, truly.
Alternatives & Substitutions
Feeling adventurous, or just missing an ingredient? No stress, we got you:
- Crust: Don’t have Oreos? Graham crackers, digestive biscuits, or even a store-bought brownie base work great. For a nutty twist, add a ¼ cup of finely chopped toasted nuts to your cookie crumbs. Go wild! Or don’t. Your call.
- Chocolate: Want a sweeter, milder mousse? Use good quality milk chocolate instead of dark. Or, for something truly rebellious, white chocolate (though you might want to add a bit of cocoa powder to the mousse for color). Just make sure it’s good quality, IMO.
- Toppings: The world is your oyster… or your chocolate cake, in this case. Caramel drizzle, chopped toasted hazelnuts or pecans, mini marshmallows, a sprinkle of sea salt flakes, or even edible glitter (why not?).
- No Gelatin? You could try stabilizing with a little cream cheese (softened) whipped into the cream, or just accept a slightly softer mousse texture. But seriously, gelatin is your friend here. Don’t fear it! It makes the mousse beautifully stable.
FAQ (Frequently Asked Questions)
- Q: Can I make this ahead of time? A: Heck yes! It’s even better the next day, allowing all those flavors to really meld. Plan accordingly, you brilliant baker.
- Q: My mousse isn’t setting. What did I do wrong? A: Did you use enough gelatin? Did you chill it long enough? Did your melted chocolate cool completely before folding? One of those, probably. Double-check your measurements and chill time!
- Q: Can I use low-fat cream? A: Erm, no. Don’t. It won’t whip properly, and you’ll be sad. This is a treat, live a little!
- Q: How long does it last in the fridge? A: If it survives that long (unlikely!), 3-4 days. Cover it tightly so it doesn’t absorb fridge odors.
- Q: I don’t have a springform pan. What now? A: A regular pie dish works for a “pie” version, or line a regular round cake pan with parchment paper, leaving an overhang to lift it out. It just won’t look as pristine.
- Q: Is this hard to make? It looks so fancy! A: Looks are deceiving, my friend! It’s surprisingly straightforward. The hardest part is truly the waiting. Your secret is safe with me.
- Q: What if I hate dark chocolate? A: Use a good quality milk chocolate instead! It’ll be sweeter and milder, but still divine. Just make sure it’s a brand you enjoy eating plain.
Final Thoughts
See? Not so scary, right? You just conquered a dessert that screams “professional patisserie” with minimal fuss and maximum deliciousness. You’ve earned every single glorious bite. Now go impress someone – or, let’s be real, yourself – with your new culinary superpowers. Go forth and mousse!


