Oh my goodness, you guys. Have you ever found yourself staring at those fancy bakery windows, practically drooling over those mirror-glazed cakes that look like they’ve been beamed down from some pastry spaceship? Yeah, me too. The good news? You can totally make one at home without a culinary degree or selling a kidney for equipment. Let’s dive into this chocolate mousse cake with a mirror glaze that’ll make your Instagram followers think you’ve been secretly training with French pastry chefs.
Why This Recipe is Awesome
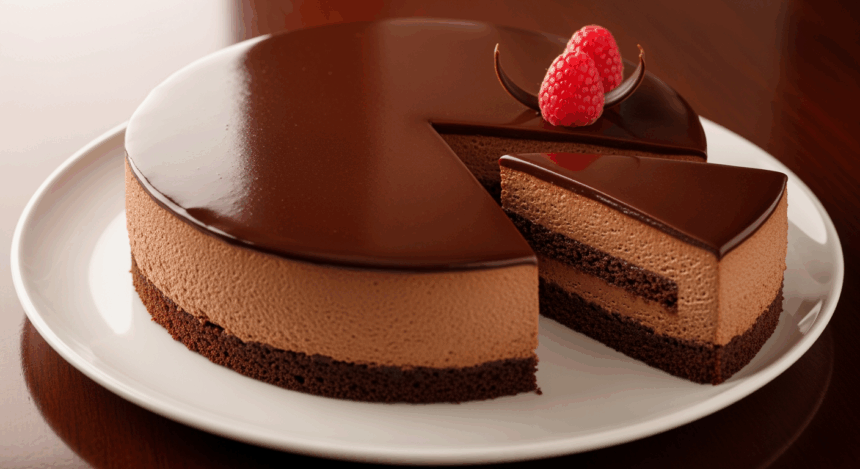
First off, this cake is basically the mullet of desserts—business on the bottom (dense chocolate cake), party in the middle (silky mousse), and pure show-off on top (that hypnotic mirror glaze). It’s the dessert equivalent of a magic trick. Your friends will be all “HOW did you DO that?” while you casually examine your fingernails like it ain’t no thing.
The best part? Despite looking like something from a fancy patisserie window, the techniques are actually pretty straightforward. No tempering chocolate or making caramel from scratch. Plus, you can make most components ahead of time, which means less day-of panic sweating. Win-win!
Ingredients You’ll Need
For the cake base:
- 1 cup all-purpose flour (the regular stuff, nothing fancy)
- 1 cup granulated sugar (the white stuff that makes everything better)
- 1/2 cup unsweetened cocoa powder (the good kind, not the hot chocolate mix—trust me on this one)
- 1 teaspoon baking soda (not powder, they’re different beasts)
- 1/2 teaspoon salt (to make the sweet sweeter, it’s science)
- 1/2 cup vegetable oil (or any neutral oil that won’t make your cake taste like a salad)
- 1 large egg (from a chicken, preferably)
- 1 cup strong coffee, cooled (don’t worry, it won’t taste like coffee—it just makes chocolate taste more chocolate-y)
For the chocolate mousse:
- 8 oz semi-sweet chocolate, chopped (or just use chips, I won’t tell anyone)
- 2 cups heavy cream, divided (yes, the fat is necessary—this isn’t diet food, people)
- 3 tablespoons granulated sugar
- 3 large eggs, separated (room temperature, please—cold eggs are mousse killers)
- 1 teaspoon vanilla extract (the real stuff, not that imitation nonsense)
For the mirror glaze:
- 1 1/2 cups granulated sugar
- 3/4 cup water
- 2/3 cup sweetened condensed milk
- 2 cups white chocolate chips (yes, white chocolate—we’re dyeing it)
- 2 tablespoons unflavored gelatin powder
- 1/4 cup cold water (for blooming the gelatin)
- Food coloring (gel works best for that cosmic effect)
Step-by-Step Instructions
Phase 1: The Cake Base
- Preheat your oven to 350°F (175°C). Don’t skip this step unless you enjoy waiting around while your oven heats up and your batter deflates.
- Grease and line an 8-inch springform pan. The springform part is important unless you enjoy destroying your cake while trying to remove it.
- In a large bowl, whisk together flour, sugar, cocoa powder, baking soda, and salt. No need for sifting—we’re not that fancy.
- Add the oil, egg, and coffee. Mix until just combined. The batter will be thin—don’t panic, that’s normal.
- Pour into your prepared pan and bake for 25-30 minutes or until a toothpick comes out mostly clean.
- Let it cool completely. I mean it—COMPLETELY. Patience, grasshopper.
Phase 2: The Chocolate Mousse
- Melt the chocolate with 1/2 cup of the heavy cream in a microwave (30-second bursts, stirring between) or over a double boiler. Set aside to cool slightly.
- Whip the egg whites in a clean bowl until soft peaks form, then gradually add the sugar and whip until glossy. Set aside.
- Whip the remaining 1 1/2 cups cream and vanilla until soft peaks form. Don’t overwhip unless you want accidental butter!
- Stir the egg yolks into the cooled chocolate mixture. Yes, they’re raw—welcome to the world of mousse.
- Fold the whipped cream into the chocolate mixture. Gently! This isn’t a workout.
- Fold in the egg whites. Again, gently! You want to keep all that air you just whipped in.
- Pour the mousse over your completely cooled cake in the springform pan. Smooth the top.
- Refrigerate for at least 4 hours or overnight. This is a great time to binge-watch something on Netflix.
Phase 3: The Mirror Glaze (the show-off part)
- Bloom the gelatin by sprinkling it over the cold water. Let it sit until it looks like weird jelly.
- In a saucepan, combine sugar, 3/4 cup water, and condensed milk. Heat until it reaches 150°F (65°C). A candy thermometer is helpful here, but not mandatory.
- Remove from heat and add the white chocolate. Let it sit for a minute, then stir until smooth.
- Add the bloomed gelatin and stir until dissolved.
- Strain the mixture through a fine-mesh sieve to catch any bits. Nobody wants lumpy glaze.
- Divide the glaze into smaller bowls if you want multiple colors. Add gel food coloring as desired.
- Let the glaze cool to 90-95°F (32-35°C). This is crucial! Too hot and it’ll melt your mousse. Too cool and it won’t flow.
- Remove your cake from the fridge and place it on a wire rack over a baking sheet.
- Pour the glaze over, starting from the center and moving outward. Let the excess drip off.
- Refrigerate for at least 30 minutes to set the glaze.
Common Mistakes to Avoid
Rushing the cooling stages — Patience isn’t just a virtue; it’s a requirement. Hot cake + mousse = soupy disaster.
Overwhipping the cream — One minute you have beautiful whipped cream, the next you’ve got sweet butter. Keep an eye on it!
Wrong glaze temperature — Too hot: melty mess. Too cold: bumpy mess. Use a thermometer, or if you’re living dangerously, test a small drop on your wrist—it should feel just slightly warm.
Freestyle measuring — I know you think you’re Beyoncé in the kitchen, but this recipe requires actual measuring. Save the improvisation for your dance moves.
Opening the oven door too early — Your cake will sink faster than my spirits when Netflix asks if I’m still watching.
Alternatives & Substitutions
Make it boozy: Add 2 tablespoons of Kahlúa or Baileys to the mousse. Because sometimes adulting deserves adult ingredients.
Dietary restrictions: Swap the heavy cream for coconut cream (the canned stuff) for a dairy-free version. It won’t be exactly the same, but it’ll still be impressive.
No coffee fan? Replace the coffee in the cake with hot water. You’ll lose some flavor depth, but your cake won’t taste like a Starbucks.
No white chocolate? IMO, the mirror glaze really needs white chocolate to work properly, but in a pinch, you could use a simple ganache topping instead. It won’t be mirror-like, but it’ll still taste amazing.
Springform alternative: If you don’t have a springform pan, you can build this in a regular cake pan lined with plastic wrap for easy removal, or assemble in individual glasses for a deconstructed version.
FAQ (Frequently Asked Questions)
Is it safe to eat raw eggs in the mousse?
If you’re concerned, use pasteurized eggs or egg products. Alternatively, you can heat the egg yolks with some of the cream to 160°F before adding to the chocolate, but that’s getting into fancy territory.
Can I make this ahead of time?
Absolutely! The cake and mousse can be made 1-2 days ahead. The glaze is best done within a few hours of serving for maximum shine.
My glaze isn’t smooth—what did I do wrong?
Did you strain it? No? There’s your problem. Yes? Then it probably cooled too much before pouring. Warm it gently and try again.
Can I use milk chocolate instead of semi-sweet?
You can, but the mousse will be sweeter and less intense. Maybe that’s your jam, though. You do you!
How long will this cake keep?
About 3-4 days in the fridge. The glaze might lose some shine after the first day, but it’ll still taste fantastic.
What if I don’t have gel food coloring?
Regular food coloring will work but might not give you those vivid, cosmic swirls. Another option is to use colored candy melts instead of white chocolate.
Do I really need to use a thermometer for the glaze?
Well, can you parallel park perfectly without looking? If yes, maybe you have supernatural temperature sensing abilities. For the rest of us mortals, a thermometer helps tremendously.
Final Thoughts
Congratulations! You’ve just created something that looks like it belongs in a pastry shop window or a fancy food magazine. Take approximately 47 photos for social media before slicing into this beauty—you’ve earned those likes!
Remember, even if your mirror glaze isn’t perfectly smooth or your layers aren’t exactly even, you still made a chocolate mousse cake FROM SCRATCH with a MIRROR GLAZE. That’s some next-level kitchen wizardry right there.
Now go slice that masterpiece and watch people’s jaws drop when they take their first bite. And if anyone asks for the recipe, you can decide whether to share your newfound powers or just smile mysteriously and say, “Oh, this old thing? It was nothing…” while mentally high-fiving yourself.
