So, you’ve decided to adult today and maybe, just maybe, you want to impress someone (or yourself!) without actually breaking a sweat, huh? Same, friend, same. Forget those fancy, intimidating desserts that require a culinary degree and a small loan. We’re here for something epic, something that says “I’m sophisticated and I know what good taste is,” but secretly whispers, “It was actually pretty chill to make.” We’re talking about a **Chocolate Mousse Cake with Cajeta**. Yeah, you heard right. Brace yourself for deliciousness!
Why This Recipe is Awesome
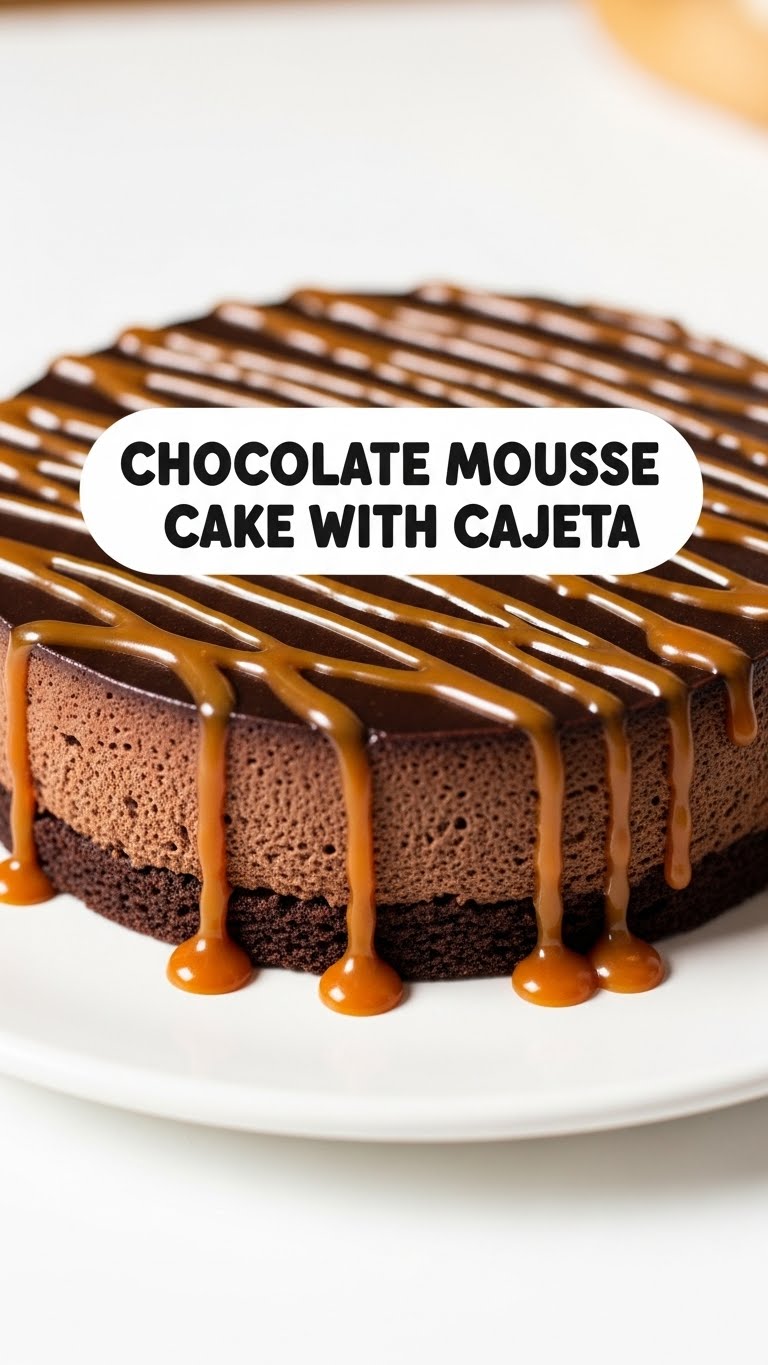
Let’s be real, this isn’t just *any* chocolate cake. This is a fluffy, dreamy, melt-in-your-mouth chocolate mousse cloud sitting on a perfectly crumbly chocolate base, all drizzled with that ambrosial, caramel-y goodness known as cajeta. It’s the kind of dessert that gets gasps, oohs, and ahhs, making you look like a total kitchen wizard. And guess what? It’s surprisingly simple. Seriously, if I can pull this off without setting off the smoke detector, anyone can. It’s a showstopper that requires minimal fuss, meaning more time for you to, well, eat it!
Ingredients You’ll Need
- **For the Chocolate Crust:**
- 1 ½ cups chocolate cookie crumbs (Oreos work wonderfully, just scrape out the cream, or don’t, I won’t judge!)
- ¼ cup unsalted butter, melted (because life’s too short for bad butter, IMO)
- **For the Chocolate Mousse:**
- 10 oz good quality dark chocolate (60-70% cacao is perfect, none of that waxy stuff, we’re better than that)
- 2 large eggs, separated (yes, separate them, it’s not a trick!)
- ½ cup granulated sugar (for that perfect balance)
- ½ teaspoon vanilla extract (the soul of all desserts)
- 1 ½ cups heavy cream, chilled (because “light” cream is just sad, and we’re not sad people)
- Pinch of salt (enhances all the chocolatey goodness!)
- **For the Cajeta Drizzle:**
- ½ cup cajeta (the magical goat’s milk caramel—don’t knock it ’til you try it! Find it in the international aisle or, if you’re feeling fancy, make your own!)
- A tiny splash of milk or cream, if needed, to thin it out (just enough to make it drippable)
- **Optional Garnish:**
- Chocolate shavings, fresh berries, or a sprinkle of sea salt (because we’re fancy like that)
Step-by-Step Instructions
- **Crush it, Mix it, Press it:** Grab those chocolate cookies and crush them into fine crumbs. You can use a food processor or a Ziploc bag and a rolling pin for some stress relief! Combine the crumbs with the melted butter. Press this glorious mixture firmly into the bottom of a 9-inch springform pan. Stick it in the fridge while you get moussey.
- **Melt the Chocolate:** Break up your dark chocolate into small pieces and melt it gently. You can use a double boiler or microwave it in short bursts, stirring frequently, until smooth and glossy. Let it cool slightly, but keep it melted.
- **Whip the Yolks:** In a medium bowl, whisk the egg yolks with ¼ cup of the sugar until the mixture is pale yellow and slightly thickened. Stir in the vanilla extract. Slowly pour the slightly cooled melted chocolate into the yolk mixture, whisking constantly until fully combined.
- **Whip the Cream:** In a separate, chilled bowl, whip the heavy cream until it forms soft peaks. Don’t go overboard, we’re not making butter here! Gently fold about a third of the whipped cream into the chocolate mixture to lighten it, then fold in the remaining cream until no streaks remain.
- **Whip the Whites:** In another clean, chilled bowl (yes, another one, it’s worth it!), whip the egg whites with the pinch of salt until frothy. Gradually add the remaining ¼ cup of sugar and continue whipping until stiff, glossy peaks form.
- **Fold with Love:** Carefully fold the whipped egg whites into the chocolate-cream mixture. Be gentle! We want to keep all that beautiful air in there.
- **Assemble and Chill:** Pour the mousse mixture over your chilled cookie crust in the springform pan. Smooth the top with a spatula. **This is a crucial step:** Cover the pan loosely with plastic wrap and refrigerate for at least 4-6 hours, or ideally, overnight. This gives the mousse time to set up and become truly magnificent.
- **Drizzle and Serve:** Once firm, carefully remove the mousse cake from the springform pan. Warm your cajeta slightly in the microwave (if it’s too thick) and drizzle it generously over the top of the cake. Garnish with chocolate shavings or berries if you’re feeling extra. Slice and prepare for compliments!
Common Mistakes to Avoid
- **Not Chilling Your Mousse Enough:** This isn’t a race, people! The mousse needs time to set. If you cut into it too early, you’ll have a delicious, but slightly messy, chocolate soup. **Patience is a virtue here.**
- **Over-whipping the Cream or Egg Whites:** Light and airy is the goal, not stiff and grainy. Stop when you hit soft peaks for cream and stiff (but not dry) peaks for egg whites.
- **Ignoring Egg Temperature:** Room temperature eggs separate more easily and whip up better. It’s a small thing that makes a big difference.
- **Using Cheap Chocolate:** Your mousse is only as good as its chocolate. Splurge a little, your tastebuds will thank you.
- **Not Greasing/Lining the Springform Pan (optional, but helpful):** While the crust usually prevents sticking, a little parchment paper on the bottom can make removal even easier, especially if you’re trying to slide it onto a serving plate.
Alternatives & Substitutions
Feeling adventurous or missing an ingredient? No stress, we can tweak this! If you can’t find cajeta (which, FYI, is a crime against deliciousness!), you can totally use good quality dulce de leche instead. It’s a close cousin and equally yummy. For the crust, feel free to swap chocolate cookies for graham crackers or even digestive biscuits for a different vibe. If dark chocolate isn’t your jam, go for milk chocolate, but be prepared for a sweeter, less intense mousse. Personally, I think the dark chocolate balances the cajeta perfectly, but you do you!
FAQ (Frequently Asked Questions)
- **Can I make this ahead of time?** Um, yes! It actually tastes even better the next day once all those flavors have had a chance to mingle and chill out. So, go ahead and be a planning genius!
- **Do I *really* need a springform pan?** You can try a regular cake pan lined with parchment paper that hangs over the edges (to help lift it out), but a springform makes life so much easier. Trust me, it’s worth the investment if you bake often!
- **What if my mousse isn’t setting?** Did you chill it long enough? Was your cream cold when you whipped it? Did you fold in the egg whites gently? Re-check those steps! If it’s a little soft, pop it back in the fridge for a few more hours or even the freezer for a quick firm-up (just don’t freeze it solid!).
- **Can I use instant coffee in the mousse?** Oh, absolutely! A teaspoon of instant espresso powder dissolved in a tiny bit of hot water (and cooled) with your melted chocolate will intensify the chocolate flavor without making it taste like coffee. It’s a secret weapon!
- **How long does it last?** Covered and refrigerated, this cake is good for 3-4 days. But let’s be honest, will it even last that long? Probably not!
Final Thoughts
And there you have it, folks! Your new go-to dessert for when you want to impress without the stress. This Chocolate Mousse Cake with Cajeta isn’t just a recipe; it’s an experience. It’s rich, it’s creamy, it’s got that delightful caramel kick, and it’s all thanks to your awesome self. Now go impress someone—or just yourself, because you’ve earned it! Enjoy every glorious, decadent bite!


