Ever stared into the fridge, wondering if magic would make a gourmet dessert appear? Yeah, me too. But what if I told you we could *make* that magic happen with a chocolate mousse cake that looks fancy but is shockingly easy? Let’s get real: you want decadent, you want impressive, and you *definitely* don’t want to spend all day doing it. Good news, my friend. This is it.
Why This Recipe is Awesome
Alright, let’s spill the cocoa beans. Why this specific chocolate mousse cake and not, like, a sad brownie? First off, it’s got layers, baby! A rich, fudgy cake base meets a cloud-like, intensely chocolatey mousse. It’s the kind of dessert that makes people go ‘oooooh’ without you having to go ‘aaaaagh’ in the kitchen. Plus, it’s surprisingly idiot-proof. Trust me, if I can whip this up without calling the fire department, you’re golden. Seriously, minimal fuss, maximum impact. Perfect for when you want to impress without actually trying too hard. #Winning
Ingredients You’ll Need
For the Cake Base (Chocolate Sponge, because who needs dry cake?):
- All-purpose flour: Just your basic white stuff. Don’t get fancy.
- Unsweetened cocoa powder: The darker, the moodier, the better.
- Granulated sugar: Sweetness for your soul.
- Baking soda & powder: Our lift-off specialists.
- Salt: Balances the chocolatey goodness.
- Milk: Any kind, moo juice or almond, whatever floats your boat.
- Vegetable oil: Keeps it moist, like a good secret.
- Large egg: The binder, the uniter.
- Vanilla extract: A little splash of happiness.
- Boiling water: The secret weapon for extra moistness!
For the Chocolate Mousse (The Cloud of Joy):
- Good quality dark chocolate: This is where you don’t skimp, my friend. Go 60-70% cacao.
- Heavy cream (cold!): Your soon-to-be fluffy cloud.
- Powdered sugar: Dissolves like a dream, no gritty bits.
- Vanilla extract: More happiness.
- Pinch of salt: Enhances the chocolate flavor.
For the “Design” (Simple Garnish):
- Extra cocoa powder: For dusting, makes it look pro.
- Chocolate shavings/curls (optional): If you’re feeling extra.
Step-by-Step Instructions
Part 1: The Cake Base
- Preheat & Prep: Get your oven to 350°F (175°C). Grease and flour an 8-inch round cake pan. Line the bottom with parchment paper. Don’t skip the prep, trust me.
- Dry Mix: In a large bowl, whisk together flour, cocoa powder, sugar, baking soda, baking powder, and salt. Give it a good whisk, no lumpy bits allowed.
- Wet Mix: In another bowl, combine milk, oil, egg, and vanilla extract. Whisk ’em good.
- Combine: Pour the wet ingredients into the dry ingredients. Mix until just combined – overmixing is the enemy of fluffy cake!
- Boiling Water Magic: Carefully stir in the boiling water. The batter will be thin, and that’s totally normal.
- Bake: Pour into your prepared pan. Bake for 30-35 minutes, or until a toothpick inserted into the center comes out clean.
- Cool Down: Let it cool in the pan for 10 minutes, then invert onto a wire rack to cool completely. Patience, grasshopper.
Part 2: The Mousse Dream
- Melt Chocolate: Roughly chop your good quality dark chocolate. Melt it gently either in a microwave (short bursts, stir often!) or over a double boiler. Let it cool slightly, but keep it melted.
- Whip Cream: In a very cold bowl (metal is best, pop it in the freezer for 10 mins beforehand!), whip the heavy cream, powdered sugar, vanilla, and salt until stiff peaks form. Don’t over-whip, or you’ll get butter!
- Fold It In: Gently fold about a third of the whipped cream into the slightly cooled melted chocolate to lighten it. Then, carefully fold in the rest of the whipped cream until no streaks remain. Be gentle! We want air, not deflated sadness.
Part 3: Assemble & Design (The “Design” Part!)
- Cake Base: Once your cake is *completely* cool (seriously, no warm cake!), place it on your serving plate or a cake stand. If you want a perfectly neat edge, use a cake collar or acetate strip around the cake.
- Mousse Layer: Spoon or pipe the chocolate mousse generously over the cooled cake base. Smooth the top with an offset spatula.
- Chill Out: Pop the whole masterpiece into the fridge for at least 4 hours, or ideally, overnight. This gives the mousse time to firm up and all those delicious flavors to mingle.
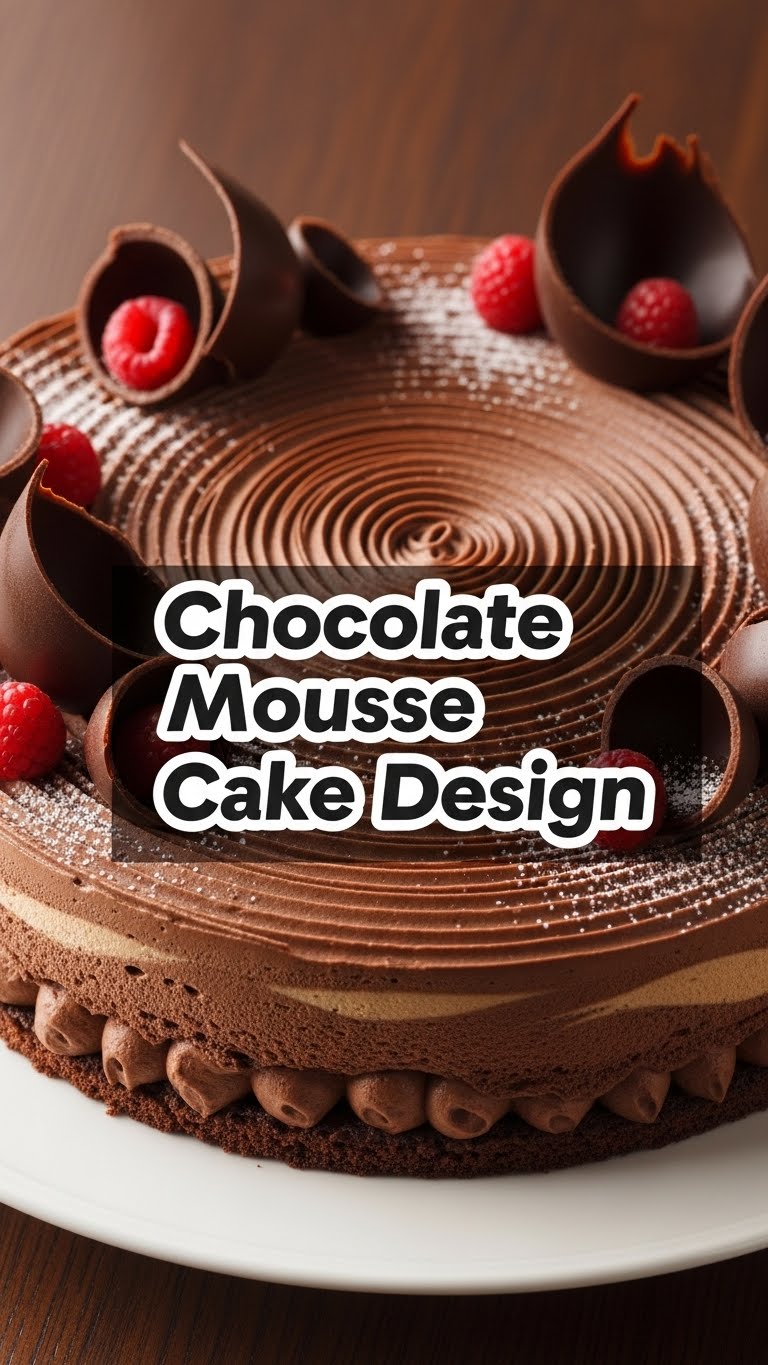
- Garnish Time: When ready to serve, carefully remove the cake collar (if used). Dust the top generously with cocoa powder through a sieve. If you’re feeling fancy, add some chocolate shavings around the edges. Voila! Chef status achieved.
Common Mistakes to Avoid
- Using warm cake for mousse: This is a one-way ticket to a soupy mess. Cool it completely.
- Overmixing the cake batter: Say hello to a tough, dry cake. Mix just until combined.
- Over-whipping the cream: Unless you’re making butter, stop when you hit stiff peaks.
- Using cheap chocolate for the mousse: Your taste buds will know, and they will judge you. Treat yourself to good chocolate.
- Impatience: Trying to slice it before it’s properly chilled. It’ll collapse, and your dreams will be crushed. Chill, literally.
Alternatives & Substitutions
Cake Base: Not a fan of chocolate cake? You could totally use a simple vanilla sponge or even a store-bought brownie base if you’re feeling extra lazy. No judgment here!
Chocolate Type: Dark chocolate is my jam for the mousse, but if you’re a milk chocolate fiend, go for it! Just be aware it’ll be sweeter. Semi-sweet is a good middle ground.
Mousse Flavor: Want to spice things up? Add a teaspoon of instant espresso powder to the chocolate for a mocha kick, or a splash of orange zest for a chocolate-orange vibe. Ooh la la!
Toppings: Instead of just cocoa, how about some fresh raspberries or strawberries? A little fruit cuts through the richness beautifully. Or a drizzle of caramel! The world is your oyster… or, well, your cake.
FAQ (Frequently Asked Questions)
“Do I really need a springform pan?” Not strictly, but it makes life *so much easier* when releasing the cake. If not, line a regular pan well with parchment hanging over the sides to lift it out.
“Can I make the cake ahead of time?” Absolutely! The cake base can be baked a day or two in advance, wrapped tightly, and stored at room temp or frozen. Just make sure it’s fully thawed before adding the mousse.
“My mousse isn’t firming up, what gives?” Did you use cold heavy cream? Did you whip it to stiff peaks? And most importantly, did you give it enough chill time? Patience, young padawan, patience.
“What if I don’t have good quality dark chocolate?” Well, you can still make it, but the flavor won’t be as intense or luxurious. Consider it an investment in your happiness.
“Can I make this dairy-free?” You bet! Use a dairy-free chocolate cake recipe and swap heavy cream for a full-fat canned coconut cream (chill it overnight, then scoop out the thick cream). It works surprisingly well!
Final Thoughts
So there you have it, your secret weapon for looking like a culinary genius without actually breaking a sweat (or a bank). This chocolate mousse cake isn’t just a dessert; it’s a statement. A statement that says, ‘Yes, I can make incredibly delicious things, and yes, I do deserve another slice.’ Go forth and conquer, my friend. Bake, chill, and impress the pants off everyone. You’ve totally earned it!


