So, you’ve scrolled past enough perfectly plated gourmet dishes on Instagram to last a lifetime, but what you *really* want is something ridiculously delicious, looks impressive, and is surprisingly easy to make? My friend, you’ve come to the right place. Forget those overly complicated recipes that make you feel like you need a culinary degree. We’re diving into the glorious world of **Chocolate Marble Loaf Cake**, and trust me, it’s a game-changer.
Why This Recipe is Awesome
Look, I love a fancy cake as much as the next person, but sometimes my ambition *far* exceeds my actual baking talent. This loaf cake? It’s basically a hug in edible form, and it’s so simple, even my cat could *supervise* its creation without too many errors (assuming she wasn’t distracted by chasing invisible dust bunnies). It looks fancy without *being* fancy, meaning you get all the “oohs” and “aahs” with minimal effort. Plus, it’s a perfect excuse to eat chocolate for breakfast. Don’t judge, it’s a valid life choice!
Ingredients You’ll Need
Gather your troops! No exotic ingredients here, just your everyday kitchen heroes:
- 1 ½ cups All-Purpose Flour: The humble backbone of our cake.
- 1 tsp Baking Powder: Gives our cake that lovely lift.
- ¼ tsp Salt: Don’t skip this! It balances all the sweetness.
- ½ cup (1 stick) Unsalted Butter: Softened to room temperature. This is crucial! No cold butter, unless you want arm cramps from mixing.
- ¾ cup Granulated Sugar: The sweet stuff. We’re not doing a ‘healthy’ cake today, okay?
- 2 Large Eggs: Also at room temperature. Happy eggs, happy cake!
- 1 tsp Vanilla Extract: The soul of most baked goods. Use the good stuff if you have it.
- ½ cup Milk: Any kind works, but whole milk gives it that extra richness. Room temp, you guessed it!
- ½ cup Semi-Sweet or Dark Chocolate Chips (or chopped chocolate bar): Melted. This is where the magic happens.
Step-by-Step Instructions
- First things first, preheat that oven to 350°F (175°C). Seriously, do it now. Don’t be that person who bakes in a cold oven. While it’s heating, grab a 9×5-inch loaf pan and grease it thoroughly. For extra peace of mind (and easier cleanup), line it with parchment paper, leaving an overhang on the sides.
- In a medium bowl, whisk together your dry ingredients: the flour, baking powder, and salt. Set that aside for a moment.
- In a larger bowl, using an electric mixer (or a strong arm and a whisk, you hero), cream together the softened butter and granulated sugar until it’s light and fluffy. This usually takes about 2-3 minutes.
- Beat in the eggs one at a time, making sure each is fully incorporated before adding the next. Then, stir in the vanilla extract. It should look lovely and creamy now.
- Now, it’s time to alternate! Add about a third of the flour mixture to the wet ingredients and mix on low speed until just combined. Then, pour in half of the milk and mix again until just combined. Repeat this process: another third of the flour, then the rest of the milk, and finally the last of the flour. Mix only until *just* combined. Overmixing is the enemy of tender cake!
- Divide your batter into two bowls, roughly two-thirds in one, one-third in the other. Melt your chocolate (microwave in 30-second bursts, stirring in between, or use a double boiler) and stir it into the smaller portion of batter. Now you have a vanilla batter and a chocolate batter – ta-da!
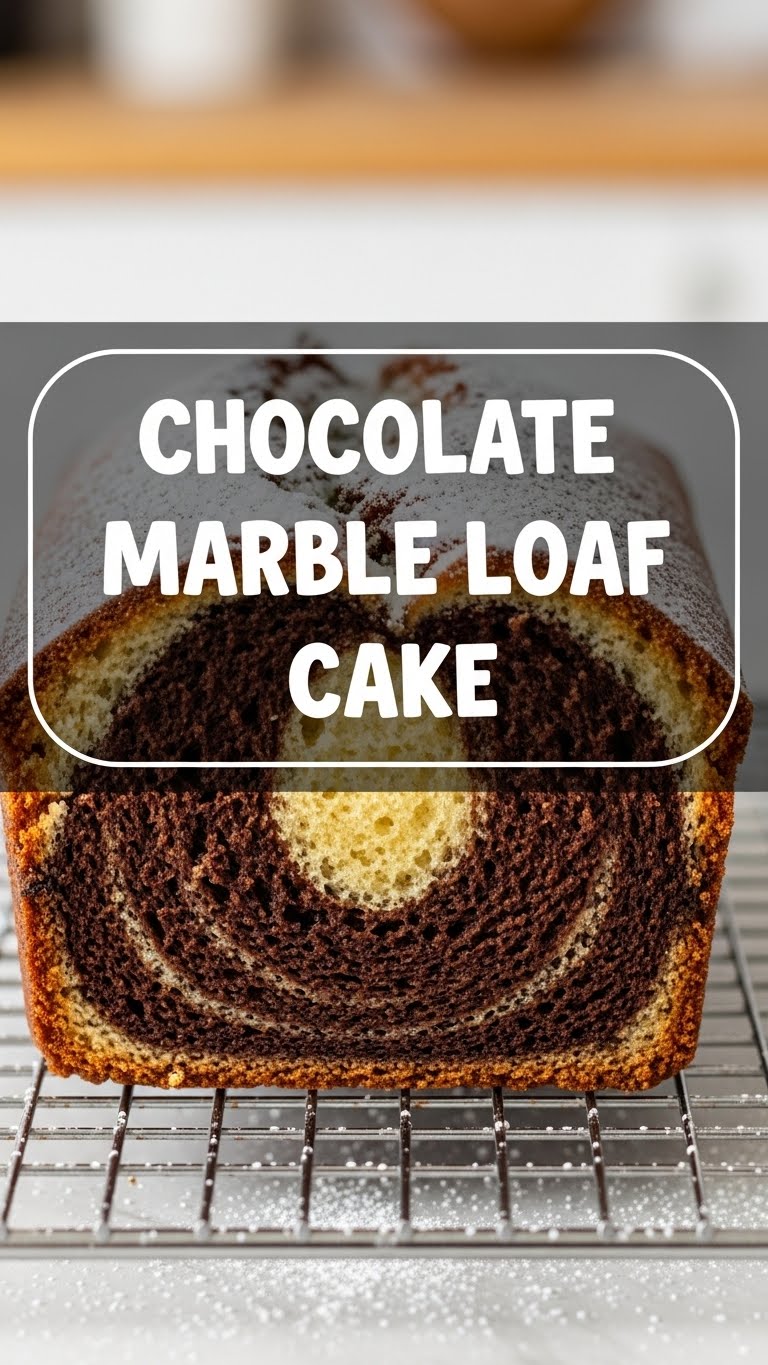
- Spoon alternating dollops of vanilla and chocolate batter into your prepared loaf pan. Don’t be shy, go wild with it! Once all the batter is in, grab a knife or a skewer and swirl it gently through the batter. Don’t over-swirl unless you want a plain brown cake, FYI. We’re aiming for marbling, not blending!
- Pop your masterpiece into the preheated oven and bake for 50-60 minutes, or until a wooden skewer inserted into the center comes out clean.
- Once baked, let the loaf cake cool in the pan for about 10-15 minutes. Then, use the parchment paper overhang to lift it out and transfer it to a wire rack to cool completely. Patience is a virtue, especially when it comes to not demolishing a hot cake.
Common Mistakes to Avoid
- Thinking you don’t need to preheat the oven: Rookie mistake! A cold oven means uneven baking and a sad, dense cake. Don’t do it.
- Using cold ingredients: Butter, eggs, milk – they all need to be at room temperature. It helps them emulsify better, leading to a smoother, fluffier cake. Impatiently using cold stuff will make your cake grumpy.
- Overmixing the batter: Once you add the flour, mix *just* until combined. Overmixing develops the gluten, resulting in a tough, chewy cake. We want tender, not tire rubber.
- Over-swirling the marble: Remember, we’re aiming for distinct swirls of chocolate and vanilla, not a homogeneous brown mess. A few gentle passes with the knife are all you need.
- Not letting it cool: I know, I know. The smell is intoxicating. But slicing a hot cake often results in crumbs and structural collapse. Let it cool; it’ll be worth it, promise.
Alternatives & Substitutions
Feeling adventurous or missing an ingredient? No stress, we can totally adapt!
- Chocolate type: Don’t have semi-sweet? Use milk chocolate for a sweeter cake or a higher percentage dark chocolate for a more intense cocoa flavor. You can even use white chocolate for a different vibe!
- Milk: Any plant-based milk (almond, soy, oat) works perfectly fine if you’re dairy-free or just prefer it. The texture might be *slightly* different, but it’ll still be delicious, IMO.
- Butter: Technically, yes, you could use margarine, but why hurt your soul like that? If you absolutely must, choose a good quality baking margarine. Coconut oil (melted and slightly cooled) can also work, but it will impart a subtle coconut flavor.
- Add-ins: Feel free to sprinkle some chocolate chips into the vanilla batter before marbling, or even some chopped nuts for extra crunch.
FAQ (Frequently Asked Questions)
- Can I use margarine instead of butter? Well, technically yes, but why hurt your soul like that? Butter just tastes better. If you *have* to, use a good baking margarine, but for optimal flavor and texture, stick with the good old butter.
- My cake top cracked, what went wrong? Cracking is super common with loaf cakes! It usually means the top set faster than the inside, causing it to split. It’s totally normal and doesn’t affect the taste. Consider it character!
- How do I store this marvelous creation? Keep it at room temperature in an airtight container for up to 3-4 days. It tastes just as good, if not better, the next day!
- Can I make this dairy-free? Absolutely! Swap the butter for a plant-based butter alternative and use your favorite non-dairy milk. Easy peasy.
- The chocolate part of my batter looks really thick, is that okay? Yes, melted chocolate can thicken batter a bit, especially as it cools. As long as it’s still spoonable and you can marble it, you’re golden. Don’t panic!
- What if I don’t have a loaf pan? You could try baking it in a round 8-inch cake pan, but the baking time will be shorter (around 25-35 minutes). Keep an eye on it!
Final Thoughts
And there you have it! Your very own, absolutely stunning, and deceptively easy Chocolate Marble Loaf Cake. This isn’t just a cake; it’s a statement. A statement that says, “Yes, I can bake, and I do it with flair (and minimal stress).” Now go impress someone—or yourself—with your new culinary skills. You’ve earned it!


