You know that moment when you’re hit with a craving so specific you can almost taste it? That’s me and malt flavor—that nostalgic, toasty goodness that instantly transports you back to old-school diners and milkshakes. Well, buckle up buttercup, because this Chocolate Malt Cake is about to become your new obsession. It’s rich, it’s malty, it’s chocolatey, and I’m drooling just thinking about it.
Why This Recipe is Awesome
Let’s be real here—there are chocolate cakes, and then there’s chocolate malt cake. The difference? That magical malt powder that transforms an ordinary chocolate cake into something that makes people say, “Wait, what IS that flavor?” It’s complex yet familiar, sophisticated yet totally unpretentious. Plus, this recipe strikes that perfect balance between “impressive enough to serve guests” and “not so complicated that you’ll have a breakdown in your kitchen.” Win-win!
The malt flavor works like a flavor enhancer for the chocolate—kinda like how salt makes everything taste more like itself, malt makes chocolate taste more chocolatey. Mind. Blown. Right?
Ingredients You’ll Need
For the cake:
- 2 cups all-purpose flour (the regular boring stuff, nothing fancy)
- 3/4 cup malted milk powder (the star of our show—don’t skimp!)
- 1 cup unsweetened cocoa powder (the good kind, not the cheap stuff you’ve had since college)
- 2 cups granulated sugar (because cake without sugar is just sad bread)
- 2 teaspoons baking soda (the stuff that makes magic happen)
- 1 teaspoon baking powder (baking soda’s less exciting cousin)
- 1 teaspoon salt (trust me on this one)
- 2 large eggs (room temperature—yes, it matters)
- 1 cup buttermilk (or regular milk with a splash of vinegar if you forgot to buy buttermilk…again)
- 1/2 cup vegetable oil (keeps things moist without being weird about it)
- 2 teaspoons vanilla extract (the real stuff, please and thank you)
- 1 cup hot coffee (brings out the chocolate flavor—and no, the cake won’t taste like coffee)
For the malt frosting:
- 1 cup unsalted butter, softened (patience, grasshopper—truly softened butter makes all the difference)
- 1/2 cup malted milk powder (more malty goodness!)
- 4 cups powdered sugar (yes, that much)
- 1/4 cup heavy cream (or more if needed)
- 2 teaspoons vanilla extract (still the real stuff)
- Pinch of salt (balances the sweetness)
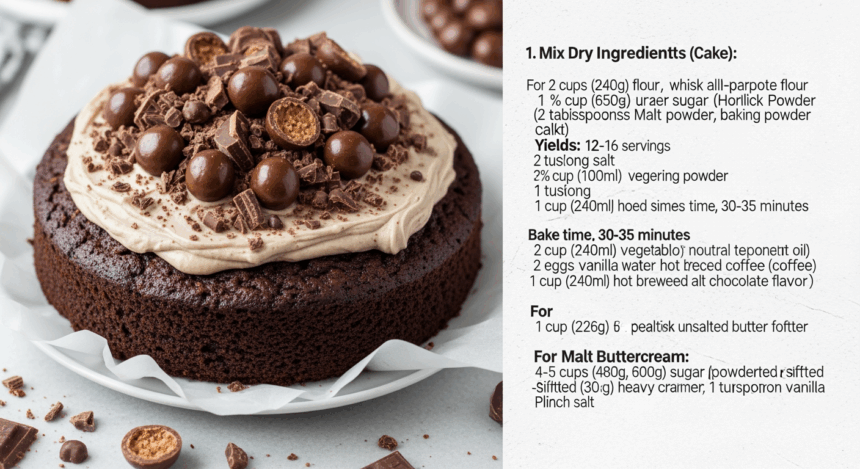
- Chocolate-covered malt balls for decoration (because why not go all in?)
Step-by-Step Instructions
Prep Work (Don’t Skip This!)
- Preheat your oven to 350°F (175°C). If you forget this step, just add it to your list of life regrets.
- Grease and line two 9-inch round cake pans. Or three 8-inch pans if you’re feeling fancy and want a taller cake.
- Brew that cup of coffee. It needs to be hot when you add it to the batter, so timing matters here.
For the Cake:
- In a large bowl, whisk together all the dry ingredients: flour, malted milk powder, cocoa, sugar, baking soda, baking powder, and salt. Get it nice and uniform—no one wants a surprise pocket of baking soda.
- In another bowl, beat the eggs, then add buttermilk, oil, and vanilla. Mix until you’ve got a smooth liquid situation going on.
- Pour the wet ingredients into the dry ingredients. Mix until just combined—don’t beat it to death. We’re making cake, not punishing it.
- Add the hot coffee and stir gently. Warning: The batter will be thin. Like, surprisingly thin. Don’t panic—this is normal!
- Divide the batter evenly between your prepared pans. Use a kitchen scale if you want to be all precise about it.
- Bake for 30-35 minutes, or until a toothpick comes out with just a few moist crumbs. If it comes out completely clean, you’ve gone too far (moment of silence for your slightly dry cake).
- Let the cakes cool in the pans for 10 minutes, then flip them onto a cooling rack to cool completely. And I mean COMPLETELY—no cheating and frosting them warm.
For the Malt Frosting:
- Beat the softened butter until it’s creamy and questioning its life choices.
- Add the malted milk powder and beat until well combined.
- Gradually add the powdered sugar, one cup at a time. Your mixer might protest; ignore it.
- Pour in the heavy cream and vanilla, then add a pinch of salt. Beat until fluffy and light—about 3-4 minutes. The frosting should hold its shape but still be spreadable.
- If it’s too thick, add a splash more cream. Too thin? More powdered sugar. You’re the boss here.
Assembly (The Fun Part):
- Place one cake layer on your serving plate. Pro tip: put strips of parchment paper under the edges to keep your plate clean while frosting.
- Spread a generous layer of frosting on top.
- Stack the second layer and frost the top and sides. Get creative—or don’t. A rustic look is totally in right now (and easier).
- Decorate with chopped or whole chocolate-covered malt balls. If some accidentally fall into your mouth during this process, I won’t tell anyone.
Common Mistakes to Avoid
Overmixing the batter – Unless you’re specifically trying to create a rubbery cake, mix just until the ingredients are combined. This isn’t a workout session.
Skipping the coffee – “But I don’t like coffee!” I can hear you whining from here. The cake doesn’t taste like coffee, promise. The coffee just enhances the chocolate. Still resistant? Fine, use hot water, but don’t come crying to me when your cake isn’t as chocolatey as it could’ve been.
Frosting a warm cake – Unless your goal is a sad puddle of frosting sliding off your cake, be patient and wait until it’s completely cool. Go watch an episode of something. Have a snack. Practice patience.
Using cold ingredients – Room temperature eggs, butter, and buttermilk blend better and create a more uniform batter. Science, people!
Alternatives & Substitutions
Gluten-free? Swap the all-purpose flour for your favorite cup-for-cup gluten-free blend. The texture might be slightly different, but it’ll still be delicious.
No buttermilk? Add 1 tablespoon of vinegar or lemon juice to a cup of regular milk and let it sit for 5 minutes. Boom—fake buttermilk.
Can’t find malted milk powder? First, I’m sorry for your loss. Second, you can use Ovaltine (the chocolate kind) for a similar effect, though it won’t be quite the same. Reduce the cocoa powder a bit if you go this route.
Want to make cupcakes instead? Go for it! This recipe makes about 24 cupcakes. Bake at the same temperature for 18-20 minutes.
IMO, the chocolate malt balls on top are non-negotiable—they’re like the cherry on a sundae. But if you must, substitute with chocolate chips or just a dusting of cocoa powder.
FAQ (Frequently Asked Questions)
Where do I find malted milk powder?
Usually in the baking aisle or near the hot chocolate mixes. Brands like Carnation or Horlicks are common. Can’t find it? Check Amazon or specialty baking stores—or befriend an older person who probably has some in their pantry from 1995.
Can I make this cake ahead of time?
Absolutely! The layers can be baked up to two days in advance. Just wrap them well in plastic wrap once completely cool. The frosted cake is best within 2-3 days but will stay good in the fridge for up to 5 days. Just let it come to room temp before serving unless you enjoy numb teeth.
Can I freeze this cake?
You sure can! Unfrosted layers freeze beautifully for up to 3 months. The fully frosted cake can also be frozen, but the malt balls might get a bit soggy upon thawing. A small price to pay for convenience, if you ask me.
Do I really need two kinds of leaveners?
Yes, baking powder and baking soda do different things here. Baking soda reacts with the acidic ingredients (buttermilk and cocoa), while baking powder provides extra lift. Skip either at your own peril.
Can I reduce the sugar?
Look, I get the health concerns, but cake is cake. You can reduce the sugar in the cake by about 1/4 cup without drastically affecting the texture, but any more than that and you’re entering experimental territory. The frosting, however, needs its powdered sugar for structure, so tread carefully there.
How do I know when the cake is done?
The old toothpick trick is reliable: insert it into the center of the cake. If it comes out with a few moist crumbs, you’re golden. Completely clean means it’s overbaked; wet batter means it needs more time. You can also gently press the center—it should spring back slightly.
Final Thoughts
This chocolate malt cake isn’t just a dessert—it’s a conversation piece. There’s something about that unique malty flavor that gets people talking, reminiscing about childhood malt shakes or those little malt ball candies we all pretended not to steal from our grandparents’ candy dishes.
Don’t be surprised if this becomes your new signature bake. It’s the perfect balance of nostalgic and sophisticated, familiar yet unexpected. Plus, it’s a whole lot easier than it looks, which is always a win in my book.
Now go forth and malt it up! Whether you’re baking to impress someone special or just treating yourself (equally valid reasons), this cake delivers. And remember—calories consumed while testing a new recipe don’t count. That’s just science.
