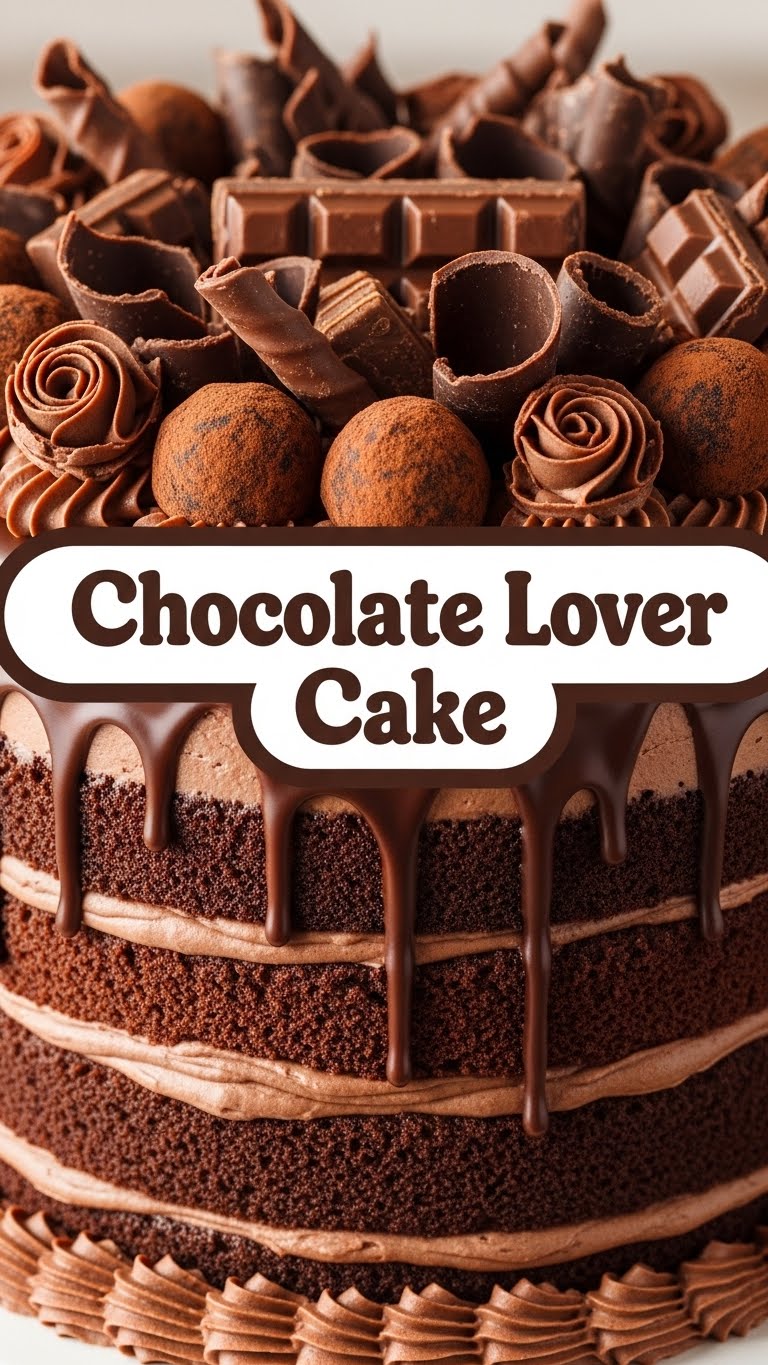
So you’re craving something rich, decadent, and utterly chocolatey but don’t want to spend your entire weekend playing master baker? My friend, you’ve come to the right place. Because today, we’re whipping up a Chocolate Lover’s Cake that’s so easy, it practically bakes itself. (Okay, not really, but close!)
Why This Recipe is Awesome
Why bother with this particular recipe, you ask? Well, for starters, it’s so **idiot-proof** even my cat could probably follow it (if she had opposable thumbs and a passion for chocolate, which, surprisingly, she does not). This isn’t one of those fussy recipes where you need a kitchen scale calibrated by NASA. It’s **quick**, it’s **delicious**, and it tastes like you spent hours slaving away, when in reality, you were probably binging Netflix. Plus, it’s guaranteed to get you compliments. Think of it as your secret weapon for looking like a baking genius without actually being one. 😉
Ingredients You’ll Need
Gather your chocolate-loving arsenal. You probably have most of this stuff lurking in your pantry already!
- All-purpose flour: 2 cups (the basic stuff, no need for fancy almond flour unless you’re feeling *extra*).
- Granulated sugar: 2 cups (because sweetness is essential, obvs).
- Unsweetened cocoa powder: ¾ cup (the darker, the better for that deep, rich chocolatey kick).
- Baking soda: 1 teaspoon (your cake’s lift-off rocket, don’t skimp).
- Baking powder: ½ teaspoon (the backup lift-off rocket, for good measure).
- Salt: 1 teaspoon (enhances all the flavors, don’t skip it, it’s vital!).
- Large eggs: 2 (room temp if you’re feeling fancy, but straight from the fridge works too, no judgment).
- Milk: 1 cup (any kind, really, but whole milk makes it a bit richer).
- Vegetable oil: ½ cup (or canola, for moisture without the butter flavor).
- Vanilla extract: 2 teaspoons (a must, makes everything taste better!).
- Hot water or brewed coffee: 1 cup (trust me on the coffee, it makes the chocolate *sing*!).
- For the frosting (optional but highly recommended): Your favorite chocolate buttercream recipe ingredients.
Step-by-Step Instructions
Let’s get down to business! Follow these simple steps and prepare for chocolatey greatness.
- Prep Time! Preheat your oven to 350°F (175°C). Grease and flour two 8-inch round cake pans. **Don’t skip this**, unless you enjoy archaeological digs for your cake.
- Dry Mix Fun. In a large bowl, whisk together the flour, sugar, cocoa powder, baking soda, baking powder, and salt. Make sure there are no lumps—we’re aiming for smooth sailing here.
- Wet Mix Wonders. In another bowl, whisk the eggs, milk, oil, and vanilla extract until well combined.
- Combine Forces. Slowly add the wet ingredients to the dry ingredients, mixing on low speed until just combined. **Don’t overmix!** Overmixing is the enemy of a tender cake.
- The Secret Weapon. Carefully stir in the hot water or coffee. The batter will be thin, and that’s perfectly normal, don’t panic! It’s what makes the cake super moist.
- Into the Pans. Divide the batter evenly between your prepared cake pans. Give them a gentle tap on the counter to release any air bubbles.
- Bake It ‘Til You Make It. Bake for 30-35 minutes, or until a wooden skewer inserted into the center comes out clean. Ovens vary, so keep an eye on it!
- Cool Down. Let the cakes cool in the pans for about 10-15 minutes before inverting them onto a wire rack to cool completely. **Patience is a virtue here.** Frosting a warm cake is a one-way ticket to a melted mess.
- Frosting Frenzy (Optional but Highly Recommended). Once completely cool, frost your cake with your favorite chocolate frosting. A simple buttercream with cocoa powder works wonders!
Common Mistakes to Avoid
Nobody’s perfect, but we can definitely steer clear of these common cake calamities!
- Thinking you don’t need to preheat the oven. **Rookie mistake!** Your cake will bake unevenly and probably be sad. Give it time to get to temperature.
- **Overmixing the batter.** Remember, we’re just combining ingredients, not auditioning for a stand mixer commercial. Overmixing develops the gluten too much, leading to a tough, dry cake. Nobody wants that.
- Not greasing and flouring your pans properly. Unless you enjoy scraping cake off the bottom of your pan, take the extra 30 seconds. Your future self will thank you.
- **Opening the oven door every five minutes.** **Seriously, resist the urge!** This drops the oven temperature and can cause your cake to sink in the middle. Be strong!
- **Frosting a warm cake.** I get it, you’re excited. But unless you’re going for a ‘deconstructed cake soup’ vibe, let those layers cool down completely. **Absolute must!**
Alternatives & Substitutions
Feel free to get creative! This recipe is pretty forgiving. Here are a few ideas:
- Coffee vs. Hot Water: I’m a coffee-in-my-chocolate-cake enthusiast. It really deepens the chocolate flavor without making it taste like coffee. But if you’re not into it, hot water works perfectly fine. Don’t stress!
- Dairy-Free? Swap out regular milk for almond, oat, or soy milk. The oil keeps it moist, so you won’t miss the butter. Just ensure your cocoa powder is dairy-free too (most are, but good to check!).
- Gluten-Free Flour: You can totally use a 1:1 gluten-free baking flour blend for this recipe. Just make sure it includes xanthan gum, or add a pinch yourself for structure.
- Oil Alternatives: Canola oil or melted coconut oil (just make sure it’s liquid) are good substitutes for vegetable oil. Avoid olive oil unless you want a savory cake… which, no.
- Add-ins: Feeling wild? Throw in some chocolate chips, a sprinkle of espresso powder (extra chocolate boost!), or even a touch of orange zest for a fancy twist. Your kitchen, your rules!
FAQ (Frequently Asked Questions)
Got questions? I’ve got (casual) answers!
- “Can I make this cake ahead of time?” Absolutely! Baked cake layers can be wrapped tightly in plastic wrap and stored at room temperature for up to 2 days, or frozen for up to a month. Just thaw them before frosting. You’re basically meal prepping dessert!
- “My cake sank in the middle! What happened?” Ah, the dreaded sinkhole! Could be a few things: oven door opened too early, under-baked, or maybe you tried to bake it at a super high altitude without adjusting. **Pro tip:** Make sure your leavening agents (baking soda/powder) aren’t expired!
- “Do I *have* to use hot coffee?” No, but seriously, give it a try! It’s not about making it taste like coffee, it’s about making the chocolate taste *more* chocolatey. It’s science, or magic, or something. Hot water is a perfectly fine substitute if coffee isn’t your jam.
- “Can I bake this in a bundt pan?” You can, but you’ll likely need to adjust baking time (probably longer) and be *extra* diligent with greasing and flouring. Bundt pans are notoriously sticky! FYI, a little cocoa powder mixed with your flour for dusting also helps the cake slide out beautifully.
- “My frosting is too thin/thick, help!” Easy fix! Too thin? Add more powdered sugar. Too thick? Add a tiny splash more milk (or cream) until it reaches your desired consistency. It’s a forgiving process, thankfully.
- “Is this cake *really* for chocolate lovers?” Is the sky blue? Is coffee delicious? Yes, my friend, this cake is practically a love letter to chocolate. If you’re not a chocolate lover, well, then… why are you even reading this? 😉
Final Thoughts
Alright, you culinary superstar! You’ve officially conquered the art of the Chocolate Lover Cake. This isn’t just a recipe; it’s a passport to chocolatey bliss and instant popularity. So go forth, bake this beauty, and share it with someone you love (or, let’s be real, keep it all to yourself—I won’t tell!). Now go impress someone—or yourself—with your new culinary skills. You’ve earned it!
