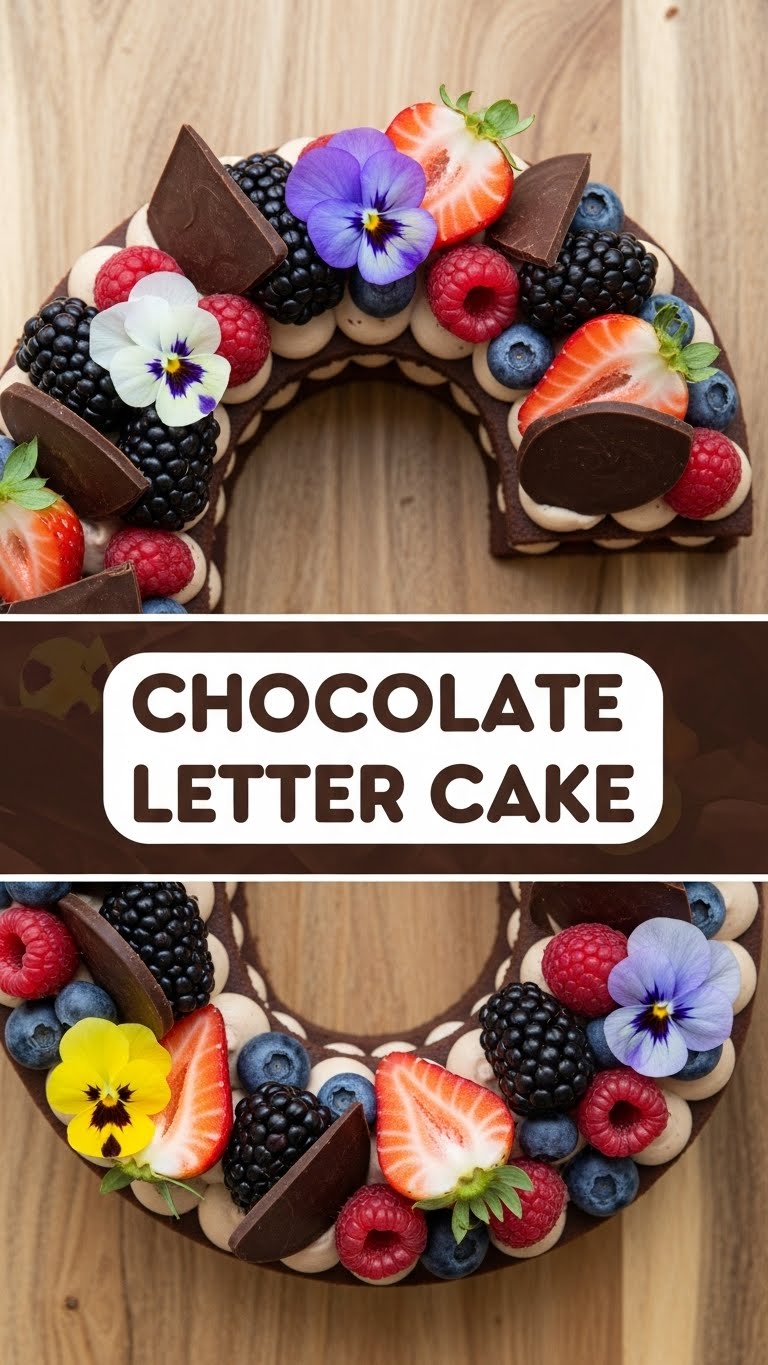
So, you’re craving something impressive, chocolatey, and maybe a little bit extra, but you also want to avoid looking like you wrestled an octopus in your kitchen? You’ve come to the right place, my friend. This Chocolate Letter Cake is basically a magic trick: it looks super fancy, tastes out-of-this-world, and yet, it’s so chill to make, you’ll wonder if you accidentally swapped your chef’s hat for a wizard’s. Let’s get baking!
Why This Recipe is Awesome
Okay, spill the tea: we all want to impress, right? But nobody wants to spend their entire Saturday slaving over a hot oven. This Chocolate Letter Cake is your secret weapon. First off, it’s chocolate. Enough said. Secondly, it’s **customizable** – you can make any letter, number, or even a heart! Think birthdays, anniversaries, or just telling your cat you love them with a giant “C” (for Cat, obviously). It’s also ridiculously forgiving, meaning even if your last baking attempt involved a smoke detector, you can totally nail this. Plus, the compliments you’ll get? Priceless.
Ingredients You’ll Need
- For the Cake:
- 1 ½ cups (3 sticks) unsalted butter, softened: Because we’re in control of the salt, not some dairy co-op.
- 2 ½ cups granulated sugar: The sweet stuff that makes your taste buds sing.
- 4 large eggs: Room temp, because they play nicer with butter. Trust me on this.
- 1 teaspoon vanilla extract: The MVP of flavor. Don’t skimp!
- 2 ¾ cups all-purpose flour: The backbone of our cakey dreams.
- ¾ cup unsweetened cocoa powder: For that deep, dark, delicious chocolateyness.
- 2 teaspoons baking soda: Our little lift-off agent.
- 1 teaspoon salt: Balances everything out like a culinary tightrope walker.
- 1 ½ cups buttermilk: Don’t have it? **DIY it!** Add 1 tbsp white vinegar or lemon juice to regular milk and let it sit for 5 mins. You’re welcome.
- For the Cream Cheese Frosting:
- 1 cup (2 sticks) unsalted butter, softened: Again, softened is key here.
- 16 ounces cream cheese, softened: This is non-negotiable for that tangy, creamy goodness.
- 6 cups powdered sugar: Sifted, unless you like lumpy frosting (nobody likes lumpy frosting).
- 2 teaspoons vanilla extract: More vanilla, more happy.
- Pinch of salt: Just to cut through the sweetness.
- For Decoration (the fun part!):
- Your favorite chocolates, candies, fresh berries, sprinkles, edible glitter… go wild!
Step-by-Step Instructions
- **Get Prepped:** Preheat your oven to 350°F (175°C). Grab two 9×13 inch baking pans, grease ’em up, and flour ’em like you’re prepping for a baking beauty pageant.
- **Cream Dream:** In a large bowl, beat the softened butter and granulated sugar together until they’re light, fluffy, and look like a cloud you want to eat. This usually takes about 3-5 minutes.
- **Egg-cellent Addition:** Crack in your eggs, one at a time, beating well after each addition. Then stir in that lovely vanilla extract. Your kitchen should be smelling pretty good about now, **FYI**.
- **Dry Mix It Up:** In a separate medium bowl, whisk together the flour, cocoa powder, baking soda, and salt. Give it a good mix so everything is evenly distributed.
- **Alternating Awesomeness:** Now for the alternating part. Add about a third of the dry ingredients to your wet mixture, mix until just combined. Then add half of the buttermilk, mix. Repeat this, ending with the dry ingredients. **Don’t overmix!** Mix until just combined, or your cake might get tough.
- **Pan Power:** Divide your batter evenly between the two prepared pans. Smooth the tops with a spatula.
- **Bake Time!** Pop them in the preheated oven for 25-30 minutes, or until a toothpick inserted into the center comes out clean.
- **Cool Down:** Let those beautiful cakes cool in their pans for about 10-15 minutes. Then, carefully flip them out onto a wire rack to cool completely. Patience, young padawan, patience.
- **Frosting Frenzy:** While the cakes are chilling, make the frosting! Beat softened butter and cream cheese together until smooth and creamy. Gradually add the sifted powdered sugar, vanilla extract, and a pinch of salt. Beat until light and fluffy.
- **The Letter Craft:** Once the cakes are completely cool, print out your desired letter or number template (you can find tons online). Place the template on your cake and carefully cut around it. You might need to cut pieces from both cakes to form your shape. This is where your inner artist shines!
- **Decorate Like a Boss:** Now for the fun! Spread or pipe your glorious cream cheese frosting over your cake letter. Arrange your chocolates, candies, berries, and sprinkles. Make it pretty, make it personal, make it YOU!
Common Mistakes to Avoid
- **Not Preheating the Oven:** Rookie mistake! Your oven needs to be at the correct temperature from the start for even baking. Think of it as a warm-up for a workout.
- **Overmixing the Batter:** This is a big no-no. Overmixing develops the gluten too much, leading to a tough, dense cake. Mix until just combined, then stop!
- **Not Greasing/Flouring Your Pans:** Unless you enjoy a cake that’s stuck forever, don’t skip this. **A well-prepped pan is a happy pan.**
- **Cutting the Cake When It’s Warm:** Hot cake crumbles. Cold cake cuts beautifully. Resist the urge to rush!
- **Using Cold Butter/Cream Cheese for Frosting:** You’ll end up with lumpy frosting. Trust me, it’s not cute. **Always use softened ingredients.**
Alternatives & Substitutions
- No Buttermilk? As mentioned, just add a tablespoon of white vinegar or lemon juice to regular milk and let it sit for 5 minutes. Boom, instant buttermilk.
- Different Frosting? While this cream cheese frosting is divine, you could totally use a rich chocolate buttercream or even a whipped ganache. Your cake, your rules.
- Gluten-Free Flour? Yes! Swap out the all-purpose flour for a 1:1 gluten-free baking blend. Results might vary slightly, but it usually works pretty well.
- Vegan Version? This recipe would need quite a few swaps (egg replacers, vegan butter, vegan cream cheese), so I’d recommend finding a dedicated vegan chocolate cake recipe for best results.
- No Cocoa Powder? You could technically make a vanilla or yellow cake, but then it wouldn’t be a Chocolate Letter Cake, would it? **IMO**, stick with the chocolate for this one.
FAQ (Frequently Asked Questions)
Can I make the cake layers ahead of time?
Absolutely! Bake the layers, let them cool completely, wrap them tightly in plastic wrap, and freeze for up to a month. Just thaw them on the counter before frosting.
My frosting is too thin/thick, what do I do?
Too thin? Add more sifted powdered sugar, a tablespoon at a time. Too thick? Add a splash of milk or cream, a teaspoon at a time, until you reach your desired consistency.
What if I don’t have two 9×13 inch pans?
No worries! You can bake one layer at a time. Just make sure to re-grease and flour the pan for the second batch of batter.
Can I use dark chocolate cocoa powder?
Heck yes! If you’re a dark chocolate fanatic, go for it. It’ll give your cake an even richer, deeper chocolate flavor.
How do I get clean cuts for my letter?
Make sure your cakes are completely chilled – even a little bit cool from the fridge helps. Use a sharp, thin knife and wipe it clean between cuts for the best results.
How long does this cake last?
Covered and refrigerated, it’ll last about 3-4 days. But let’s be real, will it even last that long?
Final Thoughts
And there you have it, folks! Your very own Chocolate Letter Cake masterpiece. It’s chic, it’s delicious, and most importantly, you made it! Now go impress someone—or yourself—with your new culinary skills. You’ve earned those bragging rights (and that extra slice). Happy baking, you rockstar!
