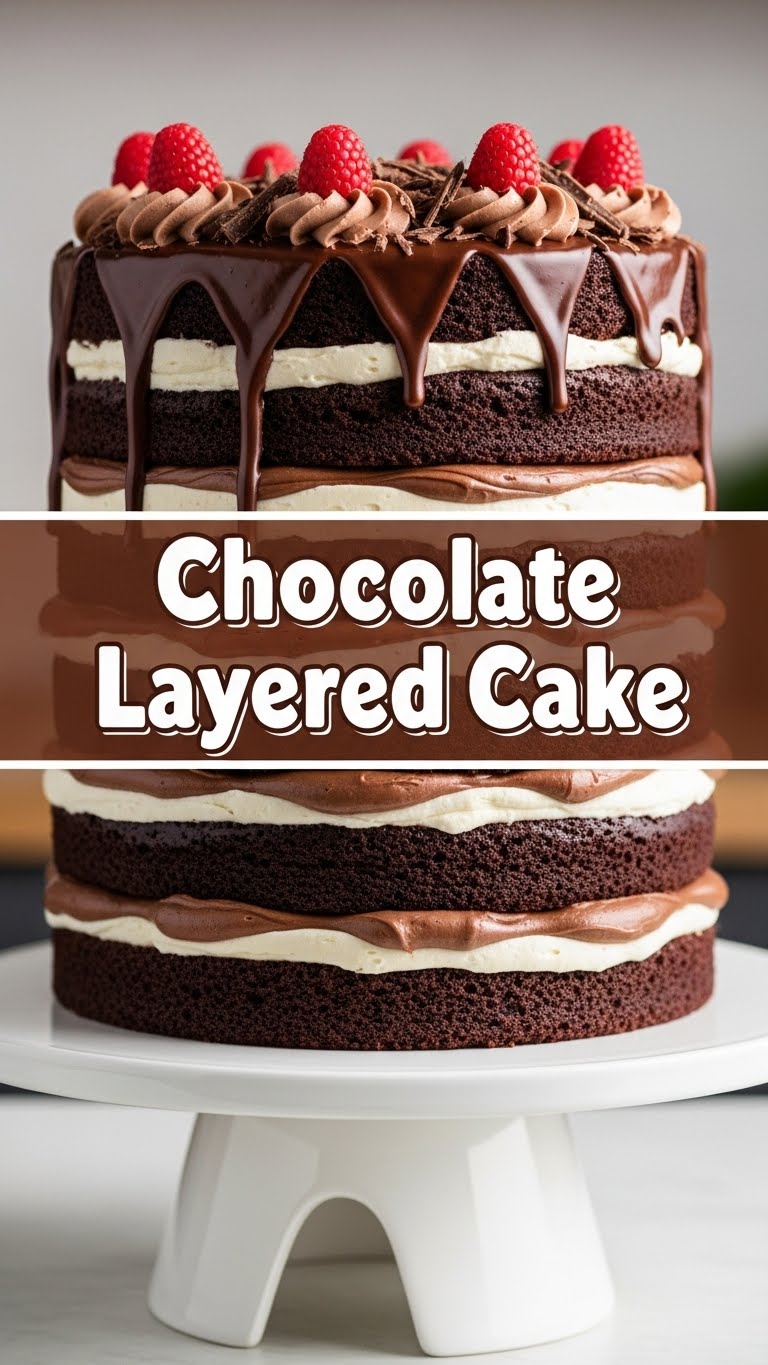
So, you’re scrolling, you’re craving, and suddenly that little voice in your head screams, “CHOCOLATE CAKE!” But not just *any* chocolate cake, right? We’re talking decadent, moist, perfectly layered, “I-can’t-believe-I-made-this-myself” chocolate cake. And you want it without spending your entire weekend slaving away? My friend, you’ve come to the right place. Let’s make some magic (the delicious kind, not the pull-a-rabbit-out-of-a-hat kind).
Why This Recipe is Awesome
Okay, let’s be real. There are approximately 7.3 bajillion chocolate cake recipes out there. So why this one? Because this isn’t your grandma’s “spend-all-day-in-the-kitchen-and-don’t-you-dare-make-a-mess” kind of cake. This is the “I-have-a-life-and-also-want-amazing-cake-tonight” kind of cake. It’s surprisingly simple, ridiculously moist, and packs a chocolate punch that’ll make your taste buds do a happy dance.
Plus, it’s pretty much **idiot-proof**. And I say that with the utmost affection, because if *I* can pull this off without setting off the smoke detector, you totally can too. You’ll look like a culinary genius, and no one needs to know how easy it actually was. 😉
Ingredients You’ll Need
Get ready to gather your delicious arsenal! Most of this stuff is probably already lurking in your pantry, waiting for its moment to shine.
- All-Purpose Flour: About 2 cups. The OG white stuff. Don’t go grabbing self-rising unless you’re feeling adventurous (and possibly regretful).
- Granulated Sugar: 2 cups. Because life is sweet, and so should be your cake.
- Unsweetened Cocoa Powder: 3/4 cup. Go for the good stuff, the darker, the better for that deep, rich chocolate flavor.
- Baking Soda: 2 teaspoons. Our leavening MVP for that perfect lift.
- Baking Powder: 1 teaspoon. The dynamic duo needs its partner.
- Salt: 1 teaspoon. Don’t skip it! It brings out all the other flavors.
- Large Eggs: 2, at room temperature. Happy chickens make happy cakes, or so I’m told.
- Milk: 1 cup (whole milk preferred for max lushness, but any kind works). Also room temperature, please!
- Vegetable Oil: 1/2 cup. This is key for that ultra-moist crumb.
- Vanilla Extract: 2 teaspoons. A splash of pure joy and flavor.
- Hot Water or Hot Brewed Coffee: 1 cup. **Secret weapon alert!** Coffee enhances chocolate flavor like nobody’s business. If you don’t have coffee, hot water is fine, but trust me on the coffee.
For the Dreamy Chocolate Buttercream Frosting:
- Unsalted Butter: 1 cup (2 sticks), softened to room temperature. Don’t rush this!
- Powdered Sugar (Confectioners’ Sugar): 3-4 cups. Sifted, unless you enjoy lumpy frosting (you don’t).
- Unsweetened Cocoa Powder: 1/2 cup. Again, the good stuff!
- Milk or Cream: 4-6 tablespoons. Start with less, add more if needed.
- Vanilla Extract: 1 teaspoon.
- Pinch of Salt: To balance the sweetness.
Step-by-Step Instructions
Time to get your chef’s hat on (or at least avoid splashing batter on your favorite shirt). These steps are short, sweet, and to the point!
- Prep Your Pans & Oven: Preheat your oven to 350°F (175°C). Grease and flour two 8 or 9-inch round cake pans. Or, line them with parchment paper circles on the bottom for an even easier release.
- Mix the Dry: In a large bowl, whisk together the flour, sugar, cocoa powder, baking soda, baking powder, and salt. Make sure there are no lumpy bits!
- Combine the Wet: In another bowl (or a large measuring cup), whisk together the eggs, milk, vegetable oil, and vanilla extract until well combined.
- Bring Them Together: Pour the wet ingredients into the dry ingredients. Mix on low speed with an electric mixer (or by hand) until just combined. **Don’t overmix!** A few small lumps are totally fine.
- Add the Hot Liquid: Carefully pour in the hot water or coffee. Mix on low speed until the batter is smooth. The batter will be thin, and that’s exactly what we want!
- Bake It Up: Divide the batter evenly between your prepared cake pans. Bake for 30-35 minutes, or until a wooden skewer inserted into the center comes out clean.
- Cool Down: Let the cakes cool in their pans for about 10-15 minutes on a wire rack. Then, carefully invert them onto the wire rack to cool completely. **This is crucial!** Frosting a warm cake is a recipe for disaster (and melty chocolate puddles).
- Whip Up the Frosting: While the cakes are cooling, beat the softened butter in a large bowl with an electric mixer until light and fluffy. Gradually add the sifted powdered sugar, cocoa powder, salt, and vanilla. Add milk/cream 1 tablespoon at a time until you reach your desired consistency – fluffy and spreadable!
- Assemble & Devour: Once the cakes are completely cool, place one layer on your serving plate. Spread a generous amount of frosting on top. Place the second layer on top, and then frost the top and sides of the entire cake. Slice, serve, and accept all the compliments!
Common Mistakes to Avoid
Nobody’s perfect, but we can avoid some classic cake calamities together!
- Not Preheating Your Oven: Rookie mistake! Your oven needs to be at the right temperature from the start for proper rising. Don’t skip this.
- Overmixing the Batter: This is probably the number one cake killer. Overmixing develops the gluten too much, leading to a tough, dense cake. Mix until just combined, a few lumps are okay, I promise!
- Warm Ingredients: Using cold eggs and milk is a no-go. Room temperature ingredients emulsify better, leading to a smoother, more consistent batter and a lighter cake. Plan ahead!
- Opening the Oven Door Too Soon: Resist the urge to peek! Especially in the first 20 minutes, opening the door can cause your cake to collapse in the middle. Be patient, young grasshopper.
- Frosting a Warm Cake: Unless you’re going for a deconstructed, soupy mess, let those cakes cool completely. Seriously. **Completely.**
Alternatives & Substitutions
Life’s about choices, even in cake-making! Here are a few simple swaps to suit your fancy.
- Milk: While whole milk gives the best texture IMO, 2% milk works fine. You can even use non-dairy milk like almond or oat milk for a slightly different flavor profile. Just stick to unsweetened!
- Vegetable Oil: Canola oil or any other neutral-flavored oil works perfectly. Avoid olive oil unless you want your cake to taste… interesting.
- Coffee: If you’re not a coffee person (gasp!), just use hot water. The coffee just deepens the chocolate flavor without making it taste like coffee, FYI. But it’s optional.
- Gluten-Free: For a GF version, simply swap out the all-purpose flour for a 1:1 gluten-free baking blend that contains xanthan gum. Easy peasy!
- Dairy-Free: Use your favorite plant-based milk and vegetable oil for the cake. For the frosting, use dairy-free butter sticks (like Miyoko’s or Earth Balance sticks) and plant-based milk.
- Frosting Flavor: Not feeling chocolate buttercream? Try a simple vanilla buttercream, cream cheese frosting, or even a raspberry cream cheese frosting for a delightful twist!
FAQ (Frequently Asked Questions)
Got questions? I’ve got (casual) answers!
-
My cake sank in the middle! What gives?
Oh no! Common culprits are opening the oven door too early, old baking soda/powder (check those expiration dates!), or overmixing the batter. Make sure your oven temp is accurate too!
-
Can I make this as cupcakes instead?
Absolutely! This recipe makes about 24 cupcakes. Fill liners about 2/3 full and bake for 18-22 minutes, or until a skewer comes out clean.
-
How long does this cake last?
If it actually *lasts* that long in your house (highly doubtful), store it covered at room temperature for 3-4 days, or in the fridge for up to a week. Let it come to room temp before serving for best flavor!
-
Do I really need hot coffee/water?
Yep! The hot liquid helps “bloom” the cocoa powder, which means it intensifies the chocolate flavor. It makes a noticeable difference, so don’t skip it if you want that deep, dark chocolatey goodness!
-
Help, my frosting is too runny/stiff!
No worries! If it’s too runny, add more powdered sugar a tablespoon at a time until it’s perfect. If it’s too stiff, add a tiny bit more milk or cream (half a teaspoon at a time) until it’s spreadable. It’s a delicate balance!
-
Can I add chocolate chips to the cake batter?
Uhm, yes! You’re the boss of your cake. A half cup of mini chocolate chips folded into the batter right before pouring into pans would be a divine addition. Go wild!
Final Thoughts
So there you have it! A seriously amazing, not-too-fussy chocolate layered cake recipe that will make you feel like a total kitchen rockstar. Now go forth, bake this beauty, and prepare for endless compliments. Whether you’re impressing friends, feeding a crowd, or just treating yourself (you totally deserve it!), this cake is a winner.
Now go on, get baking! You’ve earned those bragging rights (and that first slice!). Enjoy every single decadent bite!

