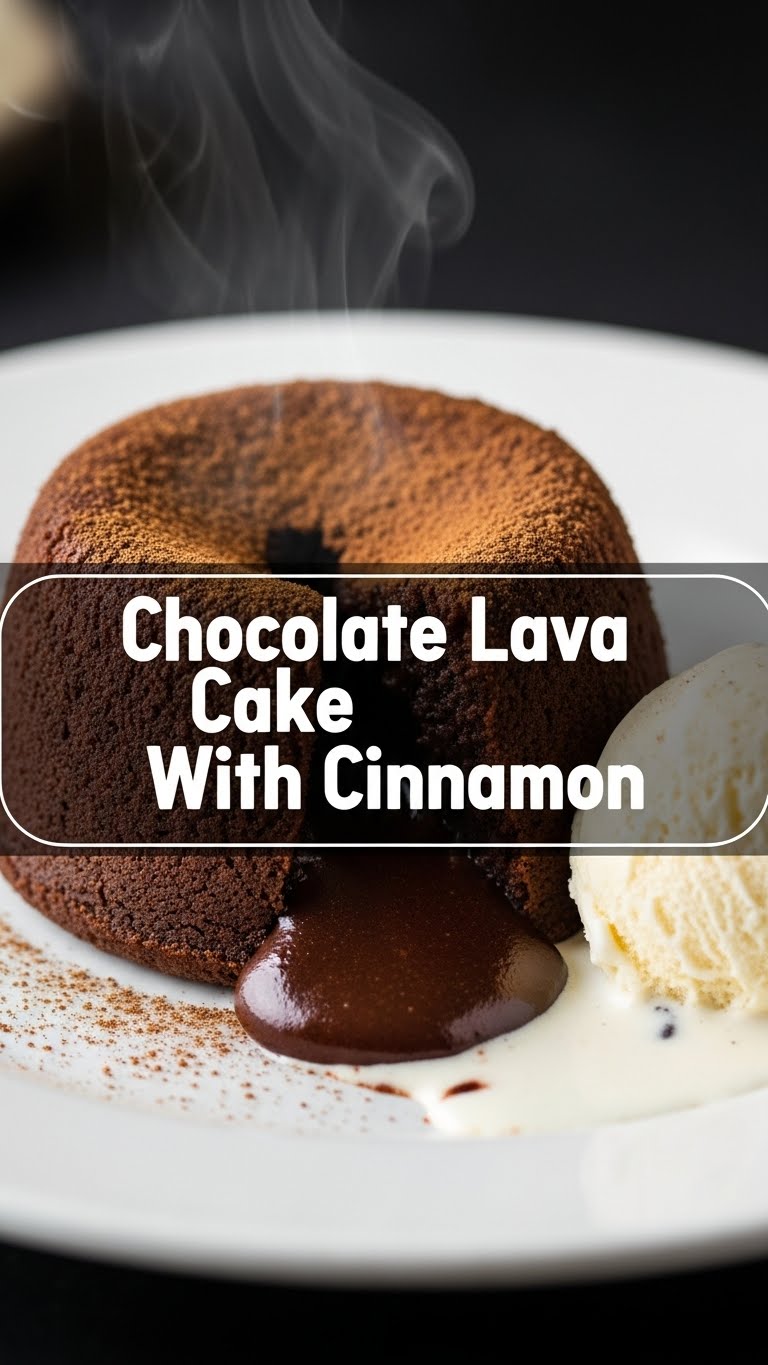
So you’ve had one of those days, huh? The kind where only molten chocolate can make things right, but you also want something a little… extra? Something that whispers, “I’m sophisticated, but I also know how to party”? Oh honey, me too. And that’s exactly why we’re making the glorious, soul-soothing, utterly irresistible Chocolate Lava Cake with a sneaky kiss of Cinnamon. Get ready to impress yourself (and maybe anyone else lucky enough to be around).
Why This Recipe is Awesome
You know those fancy restaurant desserts that look impossible to make? Yeah, this isn’t one of them, even though it tastes like it is. It’s basically magic. We’re talking rich, dark chocolate goodness with a warm, gooey, molten center that cascades out like a delicious, edible lava flow. And the cinnamon? Oh, the cinnamon is the subtle game-changer. It elevates the chocolate, adds warmth, and makes people go, “Hmm, what’s that amazing secret ingredient?”
Plus, it’s **ridiculously quick** to whip up, requires minimal ingredients, and cleans up like a dream. Seriously, it’s pretty much **idiot-proof**, even on a Monday. My kind of baking, and probably yours too!
Ingredients You’ll Need
Gather your troops! Here’s what you’ll need for about 2 glorious lava cakes (because sharing is optional, right?):
- **1/2 cup (1 stick or 113g) Unsalted Butter:** The good stuff. Not that weird spreadable stuff. Butter is flavor, embrace it.
- **4 ounces (113g) Good Quality Dark Chocolate:** We’re talking 60-70% cacao. Life’s too short for bad chocolate, friend. Chips are fine, a chopped bar is even better.
- **1 Large Egg + 1 Large Egg Yolk:** The dynamic duo for richness and structure.
- **1/4 cup (50g) Granulated Sugar:** Just regular ol’ sugar. No need for fancy stuff here.
- **1 Tablespoon All-Purpose Flour:** Just a tiny bit, to hold things together but still let the lava flow.
- **1/2 teaspoon Ground Cinnamon:** The secret weapon! Don’t skip it. It’s the “Ooh la la” of this dessert.
- **Pinch of Salt:** Because salt makes chocolate taste more chocolatey. It’s science.
- **1/2 teaspoon Pure Vanilla Extract:** Adds depth. Please, no imitation shenanigans.
- **Optional:** Cocoa powder or powdered sugar for dusting, and maybe some berries or ice cream for serving (if you’re feeling fancy).
Step-by-Step Instructions
- **Get Prepped & Greased:** Preheat your oven to **400°F (200°C)**. Grab two 6-ounce ramekins. Lightly butter the insides, then dust them with a little cocoa powder or flour. This ensures your cakes will slide out perfectly. **Don’t skip this step – it’s crucial for the big reveal!**
- **Melt the Dream Team:** In a microwave-safe bowl or a double boiler, melt the butter and chopped dark chocolate together. If microwaving, do it in 30-second intervals, stirring in between, until smooth. Don’t scorch it!
- **Whip It Good (But Not Too Good):** In a separate bowl, whisk together the egg, egg yolk, granulated sugar, cinnamon, salt, and vanilla extract until the mixture is pale yellow and slightly thickened. This usually takes about 1-2 minutes of enthusiastic whisking.
- **Combine the Magic:** Pour the slightly cooled chocolate-butter mixture into the egg mixture. Whisk until just combined. Then, gently fold in the flour until no streaks remain. **Do not overmix!** Overmixing will develop the gluten and give you a tough cake instead of a delicate one.
- **Fill ‘Em Up & Bake:** Divide the batter evenly between your two prepared ramekins. Place them on a baking sheet (just in case of any overflow, though it’s rare). Bake for **12-14 minutes**. The edges should be set, but the center should still be wonderfully jiggly. This jiggly center is your molten lava, my friend.
- **The Grand Finale:** Carefully remove the ramekins from the oven. Let them cool for just **1 minute**. Then, run a knife around the edge of each cake, place a small plate on top of the ramekin, and quickly (but confidently!) invert it. Lift the ramekin, and behold! Your perfect lava cake. Dust with cocoa powder or powdered sugar, add a scoop of vanilla ice cream, or some fresh raspberries if you’re feeling extra.
Common Mistakes to Avoid
- **Not Preheating the Oven:** Your oven needs to be consistently hot for that perfect crisp edge and gooey center. Thinking you don’t need to preheat? Rookie mistake!
- **Overmixing the Batter:** We talked about this! Treat that batter gently. A tough cake is a sad cake.
- **Overbaking:** This is the #1 culprit for a non-lava cake. If it’s firm all the way through, you baked it too long. We want a jiggly center. **Seriously, watch that clock and trust the jiggle!**
- **Forgetting to Grease/Dust the Ramekins:** Ever had a cake stick? It’s soul-crushing. Take that extra minute for a perfect release.
Alternatives & Substitutions
Feeling adventurous or missing an ingredient? No worries, I got you!
- **Chocolate Swap:** If dark chocolate isn’t your jam, you can use semi-sweet. Milk chocolate *could* work if you have a massive sweet tooth, but it might make the cake a bit too sweet and less rich, IMO. White chocolate? That’s a whole different animal, but if you’re feeling wild, go for it (might need to reduce sugar).
- **Cinnamon Twist:** Don’t have cinnamon, or want to mix it up? A pinch of cardamom makes it super elegant. Or, if you’re feeling spicy, a **tiny dash of cayenne pepper** will give it a surprising, subtle kick that enhances the chocolate beautifully!
- **Butter Alternative:** For dairy-free, you could try a vegan butter substitute or even coconut oil. The flavor profile might change slightly, but it’ll still be delicious.
- **Gluten-Free Flour:** A good quality gluten-free all-purpose flour blend can usually be substituted cup-for-cup for the small amount of flour in this recipe. Just make sure it’s a blend with xanthan gum.
FAQ (Frequently Asked Questions)
Got questions? I’ve got (casual) answers!
- **Q: Can I make these ahead of time?**
A: You *can* make the batter up to a day in advance and store it in the fridge. Just give it a good stir before pouring into ramekins. However, for true molten lava magic, baking them fresh is always best. The magic is in the fresh bake! - **Q: What if I don’t have ramekins?**
A: Muffin tins can work in a pinch! Just make sure they’re well-greased and floured. The baking time will be shorter (around 8-10 minutes) since they’re smaller, so **keep an eagle eye on them!** - **Q: My cake didn’t have a lava center! What went wrong?**
A: You, my friend, overbaked it. Probably got distracted by cat videos or a TikTok dance, didn’t you? It’s a common rookie error. Next time, aim for that jiggly center and pull them out a minute earlier. - **Q: Is the cinnamon really necessary?**
A: Necessary? No, is a vacation necessary? Also no, but it makes everything better! It truly elevates the chocolate and adds a lovely warmth. Give it a try before you judge! - **Q: Can I freeze these?**
A: You can freeze baked lava cakes, but the texture might not be quite the same when reheated. Freezing the unbaked batter in ramekins and then baking from frozen (adding a few minutes to the bake time) is a better bet if you want to prep ahead.
Final Thoughts
And there you have it, your ticket to dessert nirvana. Seriously, how easy was that? Now go forth and conquer, my friend. Bake these, devour these, share these (if you’re feeling *incredibly* generous). You’ve totally got this. You’ve earned this moment of molten, cinnamon-kissed chocolate bliss. Go impress someone—or yourself—with your new culinary skills. You rock!

