So you’re craving something ridiculously tasty but also too lazy to spend forever in the kitchen, huh? Same. High-five! There are days when my ambition level matches that of a sloth on tranquilizers, but my sweet tooth? Oh, she’s always on a marathon. That’s precisely why we’re diving headfirst into the glorious world of **Chocolate Lava Cake**. Easy peasy, lemon squeezy (minus the lemon, because, well, chocolate!).
Why This Recipe is Awesome
Let’s be real, this isn’t just a recipe; it’s a magic trick. You walk into the kitchen, wave a few ingredients around, and *poof* – you’ve got a fancy-pants dessert that looks like it took hours. It’s **idiot-proof**, I swear. I made it, and I’m generally the kind of person who burns water. Seriously, it’s that forgiving. Plus, it only dirties like, three bowls? **Minimal clean-up, maximum deliciousness.** That’s a win-win, IMO.
- **Speed demon:** From zero to hero in less than 30 minutes. Perfect for those sudden chocolate emergencies.
- **Impressive AF:** Everyone thinks you’re a culinary genius. Don’t tell them how easy it was.
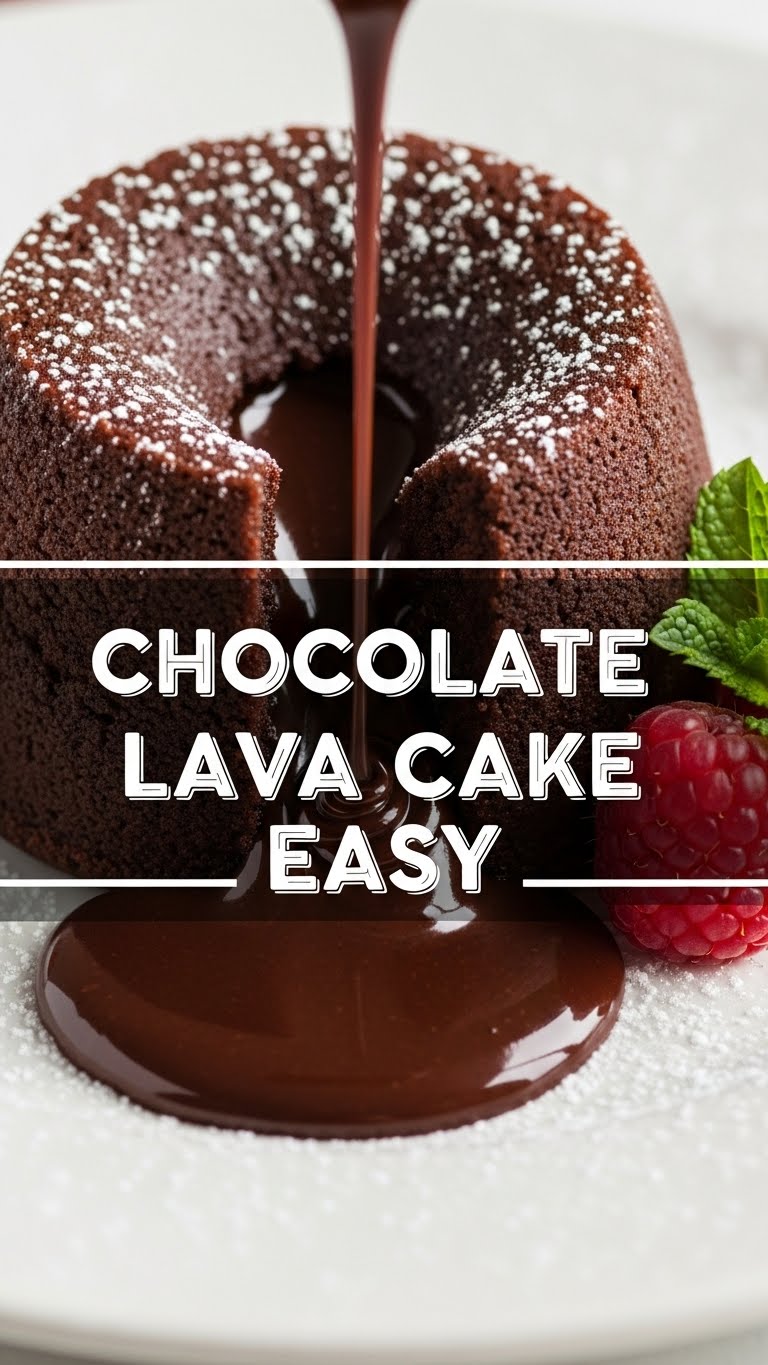
- **Warm, gooey, molten chocolate core:** Need I say more? It’s literally a hug in cake form.
Ingredients You’ll Need
Gather your troops, folks! These are the essentials for your molten chocolate adventure. Don’t skimp on the chocolate; your soul will thank you.
- Unsalted Butter (1/2 cup / 113g): The good stuff. We’re talking real butter, not that impostor margarine.
- Good Quality Dark Chocolate (6 oz / 170g): Think 60-70% cacao. This isn’t the time for Hershey’s milk chocolate, unless you want a very different (and potentially overly sweet) cake. Chop it up roughly so it melts faster.
- Granulated Sugar (1/2 cup / 100g): Just a touch of sweetness to balance the bitterness of the dark chocolate.
- Large Eggs (2 whole eggs + 2 yolks): The magic binders that give it structure and that rich texture.
- All-Purpose Flour (2 tablespoons): Barely any, because we want lava, not a dense muffin!
- Pinch of Salt (1/4 teaspoon): Don’t skip this! It enhances all the chocolatey goodness.
- Vanilla Extract (1 teaspoon): Because vanilla and chocolate are best friends forever.
- Cocoa Powder (for dusting ramekins): Optional, but highly recommended for an extra chocolatey coating and easy release.
Step-by-Step Instructions
Okay, put on your metaphorical chef’s hat. Or don’t. Whatever. Let’s make some magic!
- **Prep Your Ramekins:** Grease four 6-ounce ramekins generously with butter. Then, dust them with cocoa powder, tapping out any excess. This ensures your beautiful cakes slide right out, no drama. **Don’t skip this step!**
- **Melt the Dream Team:** In a microwave-safe bowl (or a double boiler if you’re feeling fancy), combine the chopped dark chocolate and butter. Microwave in 30-second intervals, stirring in between, until completely smooth and melted. Set aside to cool slightly.
- **Whip Up the Eggs:** In a separate medium bowl, whisk together the whole eggs, egg yolks, granulated sugar, and vanilla extract. Whisk until the mixture is light in color and slightly thickened – about 2-3 minutes.
- **Combine the Goodness:** Slowly pour the slightly cooled melted chocolate mixture into the egg mixture, whisking constantly until well combined. Don’t just dump it in; we don’t want to scramble those eggs!
- **Fold in the Dry:** Gently fold in the flour and salt until just combined. **Do not overmix!** Overmixing develops the gluten, making your cake tough, and we want tender, gooey perfection.
- **Fill ‘Em Up:** Divide the batter evenly among your prepared ramekins. They should be about three-quarters full.
- **Bake ‘Em Baby!** Place the ramekins on a baking sheet and bake in your preheated oven for 12-15 minutes. The edges should be set, but the center should still be jiggly. **A jiggly center means LAVA!**
- **Serve Hot & Fast:** Carefully remove the cakes from the oven. Let them cool for 1-2 minutes in the ramekins, then invert them onto serving plates. A little powdered sugar or a scoop of ice cream never hurt anyone.
Common Mistakes to Avoid
Listen, we all make mistakes. But let’s try to avoid these particular pitfalls for lava cake success!
- **Overbaking:** This is the ultimate lava cake sin! If you bake it too long, you’ll end up with a delicious chocolate cake, but zero lava. We’re here for the molten core, people! Keep an eye on that jiggle.
- **Not Greasing/Dusting Ramekins Properly:** Rookie mistake! Your gorgeous cake will cling for dear life, and you’ll end up with a broken mess. Grease, dust, tap. Repeat after me.
- **Opening the Oven Door Too Much:** Resist the urge to peek every 30 seconds. The fluctuating temperature isn’t good for consistent baking. Trust the process!
- **Using Cold Ingredients:** Especially the eggs! Room temperature ingredients emulsify better, leading to a smoother batter. Plan ahead, or give those eggs a quick warm bath.
- **Thinking You Don’t Need to Preheat the Oven:** Bless your heart. Always preheat! A properly hot oven ensures even cooking from the start.
Alternatives & Substitutions
Feeling adventurous? Or just missing an ingredient? Here are some ideas to tweak your lava cake game:
- **Gluten-Free Flour:** You can totally swap the all-purpose flour for a good 1:1 gluten-free baking blend. The small amount of flour means it usually works out perfectly.
- **Spice It Up:** Add a pinch of cayenne pepper to the batter for a subtle, unexpected kick. Chocolate and chili are surprisingly good together, trust me.
- **Coffee Lover’s Dream:** A teaspoon of instant espresso powder (mixed with the melted chocolate) will deepen the chocolate flavor without making it taste like coffee. It’s like magic!
- **Different Extracts:** Instead of vanilla, try a drop or two of almond extract for a nutty twist, or even a tiny splash of orange extract for a citrusy note.
- **Boozy Bits:** A tablespoon of Kahlúa, rum, or Grand Marnier added with the vanilla extract can elevate this from “delicious” to “OMG!”
FAQ (Frequently Asked Questions)
Got questions? I’ve got answers (and probably a sarcastic comment or two).
- **Can I make the batter ahead of time?** Yes, you savvy planner, you! You can make the batter, pour it into the ramekins, cover them, and refrigerate for up to 24 hours. Just add a few extra minutes to the baking time when you’re ready to bake.
- **How do I know when it’s done?** The edges should look set and slightly puffed, but the very center will still be visibly jiggly when you gently shake the ramekin. If the whole thing is firm, you’ve gone too far.
- **What if I don’t have ramekins?** You can use oven-safe custard cups, coffee mugs (make sure they’re oven-safe!), or even muffin tins (fill them about 3/4 full and bake for a shorter time, maybe 8-10 minutes).
- **Can I use milk chocolate instead of dark?** Well, technically yes, but why hurt your soul like that? Milk chocolate has more sugar and less cocoa, so your cake will be much sweeter and might not have that rich depth. Plus, the lava might be runnier. Stick to dark for the best results, FYI.
- **Why is it called “lava cake”?** Because when you cut into it, the molten chocolate goo oozes out like, you guessed it, volcanic lava! Pretty cool, right?
- **Can I store leftovers?** Leftovers? What are those? But if you somehow manage to have some, they’re best reheated gently in the microwave for 15-20 seconds or until warm and slightly gooey again.
Final Thoughts
And there you have it, future dessert superstar! You’ve just unlocked the secret to a ridiculously easy, impossibly impressive chocolate lava cake. This isn’t just a dessert; it’s a mood. A celebration. A “I deserve this because I adulted all day” kind of treat.
Now go impress someone—or yourself—with your new culinary skills. You’ve earned it! Grab a spoon, maybe some ice cream, and bask in the gooey, chocolatey glory. You’re welcome!


