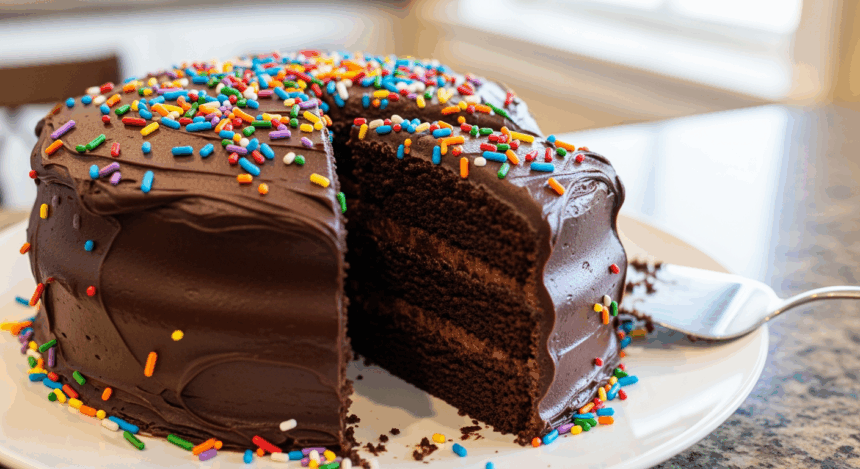
Listen, I’ve got a confession to make. Sometimes I eat frosting straight from the container. There, I said it! But when I’m feeling slightly more civilized, I’ll actually put that frosting on a cake—and if I’m really feeling fancy, I’ll throw some sprinkles on top. Today’s your lucky day because I’m sharing my go-to chocolate frosted cake recipe that makes people think you’ve got your life together, even if your kitchen looks like a crime scene afterward.
Why This Recipe is Awesome
Let’s be real—this cake is basically foolproof. I once made it while simultaneously watching Netflix and texting my mom, and it still turned out Instagram-worthy. It’s the perfect balance between “wow, that looks professional” and “this actually didn’t require culinary school.” Plus, sprinkles make everything better. That’s not just my opinion; I’m pretty sure that’s science.
The best part? This recipe forgives your mistakes. Added too much vanilla? No problem. Frosting looking a bit lumpy? Just add more sprinkles! It’s like the supportive friend who still loves you even when you show up 20 minutes late with coffee stains on your shirt.
Ingredients You’ll Need
For the cake:
- 2 cups all-purpose flour (the regular stuff, nothing fancy)
- 2 cups granulated sugar (because we’re not here to count calories)
- 3/4 cup unsweetened cocoa powder (the darker, the better for your chocolate soul)
- 2 teaspoons baking powder (the magic rising dust)
- 1 1/2 teaspoons baking soda
- 1 teaspoon salt (trust me, don’t skip this)
- 2 large eggs (room temperature—yes, it matters!)
- 1 cup milk (cow, almond, oat—whatever floats your boat)
- 1/2 cup vegetable oil (or canola, if you’re feeling wild)
- 2 teaspoons vanilla extract (the real stuff, not that imitation nonsense)
- 1 cup hot coffee (or hot water if caffeine makes you crazy)
For the chocolate frosting:
- 1/2 cup butter, softened (leave it out while you make the cake, genius)
- 2/3 cup unsweetened cocoa powder (more chocolate, more happiness)
- 3 cups powdered sugar (approximately—just keep adding until it tastes right)
- 1/3 cup milk (give or take, depending on how thick you want it)
- 1 teaspoon vanilla extract (again, the real deal please)
- Sprinkles – the more colorful, the better! (I prefer the tiny round ones, but you do you)
Step-by-Step Instructions
For the cake:
- Preheat your oven to 350°F (175°C). I know waiting for preheating is annoying, but just do it. Grease and flour two 9-inch round cake pans or line with parchment paper if you’re fancy.
- In a large bowl, whisk together the flour, sugar, cocoa, baking powder, baking soda, and salt. Make a little well in the center like you’re preparing for a tiny chocolate volcano.
- Add eggs, milk, oil, and vanilla to your dry ingredients. Beat on medium speed for about 2 minutes. Your arm might get tired if you’re doing this by hand—consider it your workout for the day.
- Stir in the hot coffee (or water). Warning: Your batter will be very thin. Don’t panic! This is normal and exactly what creates that moist, heavenly texture.
- Pour the batter evenly into your prepared pans. If you spill some, just wipe it up—or leave it and call it “rustic.”
- Bake for 30-35 minutes, or until a toothpick inserted in the center comes out clean. If you don’t have toothpicks, a spaghetti noodle works in desperate times.
- Cool in the pans for 10 minutes (perfect time to check Instagram), then remove to wire racks to cool completely. Patience is key here—frosting a warm cake is like trying to put makeup on in a sauna.
For the frosting:
- In a medium bowl, cream the softened butter until it’s smooth and not lumpy. This is your foundation, people!
- Add cocoa powder and blend it in. It’ll look like mud at this point. Delicious, chocolatey mud.
- Gradually add powdered sugar, milk, and vanilla, beating until you reach a spreadable consistency. If it’s too thick, add more milk. Too thin? More powdered sugar. Baking is basically just vibing.
- Once your cake layers are COMPLETELY cool (I cannot stress this enough), place one layer on your serving plate. Slather a generous amount of frosting on top.
- Stack the second layer on top and frost the top and sides. Get creative! No one’s judging your frosting technique except maybe your passive-aggressive aunt.
- While the frosting is still a bit tacky, go wild with sprinkles! Cover the top, do a border, make a pattern—whatever brings you joy. The sprinkles will stick to the fresh frosting.
- Step back and admire your work. Take a photo for social media (it’s basically required at this point).
Common Mistakes to Avoid
Even a “foolproof” recipe has its pitfalls. Here are some ways to not mess this up:
- Frosting a warm cake: Unless you’re going for the “melted snowman” aesthetic, wait until the cake is completely cool. I’m talking cold to the touch, people.
- Skipping the coffee: You won’t taste it in the final product, I promise. It just enhances the chocolate flavor. If you skip it, don’t come crying to me when your cake tastes “meh.”
- Over-mixing the batter: This isn’t a stress-relief exercise. Mix until combined, then stop. Your cake will thank you by not being tough and rubbery.
- Being stingy with frosting: This is not the time to show restraint. Get that frosting in the nooks and crannies. Live a little!
- Adding sprinkles too late: If your frosting has crusted over, your sprinkles will just bounce off sadly. Add them while the frosting is still tacky.
Alternatives & Substitutions
Life happens, pantries aren’t always fully stocked, and sometimes you just want to experiment. Here are some tweaks that won’t ruin everything:
- Gluten-free flour: Use a 1:1 gluten-free flour blend if you’ve got gluten issues. The texture might be slightly different, but chocolate forgives many sins.
- Dairy-free options: Almond or oat milk works great in both the cake and frosting. For the butter in the frosting, try a plant-based stick “butter” (not the tub stuff—it’s too watery).
- No coffee? Hot water will work, or even hot chai tea for a spicy twist. But seriously, the coffee makes it better, and I will die on this hill.
- Frosting alternatives: Not into chocolate frosting? (Who are you?) Try vanilla buttercream, cream cheese frosting, or even a ganache if you’re feeling extra.
- Sprinkle substitutes: No sprinkles? Try chocolate shavings, crushed candy, chopped nuts, or even edible flowers if you’re trying to impress someone.
FAQ (Frequently Asked Questions)
Can I make this cake ahead of time?
Absolutely! The cake layers can be made 1-2 days ahead and wrapped in plastic wrap. The frosted cake will be good for 3-4 days stored at room temperature in an airtight container. But let’s be honest, it won’t last that long.
My cake sank in the middle. What gives?
First of all, rude. But this usually happens when you open the oven door too early or your leavening agents (baking powder/soda) are old and tired. If it happens, just fill the crater with extra frosting and call it a “frosting pocket.” Boom—you meant to do that.
Can I turn this into cupcakes?
Heck yes! Fill cupcake liners about 2/3 full and bake for 18-22 minutes. This recipe should make about 24 cupcakes, perfect for when you need to bribe your coworkers.
Why did my sprinkles bleed into the frosting?
Some sprinkles are drama queens and bleed color when they come in contact with moisture. If this happens, just say it’s an “artistic watercolor effect.” Or next time, try non-pareils or sugar pearls, which are less likely to bleed.
Do I really need two cake pans?
I mean, technically you could bake all the batter in one deep pan and then slice it horizontally later, but that’s advanced wizardry and I don’t recommend it unless you enjoy living dangerously.
My frosting is too sweet! Help!
Add a tiny pinch of salt or a squeeze of lemon juice to cut the sweetness. Or just embrace the sugar rush and plan to crash later. Your choice.
Final Thoughts
Look at you, with your chocolate cake and fancy sprinkles! Whether this cake is for a birthday, a Tuesday night, or just because you wanted to prove you could do it, you should be proud. It doesn’t have to look perfect—it just has to taste good and make you happy.
The beauty of this recipe is its flexibility. Made it once? Great! Now make it again and tweak it to make it your signature cake. Add different extracts, try fun sprinkle combinations, or get wild and put a layer of peanut butter between the cakes. Baking is supposed to be fun, not stressful.
So go ahead and cut yourself a slice—a big one. You deserve it for reading this far and hopefully for actually making the cake. And remember: calories consumed while standing in front of the open refrigerator at midnight don’t count. That’s just another scientific fact for you. You’re welcome!

