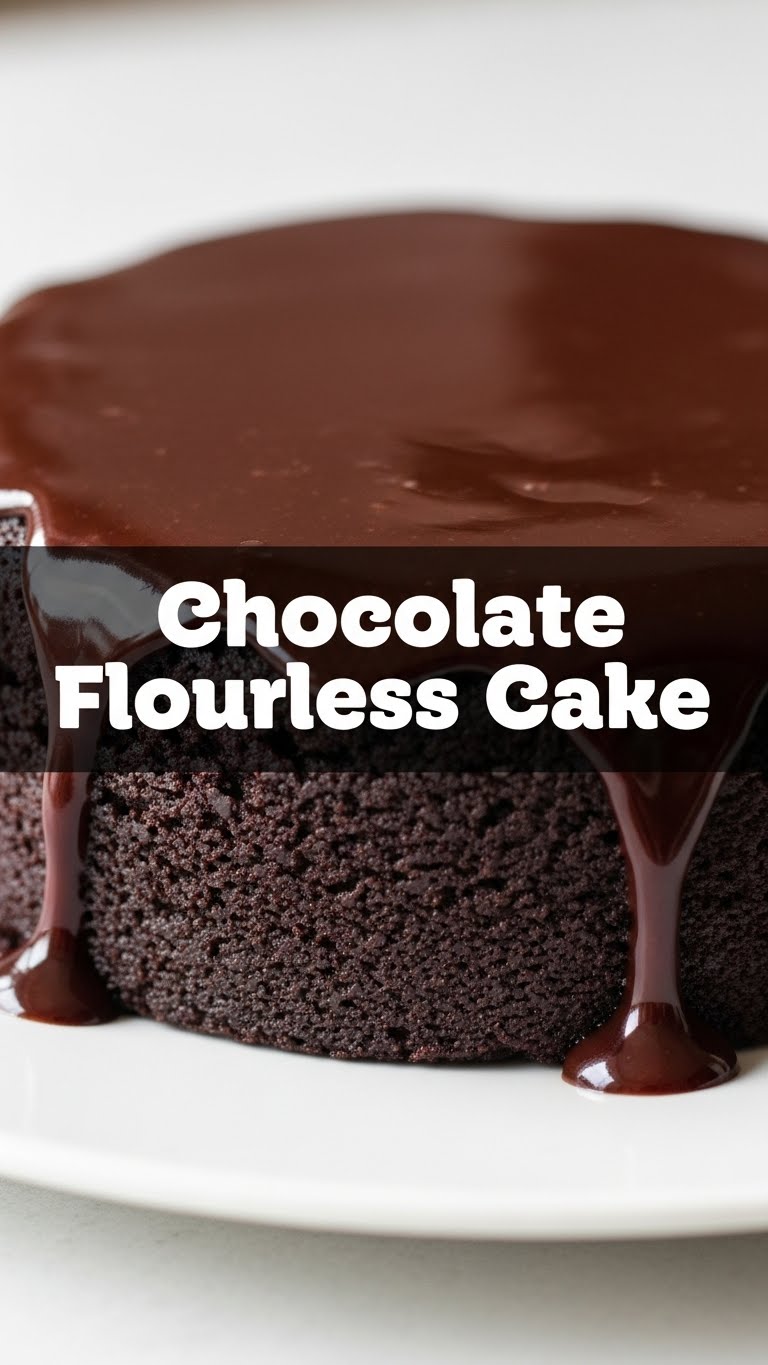
So, you’ve got that chocolate craving gnawing at your soul, but the thought of a multi-step, flour-dusted kitchen catastrophe makes you want to just order takeout? Been there, bought the T-shirt. Good news, my friend, because today we’re diving into the ridiculously easy, unbelievably delicious world of Chocolate Flourless Cake. Get ready to impress everyone (including yourself) with minimal effort and maximum chocolatey glory!
Why This Recipe is Seriously Awesome
Okay, let’s be real. We’re busy people. We don’t have time for fussy baking that requires a chemistry degree. This chocolate flourless cake? It’s the culinary equivalent of a warm hug that tells you everything’s going to be okay. It’s naturally gluten-free (hello, bonus points!), tastes ridiculously rich, and requires so few ingredients you’ll wonder if you’re forgetting something. Plus, it’s pretty much **idiot-proof**. And trust me, if I can make it without setting off the smoke alarm, you totally got this.
Ingredients You’ll Need (Spoiler: Not Many!)
Gather your simple arsenal, chef! No obscure ingredients here, just pure chocolatey goodness:
- **1 cup (2 sticks or 226g) Unsalted Butter:** The good stuff. Don’t skimp, your taste buds will thank you.
- **12 ounces (about 340g) Good Quality Dark Chocolate:** We’re talking 60-70% cacao. This is the star of the show, so make it count! No chocolate chips for snacking here, unless that’s all you’ve got in a pinch.
- **1 cup (200g) Granulated Sugar:** Just enough sweetness to balance the richness.
- **6 Large Eggs:** Room temperature, please! They mix better, trust me.
- **1 teaspoon Vanilla Extract:** A little splash of magic to enhance all that chocolate.
- **A pinch of Salt:** Don’t skip it! It surprisingly makes everything taste more chocolatey.
- Optional: Cocoa powder for dusting, berries for garnish (because we’re fancy like that).
Your Super Simple Step-by-Step Instructions
- **Prep Your Pan & Oven:** First things first, get that oven going! **Preheat it to 350°F (175°C).** Grab an 8-inch round springform pan. Line the bottom with parchment paper and grease the sides. This ensures your beautiful cake comes out without a fight.
- **Melt the Dream Team:** In a heatproof bowl set over a saucepan of simmering water (or zap it in the microwave in 30-second bursts, stirring each time), melt the butter and chopped dark chocolate together. Stir until it’s smooth and gloriously glossy. Let it cool a bit; we don’t want scrambled eggs later!
- **Whip It Good (Kinda):** In a separate large bowl, whisk together the sugar, eggs, vanilla, and salt until they’re just combined and a pale yellow. You’re not trying to make a meringue here, just get them friendly.
- **Combine the Magic:** Slowly pour the slightly cooled chocolate mixture into the egg mixture. **Gently fold them together** until just combined. Don’t overmix! We want a dense, fudgy cake, not an airy soufflé.
- **Bake Your Masterpiece:** Pour the batter into your prepared springform pan. Slide it into the preheated oven and bake for **35-40 minutes**. The edges should be set, but the center will still be a bit jiggly. That’s good, it means fudgy goodness awaits!
- **Cool Down, Buttercup:** Take it out of the oven and let it cool completely in the pan on a wire rack. It will sink slightly in the middle, which is totally normal and part of its charm. Once cool, release it from the pan.
- **Serve and Devour:** Dust with cocoa powder, pile on some fresh berries, or a dollop of whipped cream if you’re feeling extra. Slice and serve your magnificent creation!
Common Mistakes to Avoid (So You Don’t Cry into Your Chocolate)
- **Not preheating your oven:** Rookie mistake! Your cake needs a consistent temperature from the get-go.
- **Using subpar chocolate:** Seriously, this cake is like 80% chocolate. If you use waxy, cheap stuff, it’ll taste like waxy, cheap stuff. Don’t do it to yourself (or your guests).
- **Overmixing the batter:** Once the chocolate and egg mixtures are combined, stop! Overmixing develops gluten (even without flour!), making the cake tough. We want tender, fudgy bliss.
- **Baking too long:** This isn’t a dry sponge cake. A slight jiggle in the center is your friend. Overbake it, and you’ll end up with a dry, sad puck instead of a rich, moist dream.
- **Cutting it while warm:** Patience, young grasshopper. Let it cool completely. It firms up as it cools, making for perfect slices.
Alternatives & Substitutions (Because We’re All About Options!)
Feeling adventurous or just missing an ingredient? Here are a few tweaks:
- **Chocolate Type:** You can definitely play around here! Try milk chocolate for a sweeter, creamier cake (though I’m a dark chocolate purist, IMO). Or go for super dark (80%+) if you like that intense, bittersweet kick.
- **Flavor Boosts:** A splash of coffee liqueur (like Kahlúa) or a shot of espresso in the melted chocolate can deepen the flavor beautifully. A pinch of cayenne pepper adds a surprisingly subtle warmth!
- **Dairy-Free Version:** Use a high-quality dairy-free butter substitute (like Miyoko’s Kitchen) and ensure your dark chocolate is dairy-free. Easy peasy!
- **Sweetener Swap:** Coconut sugar or maple syrup *can* work, but the texture might be slightly different. Stick to granulated sugar for the classic fudgy outcome.
FAQ (Because You Might Have Questions, and I’m Here for You)
Let’s tackle some common conundrums, shall we?
- **”Can I use chocolate chips instead of a bar?”** Technically, yes, but often chocolate chips have stabilizers that prevent them from melting as smoothly. If that’s all you’ve got, go for it, but for ultimate fudginess, a good quality bar is superior.
- **”Why do I need room temperature eggs?”** Good question! Room temp eggs emulsify better with the fat from the butter and chocolate, creating a smoother, more uniform batter. Cold eggs can seize up the chocolate.
- **”My cake cracked on top, is it ruined?”** Nope, not at all! Cracks are totally normal for this type of cake. Just dust it with cocoa powder, pile on some berries, and no one will ever know. It’s character!
- **”How do I store this masterpiece?”** Cover it tightly and store it at room temperature for up to 3 days, or in the fridge for up to a week. It’s actually amazing cold from the fridge, FYI.
- **”Can I make this ahead of time?”** Absolutely! This cake is fantastic made a day or two in advance. In fact, some say the flavors deepen over time. Win-win!
Final Thoughts: Go Forth and Be Delicious!
See? I told you it was easy! You’ve just whipped up a decadent, show-stopping dessert that tastes like you spent hours slaving away, when in reality, you probably binge-watched half a season of your favorite show while it baked. This chocolate flourless cake is pure indulgence, perfect for a fancy dinner party or, let’s be honest, a Tuesday night treat just for yourself. Now go impress someone—or yourself—with your new culinary skills. You’ve earned it, you magnificent baker, you!

