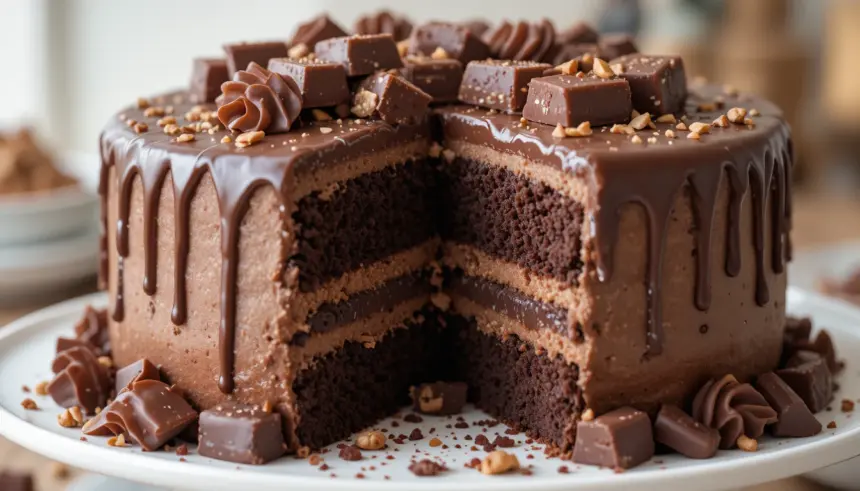
Oh, hello there, fellow dessert enthusiast! Are you ready to dive headfirst into a world where chocolate reigns supreme, where every slice is a celebration, and every bite is pure, unadulterated bliss? Today, we’re not just making a cake; we’re crafting a showstopper, a conversation starter, an edible masterpiece that will have everyone reaching for their phones before they even reach for a fork. We’re talking about the legendary, the irresistible, the utterly magnificent Chocolate Drip Cake With Chocolate Bars!
Imagine a moist, rich chocolate cake, generously frosted, with a glistening cascade of chocolate ganache artfully dripping down its sides, all crowned with an impressive array of your favorite chocolate bars. It’s a dessert that screams “fun!” and whispers “indulgence!” in the same breath. Whether you’re a seasoned baker or just dipping your toes into the world of confectionery, this comprehensive guide, filled with expert tips and a sprinkle of playful magic, will help you create a Chocolate Drip Cake With Chocolate Bars that’s not just delicious, but truly unforgettable.
The Anatomy of a Decadent Dream: What Makes a Chocolate Drip Cake With Chocolate Bars So Special?
What sets a Chocolate Drip Cake With Chocolate Bars apart from just any chocolate cake? It’s the delightful symphony of textures and flavors, a multi-layered marvel that engages all your senses. Let’s break down its captivating components:
- The Foundation: The Cake Itself. This isn’t just a vehicle for frosting; it’s the heart of our creation. It needs to be moist, rich, and intensely chocolatey, providing a sturdy yet tender base for all the deliciousness that follows.
- The Embrace: The Frosting. A luscious chocolate buttercream or a velvety ganache filling creates a smooth, delectable canvas. It needs to be stable enough to hold the cake layers and provide the perfect surface for our star attraction.
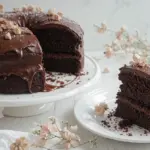
- The Cascade: The Drip. Ah, the signature drip! This elegant stream of chocolate ganache is what gives the cake its dynamic, artisanal look. Getting this right is key to achieving that professional, jaw-dropping finish.
- The Crown Jewels: The Chocolate Bars. This is where the fun really begins! An assortment of chocolate bars, strategically placed, transforms the cake from beautiful to absolutely spectacular. They add height, texture, and an undeniable “wow!” factor that’s impossible to resist.
The Perfect Base: Choosing Your Chocolate Cake Foundation
Every magnificent edifice starts with a strong foundation, and our Chocolate Drip Cake With Chocolate Bars is no different. You want a chocolate cake that’s not only delicious but also holds up well to stacking and decorating.
Here are a few stellar options:
- Classic Fudgy Chocolate Cake: Dense, rich, and incredibly moist, often made with hot coffee to enhance the chocolate flavor. It’s a robust choice.
- Devil’s Food Cake: Lighter in texture than a fudgy cake but still incredibly chocolatey, often with a hint of red hue. Its tenderness requires careful handling.
- Buttermilk Chocolate Cake: The buttermilk reacts with the cocoa powder, resulting in a super moist, tender crumb with a lovely tangy complexity.
Expert Tip: For the ultimate moist cake, don’t overmix your batter. Mix just until combined. Also, ensure your cake layers are completely cooled before attempting to frost them; otherwise, you’ll have a frosting meltdown!
Frosting Finesse: The Creamy Canvas
The frosting not only binds your cake layers but also provides the smooth, cool surface for your drip. A classic chocolate buttercream is often the best choice for a Chocolate Drip Cake With Chocolate Bars due to its stability and ease of working with.
For a flawless finish, follow these steps:
- Crumb Coat: Apply a thin layer of frosting to seal in any loose crumbs. Chill the cake for 15-20 minutes until firm.
- Final Coat: Apply a thicker, even layer of frosting. Use an offset spatula or a bench scraper to smooth the sides and top for a perfectly flat and straight surface.
A perfectly chilled, smoothly frosted cake is your secret weapon for a truly impressive drip.
Drip, Drop, Delight! Crafting the Perfect Chocolate Ganache Drip
The drip is the crown jewel of our Chocolate Drip Cake With Chocolate Bars, giving it that professional, luxurious look. Ganache is a simple mixture of chocolate and cream, but getting the consistency just right is crucial.
Ganache Ratios Demystified
The ratio of chocolate to cream will dictate the thickness and flow of your ganache. Here’s a quick guide:
| Chocolate Type | Cream to Chocolate Ratio (by weight) | Notes |
|---|---|---|
| Dark Chocolate (60-70% cocoa) | 1 part heavy cream : 1 part chocolate | Thicker, richer drip. Great for well-defined drips. |
| Milk Chocolate | 1 part heavy cream : 1.5 – 2 parts chocolate | Requires more chocolate due to higher fat content. Softer set. |
| White Chocolate | 1 part heavy cream : 2.5 – 3 parts chocolate | Needs the most chocolate for stability. Can be colored. |
Method: Heat heavy cream until just simmering. Pour over finely chopped chocolate (or chocolate chips). Let sit for 5 minutes, then stir gently from the center outwards until smooth and glossy.
The Art of the Drip: Technique and Temperature
This is where patience and precision pay off! The temperature of your ganache is paramount. It should be warm to the touch, but not hot – typically around 90-95°F (32-35°C). If it’s too hot, it will be too thin and run straight down the cake; too cool, and it will be too thick to drip gracefully.
Application Techniques:
- Spoon Method: Use a spoon to carefully drizzle ganache around the edge of the chilled cake, pushing some ganache just over the edge to create the drip. Vary the amount to create drips of different lengths.
- Squeeze Bottle Method: For more control, transfer the ganache to a squeeze bottle. Gently squeeze a small amount over the edge, letting gravity do the work. This is excellent for consistent drips.
- Filling the Top: Once the drips are done, pour the remaining ganache onto the center of the cake top and gently spread it to the edges with an offset spatula, creating a smooth, glossy surface.
Key to Success: Your cake MUST be cold! A well-chilled, firmly frosted cake allows the warm ganache to set quickly upon contact, creating those beautiful, defined drips. After applying the drip, chill the cake again for 10-15 minutes before adding your chocolate bar toppings.
The Grand Finale: Adorning Your Chocolate Drip Cake With Chocolate Bars
Now for the truly exciting part: turning your beautiful cake into a spectacular Chocolate Drip Cake With Chocolate Bars! This is where your creativity gets to shine.
Selecting Your Chocolate Bar Superstars
The beauty of this cake is its versatility. You can go classic or get wild with your chocolate bar choices. Think about variety in:
- Texture: Crunchy (Kit Kat, Twix), chewy (Snickers, Mars), smooth (Hershey’s, Cadbury).
- Shape & Size: Long bars (Kit Kat, Aero), smaller individual pieces (Reese’s Peanut Butter Cups, mini chocolate bars), or even broken chunks.
- Color: Dark chocolate, milk chocolate, white chocolate, and even colorful candies like M&M’s can add visual interest.
Popular Choices: Kit Kat, Twix, Snickers, Oreos, Toblerone, Kinder Bueno, Crunchie, Maltesers, Ferrero Rocher, and even chocolate-covered pretzels or biscuits!
Creative Placement: Beyond Just Sticking Them On
Arranging your chocolate bars is an art. Here are some playful ideas:
- Standing Tall: Break Kit Kats into individual fingers and stand them upright around the perimeter of the cake or cluster them in the center.
- Chunky Clusters: Break larger bars into appealing chunks and arrange them artfully on top of the cake, perhaps creating a focal point.
- Scattered Fun: Chop up a variety of smaller bars and candies and sprinkle them over the ganache-covered top.
- Edge Embellishments: Use mini chocolate bars or individually wrapped candies (like mini Hershey’s Kisses) along the base or top edge.
- Themed Toppers: If it’s a birthday, add some fun birthday candles or a small “Happy Birthday” sign amidst the chocolatey goodness.
Don’t be afraid to mix and match! Combine different textures and sizes for a truly dynamic display. And remember, sometimes less is more, but with a Chocolate Drip Cake With Chocolate Bars, a little glorious excess is perfectly acceptable!
Pro Tips for Your Ultimate Chocolate Drip Cake With Chocolate Bars
- Plan Ahead: Bake your cake layers a day in advance. This allows them to firm up and makes them easier to handle and level. Wrap them tightly in plastic wrap once cooled.
- Level Up: Use a serrated knife or a cake leveler to ensure perfectly flat cake layers. This is vital for a stable, straight cake.
- The Crumb Coat is Your Friend: Seriously, don’t skip it! It traps all those pesky crumbs and gives you a smooth base for your final frosting layer.
- Chill Out: Chilling your cake at various stages (after crumb coat, after final frosting, after drip) is absolutely essential for stability and a clean finish.
- Room Temperature Butter for Frosting: Ensure your butter is truly at room temperature (soft but not melted) for the smoothest, fluffiest buttercream.
- Don’t Rush the Ganache: Allow your ganache to cool to the correct temperature slowly. Rushing it can lead to a messy, uncontrolled drip.
- Practice Makes Perfect (or Pretty Good!): If you’re nervous about the drip, do a test run on the back of a chilled glass or bowl to get a feel for the consistency and how it flows.
Frequently Asked Questions About Chocolate Drip Cake With Chocolate Bars
Got questions? We’ve got answers! Here are some common queries about creating your own magnificent Chocolate Drip Cake With Chocolate Bars.
Q1: Can I use a store-bought cake mix for my Chocolate Drip Cake With Chocolate Bars?
A1: Absolutely! While a homemade cake offers unparalleled flavor, a good quality store-bought chocolate cake mix can be a fantastic shortcut, especially if you’re short on time. Just make sure to follow the package directions carefully, and consider adding an extra egg or a splash of milk for added moisture if you like.
Q2: How do I prevent my ganache drip from running straight off the cake?
A2: The key here is temperature, both of your cake and your ganache. Ensure your cake is thoroughly chilled and firm. Your ganache should be cooled down to a thick, syrupy consistency, around 90-95°F (32-35°C). If it’s too hot, it will be too thin and run too quickly. If it’s too cold, it won’t drip at all! A simple test on the back of a cold spoon can show you its consistency.
Q3: What kind of chocolate bars are best for decorating a Chocolate Drip Cake With Chocolate Bars?
A3: The best chocolate bars are truly a matter of personal preference and visual appeal! Aim for a variety of textures and sizes. Popular choices include Kit Kat for its vertical lines, Twix or Snickers for chunkiness, Oreos for a classic black and white contrast, or even Ferrero Rocher for a touch of elegance. Don’t be afraid to break them into pieces for more creative arrangements!
Q4: How far in advance can I make a Chocolate Drip Cake With Chocolate Bars?
A4: You can bake your cake layers 2-3 days in advance and store them tightly wrapped at room temperature or frozen for up to a month. The frosted and decorated cake, including the chocolate bars, can typically be made 1-2 days in advance and stored in an airtight container at room temperature (if your environment is cool) or in the refrigerator. If refrigerating, let it come closer to room temperature for about an hour before serving for the best flavor and texture.
Q5: My drip isn’t smooth, or it’s lumpy, what went wrong?
A5: A lumpy ganache usually means the chocolate wasn’t finely chopped enough, or the cream wasn’t hot enough to melt it properly. Ensure your chocolate is in small, uniform pieces, and that the cream is brought to a good simmer. After pouring the hot cream over the chocolate, let it sit for a full 5 minutes without stirring. Then, stir gently from the center outwards until completely smooth. If it’s still lumpy, a quick zap in the microwave (5-10 seconds at a time) or a gentle pass through a fine-mesh sieve can help.
Q6: Can I make this cake gluten-free or dairy-free?
A6: Yes, absolutely! For gluten-free, substitute your regular flour with a good quality gluten-free all-purpose flour blend (often with xanthan gum added). For dairy-free, use plant-based milks (like almond or oat milk) and dairy-free butter for the cake and frosting. For the ganache, use a dairy-free heavy cream alternative (like full-fat coconut cream) and high-quality dairy-free chocolate. Always check your chosen chocolate bars for dairy ingredients if you’re going completely dairy-free.
Your Chocolate Drip Cake Adventure Awaits!
Phew! We’ve journeyed through the glorious layers, mastered the art of the perfect drip, and crowned our creation with an abundance of chocolatey treasures. Creating a Chocolate Drip Cake With Chocolate Bars is more than just baking; it’s an experience, a joyful exploration of flavor and creativity that results in a truly spectacular dessert.
So, what are you waiting for? Gather your ingredients, crank up your favorite tunes, and get ready to transform simple components into an extraordinary edible masterpiece. Whether it’s for a birthday, a celebration, or just because it’s Tuesday and you deserve it, your homemade Chocolate Drip Cake With Chocolate Bars will undoubtedly be the star of the show.
Now go forth and bake with confidence, creativity, and a whole lot of chocolatey love! Don’t forget to share your dazzling creations with us – we can’t wait to see your unique spin on this delicious classic!
