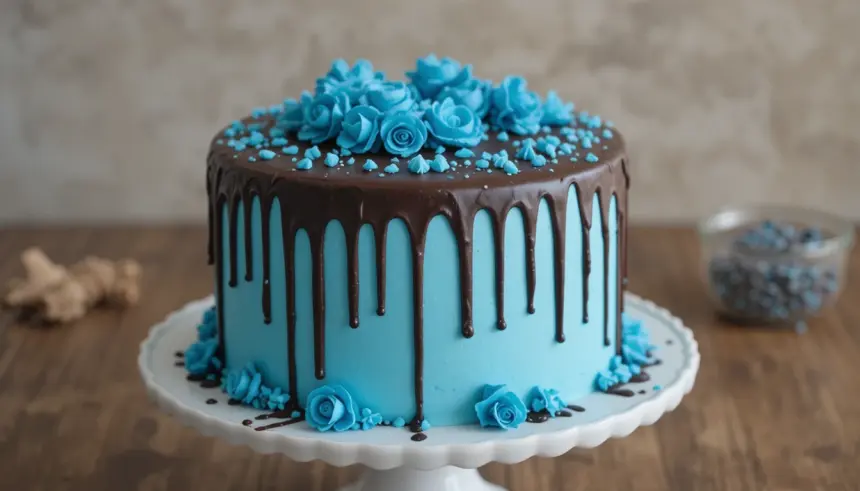
So, you’ve got a hankering for something ridiculously decadent, but the thought of a multi-day baking marathon makes you want to crawl back into bed? Been there, my friend. But what if I told you there’s a way to achieve jaw-dropping, totally Instagrammable cake greatness without all the fuss? Enter the Chocolate Drip Cake with Blue Decorations. It’s like a party in your mouth, and everyone’s invited!
Why This Recipe is Awesome
Honestly, this recipe is a lifesaver. It looks fancy enough to impress your boss, your mother-in-law, or that cute barista you’ve been eyeing, but it’s surprisingly manageable. We’re talking serious “wow” factor with minimal stress. It’s basically a shortcut to looking like a baking ninja. Plus, who doesn’t love chocolate? And blue? It’s a match made in dessert heaven. It’s so foolproof, even I didn’t manage to set off the smoke alarm this time. #winning
Ingredients You’ll Need
- Your Favorite Chocolate Cake: Boxed mix or from scratch, I’m not judging. Just make sure it’s delicious.
- Chocolate Ganache: 1 cup heavy cream, 1.5 cups chocolate chips (dark or semi-sweet work best). This is the magic goo that makes the drip happen.
- Buttercream Frosting: Enough to generously coat your cake. Your go-to vanilla or chocolate recipe is perfect.
- Blue Food Coloring: Gel-based is best for vibrant colors without thinning your frosting too much.
- Optional Blue Decorations: Sprinkles, edible glitter, chocolate shavings, candy melts for piping, or even some pretty blue berries. Get creative!
- Patience (Optional, but Recommended): Just kidding… mostly.
Step-by-Step Instructions
- Bake & Cool Your Cake: Follow your cake recipe instructions. Make sure it’s completely cool before frosting. Nobody likes a melted cake disaster.
- Make the Ganache: Heat the heavy cream until it’s just simmering (don’t boil it like a witch’s brew!). Pour it over the chocolate chips in a bowl. Let it sit for 5 minutes, then whisk until smooth and glossy. Let it cool to a *slightly* thickened, pourable consistency. Think thick honey, not water.
- Frost the Cake: Crumb coat your cake first! This is a thin layer of frosting to trap all those pesky crumbs. Chill it for 15-20 minutes until firm. Then, apply a thicker, final layer of frosting. Smooth it out as much as you can – a perfectly smooth finish is the goal, but don’t stress if it’s not salon-perfect.
- Color Your Frosting: Take about half of your remaining buttercream and divide it into two bowls. Leave one plain, and tint the other with your blue food coloring. You might want to reserve a tiny bit of white frosting for accent details.
- Drip Time!: This is the fun part! Pour your slightly cooled ganache into a squeeze bottle or a piping bag with a small tip. **Start with the edges**. Gently squeeze the ganache around the top edge of your cake, letting it drip down the sides. Control is key here; too much pressure and you’ll have a chocolate avalanche.
- Decorate Away!: Now, use your blue frosting to create swirls, rosettes, or just general swooshy-ness on top of the cake. If you have plain white frosting left, you can add little dollops or accents. Add your sprinkles, glitter, or any other blue bling you’ve got!
Common Mistakes to Avoid
- Using Hot Ganache: This will melt your frosting and make a drippy mess that no one wants. Let it cool!
- Over-Swirling the Blue Frosting: Less is often more. You want a pretty contrast, not a muddy explosion.
- Skipping the Crumb Coat: Trust me on this one. It’s the secret weapon for a clean finish.
- Trying to Make It Perfect: It’s a homemade cake, not a museum piece. A little rustic charm is part of its beauty.
- Not tasting the ganache as you go: Okay, this isn’t a mistake, it’s a delicious necessity.
Alternatives & Substitutions
Don’t have heavy cream for ganache? You can try using whole milk, but the ganache might be a bit thinner. If you’re not a fan of dark chocolate, milk chocolate chips work too, but you might need a touch more cream. Feeling adventurous? Swap the blue frosting for a different color, like a shimmering silver or a deep purple. For decorations, use whatever you have on hand! M&Ms, chopped nuts, or even edible flowers can look amazing.
FAQ (Frequently Asked Questions)
Q: Can I use store-bought frosting?
A: Absolutely! Nobody will know, and it saves you a step. Just make sure it’s firm enough to hold its shape.
Q: My ganache is too thick/thin, help!
A: If it’s too thick, gently warm it up a tiny bit (like, 5-10 seconds in the microwave) and whisk. If it’s too thin, add more chocolate chips and stir until melted. You can also pop it in the fridge for a few minutes to thicken.
Q: How far in advance can I make this?
A: You can bake and frost the cake a day ahead and store it covered at room temperature. Make the ganache a few hours before you plan to drip, and do the final decorations just before serving for maximum wow-factor.
Q: My drip isn’t as dramatic as I wanted. What went wrong?
A: Your ganache might have been too cool, or you were a little too shy with the squeeze bottle. Don’t be afraid to go for it (but still with control!). A slightly warmer ganache will drip more.
Q: Can I make this gluten-free or vegan?
A: Totally! Use your favorite gluten-free cake mix and frosting recipe. For vegan, look for vegan chocolate chips, plant-based cream for the ganache, and vegan buttercream. Easy peasy!
Q: What if I don’t have a squeeze bottle?
A: A piping bag with a small round tip is your best friend here. If you don’t have either, you can carefully spoon the ganache and gently guide it over the edge with the back of the spoon. It’s a little messier, but totally doable!
Final Thoughts
And there you have it! A show-stopping chocolate drip cake that’s surprisingly easy to create. Remember, baking should be fun, not stressful. So embrace the imperfections, enjoy the process (and maybe sneak a bite of ganache), and get ready to wow everyone with your edible masterpiece. Now go impress someone—or yourself—with your new culinary skills. You’ve earned it!
