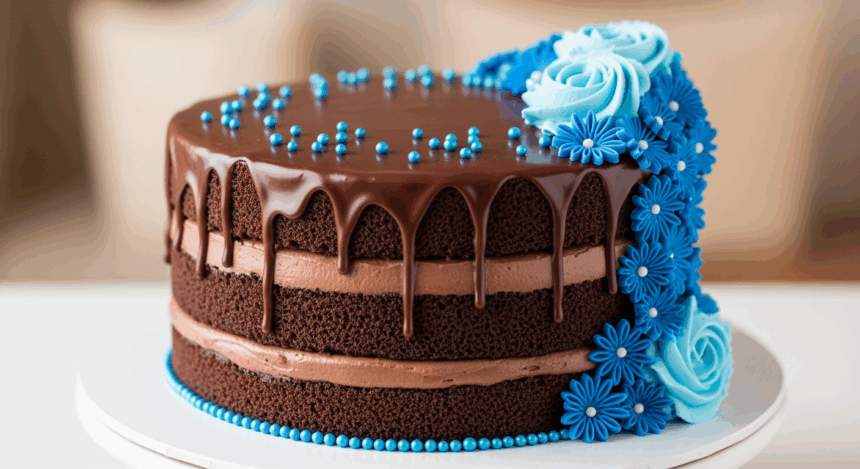
Hold onto your whisks, people – we’re about to create the most jaw-dropping chocolate drip cake with blue decorations that’ll make your Instagram followers weep with jealousy! This isn’t just any cake; it’s that show-stopping centerpiece that screams “I’m not a regular baker, I’m a cool baker” without requiring a culinary degree. Chocolate? Check. Dramatic drips? Absolutely. Blue accents that pop? You know it. Let’s dive into cake heaven, shall we?
Why This Recipe is Awesome
Let me count the ways this chocolate drip cake is about to change your life. First, that chocolate drip effect looks incredibly professional but is actually ridiculously simple to execute (shh, don’t tell your impressed guests). Second, the blue decorations add that perfect pop of color that makes everyone think you planned this for weeks. Third, it’s basically fool-proof – I once made this while simultaneously binge-watching an entire season of my favorite show and it still turned out Instagram-worthy. The beauty-to-effort ratio here is off the charts. Plus, chocolate. Need I say more?
Ingredients You’ll Need
For the Chocolate Cake:
- 2 cups all-purpose flour (the regular stuff, nothing fancy)
- 2 cups granulated sugar (because we’re not here to count calories)
- ¾ cup unsweetened cocoa powder (the darker, the better)
- 2 teaspoons baking soda (not baking powder – trust me, there’s a difference)
- 1 teaspoon salt (to make the sweetness pop)
- 2 large eggs (room temperature, pretty please)
- 1 cup buttermilk (or regular milk with a splash of vinegar if you’re not a buttermilk-keeping kind of person)
- ½ cup vegetable oil (keeps things moist like nobody’s business)
- 2 teaspoons vanilla extract (the real stuff, not that imitation nonsense)
- 1 cup hot coffee (don’t worry, it won’t taste like coffee – it just makes the chocolate flavor pop)
For the Frosting:
- 1 cup unsalted butter, softened (patience, my friend)
- 4 cups powdered sugar (yes, FOUR cups – we’re going all in)
- 1/4 cup heavy cream (or milk if you’re in a pinch)
- 2 teaspoons vanilla extract (again, the real stuff)
- Pinch of salt (trust the process)
For the Chocolate Drip:
- 1 cup semi-sweet chocolate chips (or chopped chocolate if you’re feeling fancy)
- 1/2 cup heavy cream (liquid gold in this recipe)
For the Blue Decorations:
- Blue gel food coloring (the gel kind, not the wimpy liquid stuff)
- 1/2 cup white chocolate, melted (for colored chocolate decorations)
- Blue sprinkles, assorted sizes (go wild!)
- Blue macarons or meringues (store-bought is 100% acceptable – I won’t tell)
Step-by-Step Instructions
Bake the Cake Layers:
- Preheat your oven to 350°F (175°C). Skip this step at your own peril. Grease and line two 8-inch round cake pans.
- In a large bowl, whisk together flour, sugar, cocoa powder, baking soda, and salt. No need for sifting – we’re not that precious here.
- Add eggs, buttermilk, oil, and vanilla. Beat with an electric mixer on medium speed for about 2 minutes until smooth.
- Stir in the hot coffee by hand. Don’t panic – the batter will be thin. That’s supposed to happen!
- Pour evenly into your prepared pans and bake for 30-35 minutes, or until a toothpick comes out mostly clean.
- Cool in pans for 10 minutes, then remove to cooling racks. If you try to frost them warm, you’ll have a melty disaster on your hands.
Make the Frosting:
- Beat the butter until creamy and pale. This is not the time to rush – give it a good 3-4 minutes.
- Gradually add powdered sugar, one cup at a time, beating well after each addition. Your mixer might protest, but push through.
- Add the vanilla and salt, then pour in the cream. Beat until fluffy and smooth – about 2 more minutes.
- Set aside about 1/2 cup of frosting and tint it blue with gel food coloring for decorative touches later.
Assemble and Frost:
- Level your cake layers if they have domes. Eat the scraps – that’s your baker’s tax.
- Place one layer on your cake board or serving plate. Spread a thick layer of white frosting on top.
- Add the second layer and cover the entire cake with frosting. Get it as smooth as possible for that professional look.
- Refrigerate for at least 30 minutes until the frosting is firm. DO NOT SKIP THIS STEP or your drip will be a drippy mess (and not in a good way).
Create the Chocolate Drip:
- Heat heavy cream just until it begins to simmer (tiny bubbles around the edge). Don’t boil it – we’re not making soup here.
- Pour over chocolate chips in a heatproof bowl and let sit for 3 minutes untouched.
- Stir until smooth and glossy. If there are still lumps, microwave in 10-second bursts, stirring between each.
- Let cool until it’s still pourable but not hot – about 10 minutes. Test a drip on the inside of your bowl to check consistency.
- Pour or spoon the ganache around the edge of your chilled cake, encouraging drips down the sides. Then fill in the top.
Add Blue Decorations:
- Melt white chocolate and color it blue with gel coloring. Pour into a piping bag or zip-top bag with a tiny corner snipped off.
- Create blue chocolate decorations on parchment paper – swirls, stars, whatever your artistic heart desires. Let harden.
- Pipe blue frosting accents on top of the cake using a decorative piping tip.
- Carefully place your blue chocolate decorations, sprinkles, and any store-bought blue treats on top of the cake.
- Step back and admire your masterpiece before everyone devours it!
Common Mistakes to Avoid
Here’s where people typically go wrong with this showstopper:
- Rushing the cooling process – Hot cake + frosting = The Leaning Tower of Disaster
- Making the chocolate drip too hot – Unless you want your frosting to slide right off the cake in a sad puddle
- Going overboard with food coloring – Unless “Smurf Explosion” is the vibe you’re going for
- Forgetting to chill the frosted cake – Your drip will race to the bottom faster than kids chasing an ice cream truck
- Overthinking the decorations – Sometimes “beautifully messy” is better than “tried too hard and had a meltdown”
Alternatives & Substitutions
Not feeling some of these ingredients? No worries!
Cake Alternatives: Not a coffee person? Use hot water instead. The cake won’t have quite the same depth of flavor, but it’ll still be delicious. For a non-chocolate version, use a vanilla cake recipe and add blue food coloring to the batter for a stunning contrast with the chocolate drip.
Frosting Options: Cream cheese frosting works beautifully here if you want a tangier flavor profile. Just swap the butter for half butter/half cream cheese. IMO, this makes an even more interesting flavor contrast with the chocolate.
Blue Decoration Alternatives: No time for fancy chocolate work? Blue candies, blueberries, or blue candy melts work great. Even blue M&Ms can look cute in a pinch. Or go natural with butterfly pea flower-infused white chocolate for a natural blue tint!
Dietary Adjustments: For gluten-free, swap in your favorite 1:1 gluten-free flour blend. For dairy-free, coconut cream can replace heavy cream, and there are decent plant-based butter alternatives for the frosting.
FAQ (Frequently Asked Questions)
Can I make this cake in advance?
Absolutely! The cake layers can be baked up to 2 days ahead and wrapped tightly, or frozen for a month. The assembled cake (pre-drip) can be refrigerated overnight. Just add the drip and decorations the day you’re serving.
Why is my chocolate drip setting too quickly?
Your ganache probably cooled too much before dripping. If it’s getting thick, warm it for 5-10 seconds in the microwave and stir well. Chocolate is temperamental – like that one friend who gets hangry if dinner is late.
Can I use canned frosting instead?
Can you also wear socks with sandals? Technically yes, but should you? If you must use canned frosting, whip it vigorously with a mixer first to improve the texture. But honestly, homemade buttercream is worth the extra few minutes.
My cake layers came out flat. What went wrong?
Check your baking soda’s expiration date. That stuff doesn’t last forever! Also, make sure you’re using hot coffee – the heat activates the baking soda for maximum fluffiness.
How do I get the perfect drip?
The secret is temperature – both your cake (cold) and your ganache (warm but not hot). Test a drip on the back of the cake first to gauge how far it will run. And remember, you can always add more, but you can’t take it back!
Do I really need gel food coloring?
Unless you want your frosting to have the consistency of soup, yes. Liquid coloring adds too much moisture. Gel coloring gives you vibrant color without changing the texture.
Final Thoughts
There you have it – a chocolate drip cake that’s equal parts delicious and show-stopping! The combination of rich chocolate cake, smooth frosting, dramatic drips, and those eye-catching blue decorations makes this dessert pure magic on a plate. The best part? Despite looking like you spent all day slaving away, it’s actually pretty straightforward (our little secret).
Remember, perfection is overrated – if your drips aren’t identical or your decorations look a little freestyle, that’s just your artistic signature! The flavor is what people will remember, and this cake delivers in spades. Plus, that moment when you slice in and reveal those perfect layers? Pure dopamine.
Now go forth and create your blue-accented chocolate masterpiece! Your social media feed (and everyone’s taste buds) will thank you. And if anyone asks for the recipe, feel free to be mysteriously vague about how “complicated” it was – baking goddess status: achieved!


