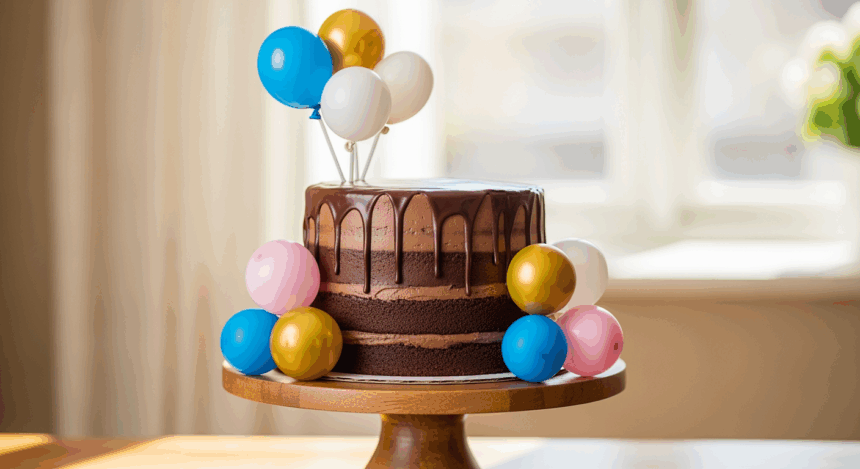
Ever stared at those fancy drip cakes on Instagram with their perfect chocolate cascades and colorful balloon decorations and thought, “Yeah, that’s definitely witchcraft”? Well, grab your wand (or whisk), because I’m about to spill all the magical secrets to creating a showstopper Chocolate Drip Cake with Balloons that’ll make your friends think you’ve been secretly attending Hogwarts School of Baking.
Why This Recipe is Awesome
Look, I’m not saying this cake will solve all your problems, but it definitely has superpowers. First, that chocolate drip effect? It’s ridiculously simple but looks like you spent hours perfecting it. Second, those candy balloons aren’t just adorable—they’re edible trophies of your kitchen prowess. And honestly, who doesn’t want to eat balloons without the risk of a helium voice afterward?
The best part? This recipe is surprisingly forgiving. Had a glass of wine (or three) while baking? No problem! The drip technique actually looks better with a little “artistic interpretation,” if you catch my drift.
Ingredients You’ll Need
For the cake:
- 2 boxes of cake mix (hey, I’m not judging—we’re making art here, not competing on a baking show)
- 6 eggs (the chicken kind, not dragon eggs)
- 1 cup vegetable oil
- 2 cups water
- 1 tablespoon vanilla extract (the real stuff, not that imitation nonsense)
For the frosting:
- 4 cups unsalted butter, softened (yes, FOUR cups—this isn’t diet food, people)
- 8 cups powdered sugar (again, we’re going full sugar coma here)
- 2 teaspoons vanilla extract
- 4-6 tablespoons heavy cream (because when have calories ever made a cake taste worse?)
- Food coloring of your choice (go wild or keep it classy—I’m not your boss)
For the chocolate drip:
- 1 cup chocolate chips (semi-sweet, dark, or milk—whatever makes your heart happy)
- 1/2 cup heavy cream
- 1 tablespoon corn syrup (for that glossy magazine finish)
For the balloon decorations:
- 12 small balloons (washed and dried—we’re not savages)
- 2 cups candy melts in various colors
- Sprinkles, edible glitter, or whatever sparkly edible things make you happy
Step-by-Step Instructions
- Bake your cake layers. Follow the box instructions but add the vanilla extract to the batter. Divide between three 8-inch pans and bake. Let’s be honest—box mix cakes are consistently delicious and I’ll fight anyone who cake-shames.
- Make your buttercream. Beat that butter until it’s fluffy enough to float away. Add powdered sugar gradually (unless you enjoy looking like a ghost). Mix in vanilla and cream until it’s smooth like your favorite pick-up line. Add food coloring if desired.
- Stack and frost that baby. Once cakes are completely cool (patience, grasshopper), level them if needed. Stack with buttercream between layers. Frost the outside with a thin crumb coat first, chill for 15 minutes, then add the final coat. Make it smoother than your ex’s excuses.
- Chill out. Put your frosted cake in the fridge for at least an hour. This is non-negotiable unless you want your drip to slide right off like it’s trying to escape.
- Make the chocolate drip. Heat cream until just simmering, pour over chocolate chips and corn syrup, let sit for 2 minutes, then whisk until smooth. Let cool until it’s thick but still pourable—about the consistency of warm honey. Too runny and you’ll have a chocolate waterfall situation.
- Apply the drip. Using a spoon or squeeze bottle, carefully add chocolate around the edge of the cake, letting it drip down naturally. Add a thin layer on top and smooth. Return to fridge for 15 minutes.
- Create balloon decorations. Inflate small balloons to desired size (keep them tiny—like golf ball size). Melt candy melts according to package directions. Dip balloons halfway into melted candy, let excess drip off, and place on parchment paper. Add sprinkles while still wet if using. Let harden completely.
- Carefully remove balloons. Once candy has set, gently pull the balloon away from the candy shell. If you hear popping, you’re doing it wrong (or having more fun than intended).
- Assemble your masterpiece. Arrange candy balloon shells on top of the cake. Add additional sprinkles or decorations if you’re feeling extra.
Common Mistakes to Avoid
Rushing the cooling process: Putting drip on a warm cake is like putting makeup on while running—disaster waiting to happen.
Making the chocolate drip too hot: Unless you’re going for the “melted frosting avalanche” look, let that ganache cool before application.
Overfilling balloons: These are decorative balloons, not actual party balloons. Bigger is NOT better here—unless you want your candy shells to look like failed space helmets.
Forgetting to wash balloons: They come from factories, people. Wash them unless you enjoy the taste of industrial rubber and questionable packaging dust.
Getting impatient with the candy shells: Pull those balloons out too soon and you’ll just have colorful puddles, not balloon shapes. Trust me on this one.
Alternatives & Substitutions
Cake flavors: Not into vanilla? Go chocolate, red velvet, or funfetti. Life’s too short for boring cake.
No corn syrup? Use honey or golden syrup for the drip. It’ll affect the taste slightly, but the shine will still be there.
Dairy-free option: Substitute coconut cream for heavy cream in both the frosting and ganache. Vegan butter works for the frosting too, though IMO the texture’s a bit different.
No candy melts? White chocolate with food coloring works too. Just don’t use regular chocolate for the balloons—it’s too brittle and will crack faster than my motivation during a workout.
Semi-homemade version: Store-bought frosting can work in a pinch. Doctor it up with a bit of extra powdered sugar to stiffen it. I won’t tell anyone if you don’t.
FAQ (Frequently Asked Questions)
How far in advance can I make this cake?
The completed cake will stay fresh for 2-3 days in the fridge. But let’s be real—who has the willpower to not eat this immediately?
Can I use chocolate bars instead of chips for the drip?
Absolutely! Just chop them finely so they melt evenly. Fancy chocolate will give you a fancier taste, but chips are perfectly fine for us regular humans.
What if my balloons pop while making the candy shells?
First, change your underwear. Then, clean up and start again. Maybe inflate them a bit less next time—we’re not trying to send them to space.
How do I transport this masterpiece?
Very carefully, my friend. Very carefully. Cake box and a flat surface in your car. And maybe drive like there’s an open bowl of soup on your passenger seat.
Can I make the balloon decorations a day ahead?
Yes! Store them in a cool, dry place in a single layer. Don’t put them in the fridge or they might get condensation and turn sad and sticky.
Why did my drip harden before I finished the cake?
Your chocolate probably cooled too much. Gently reheat it by placing the bowl over warm water and stirring—but don’t microwave it or you’ll be back at square one with runny chocolate.
Final Thoughts
There you have it—a cake that looks like it should come with its own Instagram filter but is actually doable for us mere baking mortals. The combination of that glossy chocolate drip with the whimsical balloon decorations is guaranteed to make people think you’ve been secretly training with pastry chefs in your spare time.
Remember, even if your drips aren’t perfectly spaced or your balloon shells look more abstract than round, it’s still going to taste amazing. And really, isn’t that what matters? (That, and the photos you’ll take before anyone cuts into it.)
Now go forth and create that showstopper! Your social media feed—and your taste buds—will thank you. Just be prepared for everyone to ask you to make their birthday cake from now until eternity.
