
Alright, so your child’s birthday is coming up, and you’ve decided to be that Pinterest-worthy parent who makes a fancy cake instead of grabbing one from the grocery store. Brave move! Don’t worry—this Chocolate Drip Birthday Cake with Balloon topper is actually doable, even if your baking skills usually extend to not burning toast. Plus, it looks way more impressive than the effort required. Win-win!
Why This Recipe is Awesome
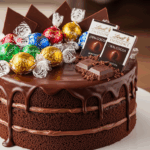
Let’s be real—this cake is basically your ticket to the Parent Hall of Fame (or just major Instagram likes). It features that trendy chocolate drip effect that makes everyone go “oooh” and a balloon decoration that says “I tried really hard” without you actually having to try that hard. The best part? The drip technique is basically foolproof. If it looks messy, just call it “rustic” or “artistic expression.” Nobody will question you.
Plus, it’s a chocolate cake. Show me someone who doesn’t like chocolate cake, and I’ll show you someone who’s lying.
Ingredients You’ll Need
For the Cake:
- 2 boxes of chocolate cake mix (yes, from a box—we’re making memories, not auditioning for Bake Off)
- 6 eggs (room temperature if you remember, straight from the fridge if you’re like the rest of us)
- 1 cup vegetable oil
- 2 cups water (tap water is fine, no need to get fancy with bottled)
- 1/2 cup sour cream (the secret weapon that makes box mix taste homemade)
For the Frosting:
- 4 sticks unsalted butter (that’s right, the whole darn pound)
- 8 cups powdered sugar (your kitchen will look like a winter wonderland)
- 1/4 cup heavy cream
- 2 tsp vanilla extract (the real stuff, not that imitation nonsense)
- Pinch of salt (to cut the sweetness so your teeth don’t immediately fall out)
- Food coloring of choice (go wild or keep it classy, your call)
For the Chocolate Drip:
- 1 cup chocolate chips (semi-sweet, dark, or milk—choose your fighter)
- 1/2 cup heavy cream
For the Balloon Topper:
- Small balloons (those tiny water balloon ones work perfectly)
- Wooden skewers or lollipop sticks
- String or ribbon
- Optional: sprinkles, because more is more
Step-by-Step Instructions
- Prep your battle station. Preheat oven to 350°F. Grease and line two 8-inch cake pans. If you’re feeling ambitious, use three pans for a taller cake (and more impressive photos).
- Mix the cake batter. Dump cake mixes, eggs, oil, water, and sour cream into a large bowl. Beat until smooth, about 2 minutes. Don’t overmix unless you’re going for that dense, rubbery texture (you’re not).
- Bake the cakes. Divide batter between pans and bake for 25-30 minutes or until a toothpick comes out clean. Cool in pans for 10 minutes, then remove and cool completely on a rack. Seriously, wait until they’re completely cool or your frosting will slide off like a kid on a water slide.
- Make the frosting. Beat butter until fluffy (about 3-4 minutes). Gradually add powdered sugar, cream, vanilla, and salt. Beat until you could float away on a cloud of buttercream. Add food coloring if desired.
- Level and stack the cakes. Slice off the domes if your cakes have them. Place first layer on cake board, add frosting, stack next layer. Repeat if you made three layers.
- Crumb coat and chill. Apply a thin layer of frosting all over the cake. This catches the crumbs. Refrigerate for 30 minutes or until firm.
- Frost for real. Apply a thicker layer of frosting, smoothing the sides and top as best you can. A bench scraper works wonders here, but a knife will do. Refrigerate again for at least 30 minutes.
- Make the chocolate drip. Heat heavy cream until just simmering. Pour over chocolate chips and let sit for 2 minutes. Stir until smooth. Let cool slightly until it’s thick but still pourable.
- Apply the drip. Using a spoon or squeeze bottle, apply the chocolate around the edge of the cake, allowing it to drip down. Fill in the top with remaining chocolate.
- Create balloon toppers. Inflate small balloons, tie them, and attach to skewers with string. Arrange artfully on top of the cake just before serving.
- Add final touches. Sprinkle additional decorations, write a message, or just stand back and admire your handiwork.
Common Mistakes to Avoid
The “I’m in a hurry” syndrome – Frosting a warm cake is like trying to put makeup on while running—it doesn’t work. Give yourself enough time or embrace the melty look.
Balloon disasters – Don’t inflate the balloons too early or they might deflate and look sad. Also, don’t use giant balloons unless you want your cake to disappear underneath them.
The chocolate avalanche – If your chocolate drip is too warm, you’ll end up with puddles, not drips. Too cool and it won’t drip at all. Test a small section first.
Overthinking it – Remember, this is a birthday cake, not a wedding at the royal palace. Kids will be impressed by the balloons alone, and adults will be impressed you made anything at all.
Alternatives & Substitutions
Cake flavor options: Not into chocolate? Use vanilla, funfetti, or red velvet cake mix instead. The drip technique works with any base.
Frosting variations: Cream cheese frosting works beautifully here if you prefer something less sweet. Or go with chocolate frosting for maximum chocolate overload (no judgment).
Drip options: White chocolate colored with gel food coloring makes for a fun alternative. You can also use caramel for a more sophisticated vibe.
No balloons? Use paper straws with flags, fresh flowers (make sure they’re non-toxic), or a store-bought cake topper. Let’s be real, the drip is the star anyway.
FYI, if you’re making this for a super fancy occasion, you can sub the cake mix for scratch-made, but TBH, with good frosting, nobody will know the difference.
FAQ (Frequently Asked Questions)
How far in advance can I make this cake?
You can bake the cake layers up to three days ahead and freeze them wrapped in plastic wrap. The assembled cake (minus balloons) will stay fresh in the fridge for 2-3 days. Add the balloons right before serving or they’ll give up on life.
My drips are running all the way down! What happened?
Your ganache was too warm or your cake wasn’t cold enough. Pop the whole thing in the freezer for 5 minutes, then try again with cooler chocolate.
Can I use canned frosting instead?
Can you also wear socks with sandals? Technically yes, but should you? If you must, at least whip it with a mixer first to make it fluffier and more spreadable.
What if I don’t have cake pans?
Are you baking a cake without cake pans? I admire your optimism! Disposable aluminum pans work in a pinch, or you can make cupcakes instead and arrange them in a cake shape.
My cake looks like it was decorated by a toddler. Help?
Add more sprinkles and tell everyone your kid helped. Instant charm factor. Alternatively, dim the lights during the big reveal.
Are the balloons food-safe?
Regular balloons aren’t meant to be eaten (shocking, I know), so make sure they don’t touch the cake directly. Place them on skewers or straws that can be easily removed before serving.
Final Thoughts
Look at you, making a fancy drip cake with balloon toppers like some kind of domestic wizard! Even if your creation doesn’t look exactly like the Pinterest version (whose does?), you’ve still created something special that required more effort than clicking “add to cart.” The birthday person will feel the love, the guests will be impressed, and you can ride that baking high for at least a week.
Remember, at the end of the day, it’s sugar, butter, and chocolate—it’s going to taste good no matter what. And if all else fails, just serve it in the dark while singing Happy Birthday really loudly. Works every time.
