So, you’re staring into the fridge, dreaming of something ridiculously delicious but can’t be bothered with anything that involves, like, *actual effort*? And maybe you’ve got a secret stash of Oreos begging for a higher purpose? My friend, you’ve come to the right place. We’re about to make magic happen with a Chocolate Dirt Cake that’s so easy, it practically makes itself. Seriously, if you can open a package, you can nail this. Let’s get dirty!
Why This Recipe is Awesome
Okay, let’s be real. In a world full of complicated soufflés and fussy pastries, sometimes you just need a dessert that delivers maximum deliciousness with minimum fuss. This Chocolate Dirt Cake is that hero. It’s **no-bake**, meaning your oven gets a much-deserved vacation. It’s gloriously rich, perfectly creamy, and chocolatey AF. Plus, it looks super cool and rustic (hence “dirt”), so you can totally pretend you’re a gourmet gardener. It’s also dangerously addictive, incredibly forgiving, and, **bonus points**, it’s pretty much impossible to mess up. Even *I* haven’t managed to ruin it yet, and that’s saying something.
Ingredients You’ll Need
Gather ’round, my fellow lazy gourmets! Here’s what you’ll need to make this glorious mess:
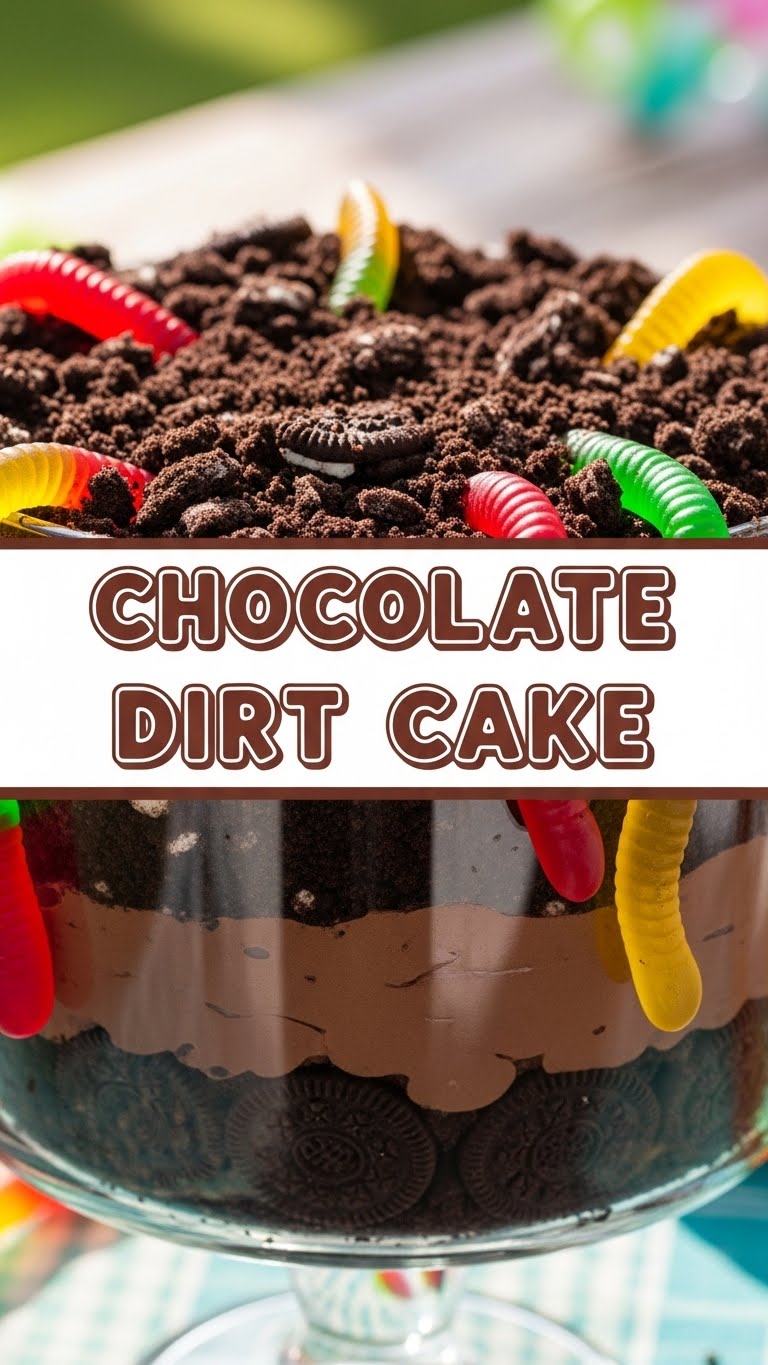
- **1 (14.3 oz) package OREO Cookies:** The original, the best. Don’t cheap out. These are your “dirt.”
- **1 (8 oz) package Cream Cheese:** Softened. Take it out of the fridge, like, an hour before. Don’t be that person who tries to microwave it.
- **1/2 cup (1 stick) Unsalted Butter:** Softened, same deal as the cream cheese. Because butter makes everything better.
- **1 cup Powdered Sugar (Confectioners’ Sugar):** For that melt-in-your-mouth sweetness. Sift it if you’re feeling fancy, but I usually don’t bother. YOLO.
- **2 (3.4 oz) packages Instant Chocolate Pudding Mix:** Make sure it’s *instant*. We’re not cooking anything here, remember?
- **3 1/2 cups Cold Milk:** Any kind you like, but whole milk makes it extra creamy and decadent.
- **1 (12 oz) container Whipped Topping:** Thawed. Cool Whip, whatever. It’s a key player in the creamy dream team.
- **Optional Garnish:** Gummy worms or flowers for that authentic “garden” vibe. Or just more crushed Oreos. No judgment.
Step-by-Step Instructions
Alright, apron on (or not, who cares?), let’s get down to business!
- **Get Crushing:** Grab your Oreos. The whole package. Either put them in a food processor and pulse until they’re fine crumbs, or, if you’re feeling feisty, put them in a Ziploc bag and smash ’em with a rolling pin. **You want actual crumbs, not big chunks!** Set aside about a cup for topping later.
- **Creamy Dream Base:** In a large bowl, beat the softened cream cheese and butter together with an electric mixer until it’s super smooth and fluffy. Add the powdered sugar and beat again until combined. This is your luscious base.
- **Pudding Perfection:** In a separate medium bowl, whisk together the instant chocolate pudding mixes and cold milk for about 2 minutes, or until it starts to thicken. Don’t overmix!
- **Fold It In:** Gently fold the thawed whipped topping into the pudding mixture until it’s all combined. Then, carefully fold *that* mixture into your cream cheese mixture. You should have one big, glorious bowl of chocolatey, creamy goodness.
- **Layer Up!** Find a cute trifle bowl, a 9×13 inch baking dish, or individual serving cups. Start with a layer of your crushed Oreo “dirt” at the bottom. Then, dollop half of your creamy chocolate mixture over the crumbs and spread it gently. Add another layer of “dirt,” then the rest of your creamy mixture. Finish with a generous final layer of the remaining Oreo crumbs.
- **Chill Out:** Cover your masterpiece and pop it in the fridge for at least 4 hours. **Overnight is even better!** This gives everything time to set and for the flavors to really get acquainted.
- **Garnish & Devour:** Before serving, scatter those gummy worms or whatever cute little garden adornments you desire on top. Then, dig in!
Common Mistakes to Avoid
Listen, this recipe is practically foolproof, but even the best of us can stumble. Here’s how not to be *that* person:
- **Not Softening Your Butter/Cream Cheese:** Trying to beat cold, hard ingredients is like trying to reason with a toddler – messy and ultimately fruitless. **Seriously, take them out ahead of time!**
- **Using Cook-and-Serve Pudding:** Read the package, people! We’re instant gratification chefs here. Cook-and-serve requires, well, cooking, and that’s not our vibe today.
- **Skimping on Chill Time:** I know, the wait is agonizing. But pulling it out too early means a runny, sad dirt cake. **Patience, young grasshopper!** Your future self will thank you.
- **Not Crushing Oreos Enough:** Big chunks of Oreos are fine if you like a really chunky texture, but for that authentic “dirt” feel, you want fine crumbs. Otherwise, it’s more like “rock garden cake,” and that’s just not the same.
Alternatives & Substitutions
Feeling adventurous? Or just realized you’re missing an ingredient? No worries, we’ve got options:
- **Cookie Chaos:** Don’t have Oreos? Graham crackers, Nilla Wafers, or even chocolate chip cookies (crushed, obvi) can work in a pinch. The flavor profile will change, but it’ll still be delicious.
- **Pudding Power-Up:** Swap chocolate pudding for vanilla, white chocolate, or even a delightful peanut butter instant pudding for a different twist. **FYI, vanilla pudding with chocolate Oreos is also amazing!**
- **Dairy-Free Delight:** Use dairy-free cream cheese, butter alternatives, almond milk, and a dairy-free whipped topping. Most instant pudding mixes are already dairy-free, but always double-check the label!
- **Whipped Topping Woes?** You *can* make your own whipped cream (heavy cream + powdered sugar), but **IMO**, for ease and stability, the pre-made stuff is king here.
- **Adult Version:** Add a splash of Kahlua or a coffee liqueur to the pudding mixture for a boozy kick. You’re welcome.
FAQ (Frequently Asked Questions)
- **”Can I make this ahead of time?”** Oh, absolutely! This cake actually tastes *better* the next day, once all those delicious flavors have had time to mingle. Make it up to 2-3 days in advance.
- **”How long does it last in the fridge?”** Covered properly, your dirt cake will stay fresh and fabulous for about 3-5 days. If it lasts that long, that is.
- **”What if I don’t have a food processor for the Oreos?”** No worries! A sturdy Ziploc bag and a rolling pin (or a heavy can, or your fist – hey, whatever works!) will do the trick. Just make sure to get those crumbs fine.
- **”Can I use regular pudding mix instead of instant?”** Well, technically yes, but why add an extra cooking step to a glorious no-bake recipe? Stick with instant, my friend. It’s called “instant” for a reason!
- **”Do I *have* to use gummy worms? They kinda freak me out.”** Nope! They’re purely for fun. You can use sprinkles, chocolate shavings, fresh berries, or just embrace the simple beauty of a purely “dirt” topping.
- **”My dirt cake is a bit runny, what happened?”** Most likely, it didn’t chill long enough, or your pudding wasn’t fully set before mixing. Make sure your pudding is thick before folding in the whipped topping, and **always give it ample fridge time.**
Final Thoughts
There you have it! Your ticket to dessert heaven, no baking degree required. This Chocolate Dirt Cake is proof that sometimes, the simplest things are the most satisfying. It’s perfect for parties, potlucks, or just a Tuesday night when you need a serious chocolate fix. So go forth, conquer your kitchen (without breaking a sweat!), and enjoy this ridiculously easy, incredibly delicious treat. Now go impress someone—or yourself—with your new culinary skills. You’ve earned it!


