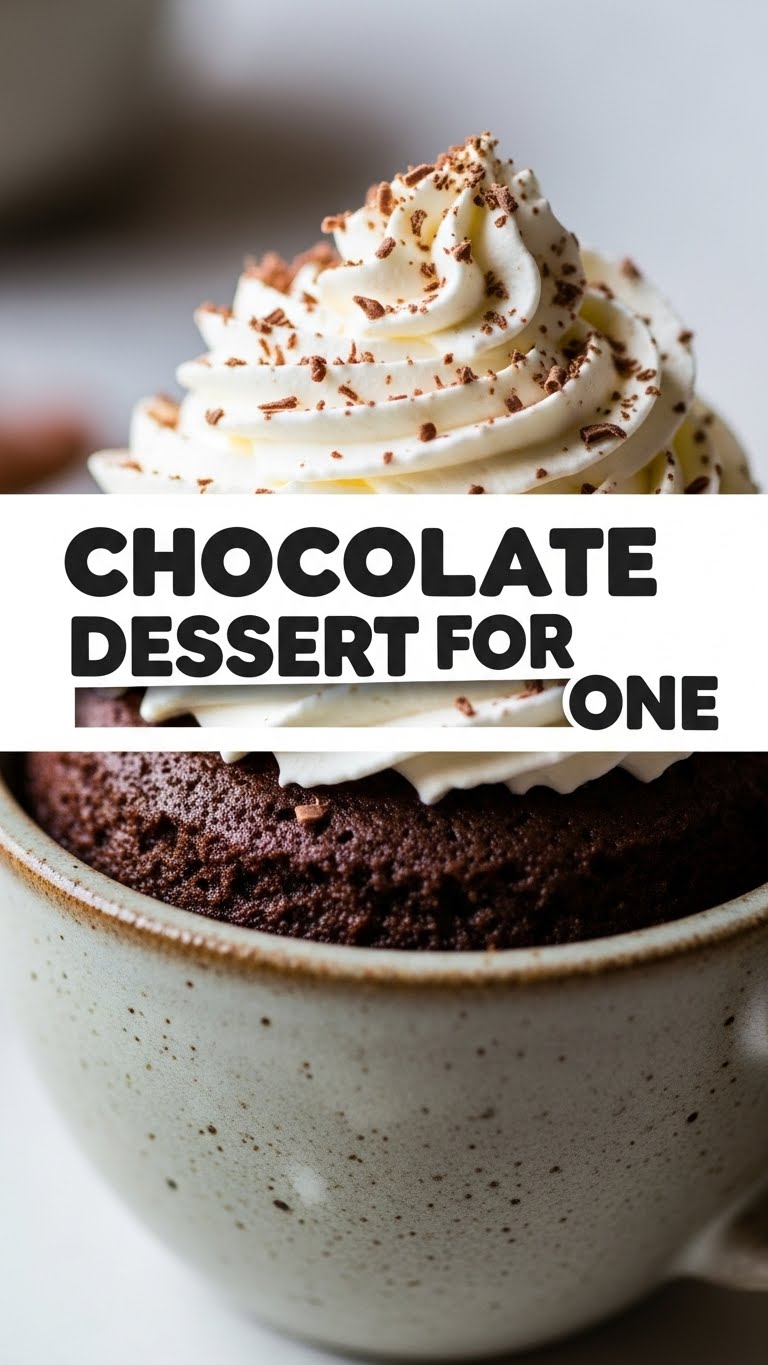
So, you’ve scrolled through enough TikToks to realize a sudden, undeniable truth: a chocolate craving has hit you like a rogue shopping cart in a crowded aisle. But, let’s be real, baking a whole darn cake just for your glorious self? Who has the energy for that kind of commitment? Not me, friend. And probably not you either. This, my culinary comrades, is where our magic single-serve chocolate dessert comes in. Get ready to have your taste buds serenaded by pure chocolatey bliss, with minimal effort and even less clean-up. You’re welcome.
Why This Recipe is Awesome
Because let’s be honest, sometimes you just want dessert *now*, without the drama. This isn’t some fancy-pants patisserie creation, it’s a warm, gooey hug in a mug (or ramekin, if you’re feeling classy). It’s **super speedy**, cooks in a flash, and uses ingredients you probably already have lurking in your pantry. Plus, and this is the important part: it’s perfectly portioned for one. No awkward leftovers staring at you from the fridge, judging your life choices. It’s practically idiot-proof, even I’ve managed not to mess this one up. And trust me, I’ve had some kitchen ‘adventures’.
Ingredients You’ll Need
Gather ’round, my little chef-in-training! Here’s your hit list of essentials. No weird, unpronounceable stuff here.
- 2 tablespoons all-purpose flour: Just a tiny bit, to hold everything together. Don’t overthink it.
- 2 tablespoons granulated sugar: For that sweet, sweet goodness. Feel free to adjust if you like things extra sweet, or a little less so. I’m not the sugar police.
- 1 tablespoon unsweetened cocoa powder: The good stuff! This is where our chocolate magic happens.
- 1/4 teaspoon baking powder: Our secret weapon for a little lift, so it’s not a dense chocolate brick.
- Pinch of salt: Don’t skip this! It seriously makes the chocolate flavor *pop*. Trust me on this one.
- 2 tablespoons milk: Any kind! Dairy, almond, oat, soy – whatever’s in your fridge.
- 1 tablespoon neutral oil (like vegetable or canola) or melted butter: For moisture and richness. Olive oil works in a pinch, but maybe not your fancy extra virgin stuff, unless you want a fruity chocolate dessert… which, no.
- 1/4 teaspoon vanilla extract: Adds that little extra “oomph” to the flavor.
- 1 tablespoon chocolate chips (optional, but highly recommended): Because more chocolate is always the answer, IMO.
Step-by-Step Instructions
Right, apron on (or not, we’re not judging), let’s get this party started!
- Grab your favorite microwave-safe mug or a small ramekin. Make sure it’s big enough to hold everything, plus a little room for puffing up.
- Toss in all the dry ingredients: flour, sugar, cocoa powder, baking powder, and that crucial pinch of salt. **Give them a good whisk** with a fork until they’re all friendly and combined. No lumpy bits!
- Now, pour in the wet stuff: milk, oil (or melted butter), and vanilla extract.
- Stir, stir, stir! Mix everything with your fork until just combined. You want to get rid of any dry streaks, but **don’t overmix**! A few small lumps are totally fine. Overmixing makes tough cake, and we’re aiming for tender.
- If you’re using chocolate chips, now’s the time to fold them in. Nestle them down into the batter like tiny chocolate treasures.
- Pop your mug/ramekin into the microwave. Cook on high for about **60-90 seconds**. The exact time will depend on your microwave’s wattage, so start with 60 and add 10-second bursts if it’s still looking super gooey in the center. It should be mostly set, but still soft.
- Carefully remove your masterpiece from the microwave. It’ll be hot! Let it cool for a minute (if you can resist) before diving in. Top with ice cream, whipped cream, or just a spoon. You do you.
Common Mistakes to Avoid
Even though this recipe is basically foolproof, there are a couple of rookie errors to watch out for. Learn from my past blunders, folks!
- Overmixing the Batter: I mentioned it, but it bears repeating! Stir until just combined. Going wild with that fork will develop the gluten too much, giving you a dense, chewy cake instead of a light, tender one. We want fluffy, not rubbery!
- Overcooking: This is the biggest culprit for a dry, sad cake. Microwaves vary wildly, so always start with the lower end of the time range (60 seconds) and check. It’s better to undercook slightly and pop it back in for a few more seconds than to end up with a hockey puck. The center can still be a *little* moist.
- Using a Tiny Mug: Seriously, your batter needs room to grow! If your mug is too small, you’ll end up with a chocolatey volcano overflowing in your microwave. Messy, and a waste of precious dessert.
Alternatives & Substitutions
Feeling adventurous or just missing an ingredient? No stress! This recipe is super forgiving.
- No neutral oil? Melted butter works beautifully and adds a richer flavor. You can also use a ripe mashed banana or unsweetened applesauce for a slightly healthier (and less rich) version, though the texture will be a bit different.
- No milk? Water can work in a pinch, though it won’t be as rich. Coffee is also an amazing substitute and really enhances the chocolate flavor! Who knew?
- Want extra flair? Add a tiny pinch of espresso powder (it won’t make it taste like coffee, just boost the chocolate!), a sprinkle of cinnamon, or even a few chopped nuts for some crunch. Mini marshmallows are also a fun addition towards the end of cooking!
- Don’t have chocolate chips? A spoonful of Nutella swirled into the batter or a square of your favorite chocolate bar pressed into the middle before microwaving will melt into a glorious lava-like center. *Chef’s kiss!*
FAQ (Frequently Asked Questions)
Got questions? I’ve got (casual) answers!
- Can I bake this in a conventional oven instead of a microwave? You totally can! Preheat your oven to 350°F (175°C). Pour the batter into an oven-safe ramekin and bake for 12-15 minutes, or until a toothpick inserted comes out with moist crumbs.
- My cake is dry! What went wrong? Probably overcooked, sweet pea. Next time, cook for less time. Every microwave is a beast of its own, so learn yours!
- Can I make this vegan? Absolutely! Just use your favorite plant-based milk (almond, oat, soy) and a neutral oil. Ensure your chocolate chips are dairy-free too, FYI.
- How long can I store this? Store? What even is that word in the context of single-serve chocolate dessert? In theory, sealed at room temperature for a day, but let’s be real, it won’t last that long.
- Can I add toppings? Oh honey, yes! A scoop of vanilla ice cream, a dollop of whipped cream, a sprinkle of sea salt, fresh berries, or even a drizzle of chocolate sauce. Go wild!
- What if I don’t have vanilla extract? It’s not the end of the world, but it does add depth. Skip it if you must, but your cake will thank you for including it next time.
Final Thoughts
There you have it, folks! Your very own, incredibly easy, dangerously delicious chocolate dessert for one. You’ve conquered the craving, avoided a mountain of dishes, and probably didn’t even break a sweat. Now go impress someone—or more realistically, just yourself—with your new culinary prowess. You’ve earned every single glorious bite. Enjoy!


