So, you’ve baked a glorious cake, patted yourself on the back, and then realized… it looks a little… naked? Like it just rolled out of bed and forgot its pants? Same, friend, same. Don’t worry, we’re not about to suggest anything that requires a culinary degree or a tiny paintbrush. We’re going for maximum visual impact with minimum effort – because life’s too short for boring cakes (and complicated recipes!).
Why This Recipe is Awesome
Because it’s practically magic! You take humble chocolate, melt it, do a few simple things, and *poof* – you’re a cake decorating wizard. This isn’t just easy; it’s **idiot-proof**. Seriously, if I can do it without setting off the smoke alarm or accidentally gluing my fingers together, you definitely can. Plus, it makes any cake look instantly fancier, even if it’s just a boxed mix (no judgment here!). It’s also super versatile, meaning you can unleash your inner artist without needing actual artistic skills. Win-win!
Ingredients You’ll Need
- **Good Quality Chocolate:** About 200g (7oz). What’s “good quality”? Anything you actually enjoy eating! Dark, milk, semi-sweet, white chocolate – your call. **Chocolate chips work too, but bars melt smoother.**
- **A Tiny Bit of Neutral Oil (Optional but recommended):** Like coconut oil (refined, so it doesn’t taste like a piña colada), vegetable oil, or a touch of butter. About 1 teaspoon per 100g of chocolate. This helps it melt super smoothly and gives it a nice shine.
- **Parchment Paper or Wax Paper:** Essential for not making a giant sticky mess.
- **A Baking Sheet or Flat Surface:** To chill your chocolate creations.
Step-by-Step Instructions
- **Melt That Chocolate, Baby!** Break your chocolate into small pieces. You can do this two ways:
- **Microwave Method (Fastest, but proceed with caution!):** Place chocolate in a microwave-safe bowl. Heat in 30-second intervals, stirring well after each. **Stir, stir, stir!** Chocolate holds its shape even when melted, so don’t be fooled. Add your tiny bit of oil/butter with the last heating interval.
- **Double Boiler Method (Fancy & Foolproof):** Place chocolate in a heat-safe bowl over a pot of simmering water (make sure the bowl doesn’t touch the water). Stir gently until smooth and fully melted. Add oil/butter.
**Key Tip:** Don’t overheat it! Scorched chocolate is a sad, lumpy situation.
- **Get Your Canvas Ready:** Lay out a sheet of parchment paper on your baking sheet or counter.
- **Unleash Your Inner Picasso (or not):**
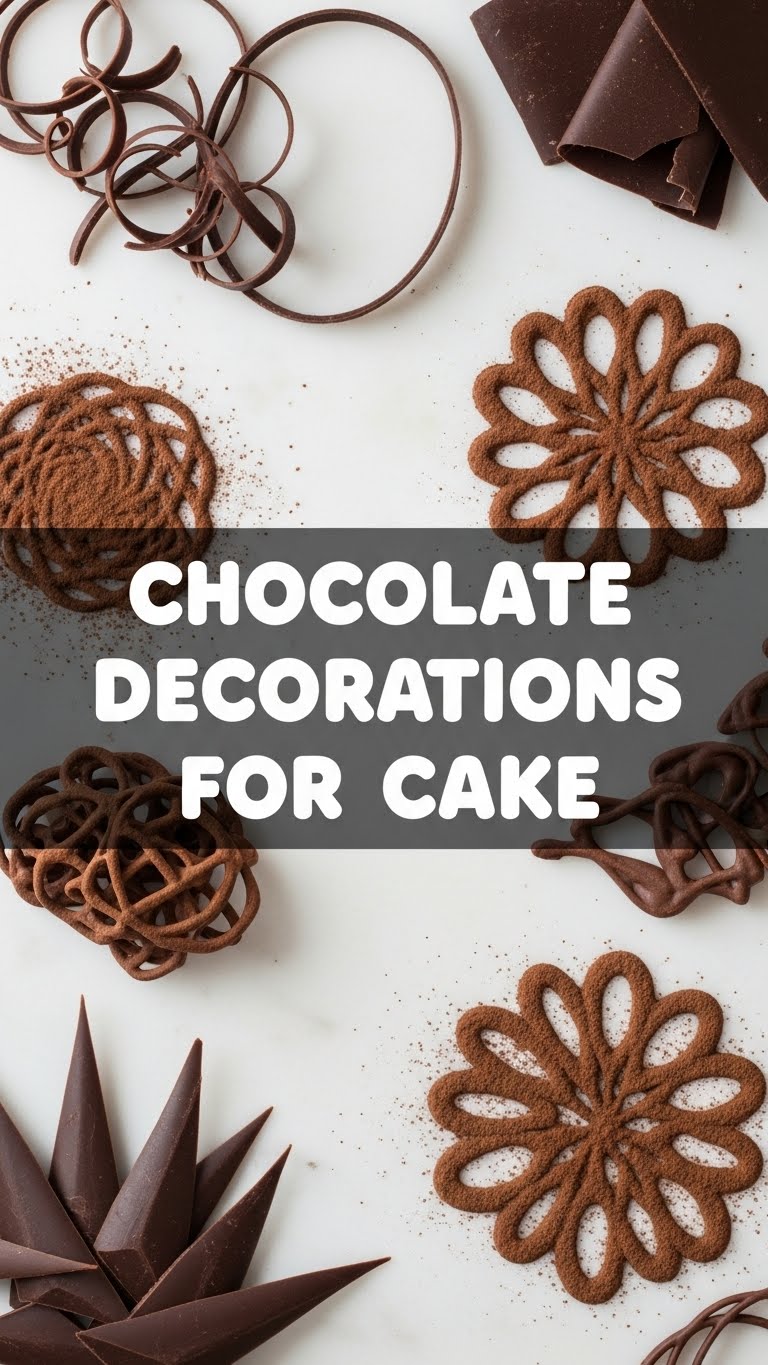
- **For Shavings/Curls:** Spread a thin layer of melted chocolate evenly onto the parchment. Let it sit at room temperature for about 5-10 minutes, or until it’s *just* set but still flexible. Then, use a metal spatula or knife to scrape it across the surface, creating beautiful curls or shavings.
- **For Shapes/Shards:** Pour the melted chocolate onto the parchment and spread it out to your desired thickness (thinner for delicate shards, thicker for more robust pieces). You can swirl it, drizzle other colors on top, or even sprinkle on some nuts/sprinkles.
- **For Drizzles/Piping:** Pour some melted chocolate into a piping bag, a Ziploc bag with a corner snipped off, or just use a spoon. Drizzle patterns directly onto the parchment. Think zig-zags, loops, or simple lines.
- **Chill Out:** Once you’ve created your masterpieces, pop the baking sheet into the fridge for 10-15 minutes, or until the chocolate is firm and snaps easily.
- **Break & Decorate!** Once chilled, gently peel the chocolate off the parchment. If you made a slab, just break it into shards. Arrange your chocolatey delights on your cake however your heart desires!
Common Mistakes to Avoid
- **Overheating the Chocolate:** This is the #1 culprit for seized, grainy, unusable chocolate. **Low and slow is the way to go.** If microwaving, stir often!
- **Getting Water in Your Chocolate:** Even a single drop can make your chocolate seize and become a clumpy mess. Make sure your bowls and spatulas are completely dry, and if using the double boiler method, ensure no steam gets into the chocolate.
- **Impatience:** Trying to scrape curls too early will result in sticky smears. Waiting too long will make it crack instead of curl. **The “just set but still flexible” stage is crucial.** You’ll get a feel for it!
- **Touching Too Much:** Melted chocolate is hot. Cooled chocolate melts from the heat of your hands. Try to handle your finished decorations as little as possible.
Alternatives & Substitutions
- **Different Chocolate, Different Vibe:** Dark chocolate gives a sophisticated, slightly bitter edge. Milk chocolate is classic and sweet. White chocolate is super versatile for coloring (food coloring, FYI, not water-based!) or adding a creamy contrast. **Mix ’em up for a marbled effect!**
- **Flavored Extracts:** Add a tiny drop of mint, orange, or almond extract to your melted chocolate for an extra flavour dimension.
- **Sprinkles & Crunch:** Before chilling, sprinkle your chocolate with sea salt, chopped nuts, sprinkles, dried fruit pieces, or even crushed candy canes for extra texture and visual appeal.
- **Cookie Cutters:** Want perfectly shaped chocolate pieces? Pour your melted chocolate onto parchment, spread thinly, let it cool *slightly* (so it’s firm but not hard), then use mini cookie cutters to cut out shapes before chilling completely.
FAQ (Frequently Asked Questions)
Can I use chocolate chips instead of a bar? Well, technically yes, but why make things harder on yourself? Chocolate chips often have stabilizers that make them melt a bit thicker and sometimes less smoothly than good quality baking bars. They’ll work, but bars are generally better for this particular purpose.
My chocolate seized! What did I do wrong? Ah, the dreaded seize! This usually happens if you overheated it or, more commonly, got even a tiny drop of water in it. Sadly, once it’s seized, it’s pretty hard to bring back. Your best bet is to start fresh. Sorry, pal!
How long do these decorations last? If stored in an airtight container at room temperature (or in the fridge if your house is a furnace), they can last for a couple of weeks! Just make sure they’re not touching anything that will make them melt or get sticky.
Can I color white chocolate? Absolutely! But here’s the kicker: **use oil-based food coloring**, not water-based gel or liquid food coloring. Water-based coloring will make your white chocolate seize faster than you can say “oops.”
What if I don’t have parchment paper? Wax paper can work in a pinch, but it’s a bit stickier and might require a bit more chilling time. Aluminum foil, even greased, is generally a no-go as the chocolate tends to stick like glue.
Can I re-melt any leftover chocolate? You bet! As long as it hasn’t been overheated or had water in it, you can totally re-melt your scraps and use them for another round of decorating. Reduce waste, baby!
Final Thoughts
See? That wasn’t scary at all, was it? You’ve just unlocked a whole new level of cake-decorating prowess, all without breaking a sweat or needing to buy expensive equipment. Now go impress someone – or just yourself – with your new culinary skills. You’ve earned those extra chocolate shards. Maybe eat one or two while you’re decorating. You know, for quality control. 😉


