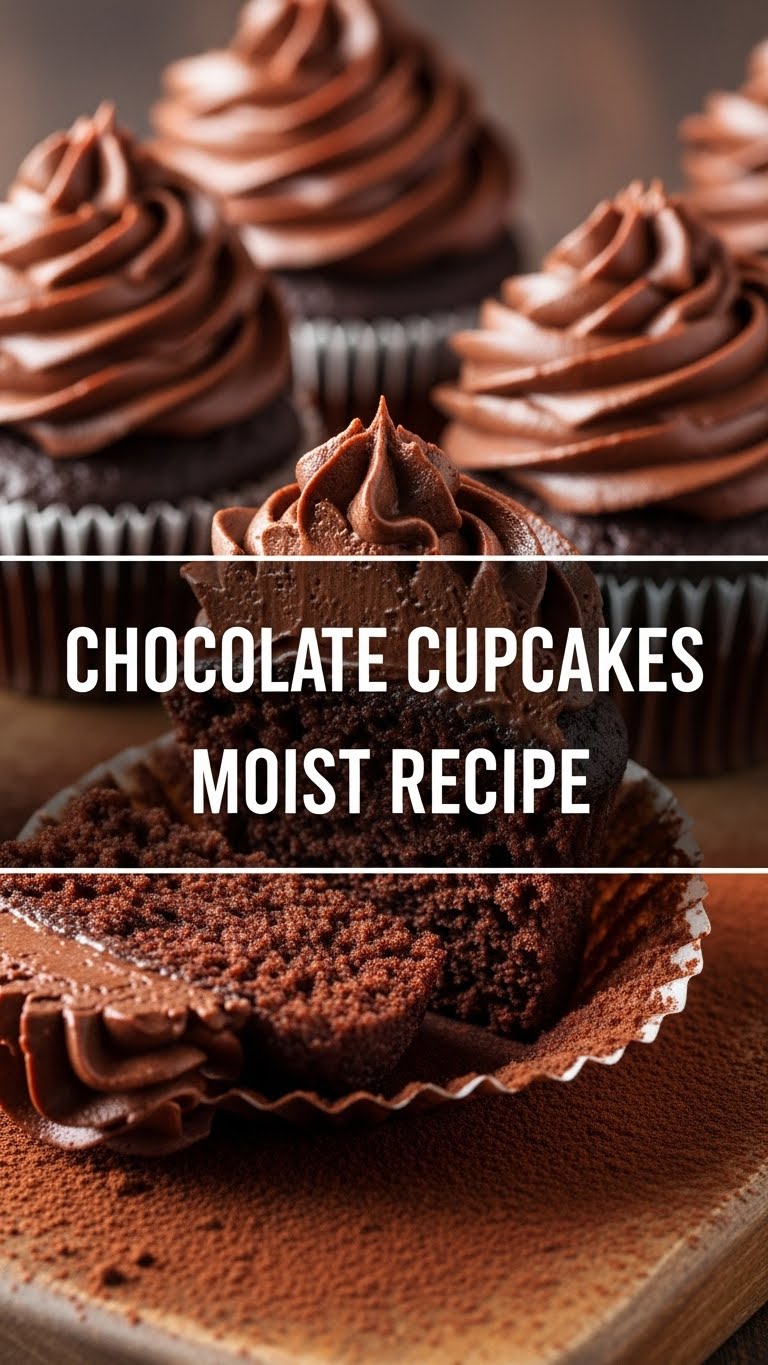
So you’re craving something ridiculously tasty but too lazy to spend forever slaving away in the kitchen, huh? Same, friend, *same*. We’ve all been there, staring into the fridge, wondering if a cheese stick counts as dessert (it doesn’t). But what if I told you there’s a way to get your chocolate fix in the form of unbelievably moist cupcakes without breaking a sweat? Yeah, you heard right. Ditch those sad, dry excuses for baked goods. We’re diving headfirst into a chocolate cupcake recipe so good, it should come with a warning label.
Why This Recipe is Awesome
Alright, let’s get real. This isn’t just *another* chocolate cupcake recipe. This is THE chocolate cupcake recipe for people who appreciate deliciousness but also value their precious couch time. Why is it awesome, you ask? Well, for starters, it’s practically **idiot-proof**. Seriously, even I, a person known to burn toast, didn’t mess this up. It’s quick, it uses simple ingredients you probably already have lurking in your pantry, and the result? Oh, the result is a cupcake so moist and chocolaty, it practically melts in your mouth. Forget dry, crumbly disasters. We’re talking pure, unadulterated, moist chocolate bliss. Plus, it comes together in one bowl (mostly), which means less dishes. You’re welcome.
Ingredients You’ll Need
Gather your squad! Here’s what you’ll need to create these little pockets of joy:
- 1 ½ cups all-purpose flour: The backbone of our operation. Don’t overthink it.
- 1 ½ cups granulated sugar: For that sweet, sweet goodness.
- ¾ cup unsweetened cocoa powder: Go for a good quality one. Life’s too short for sad chocolate. Dutch-processed is my fave for deep flavor.
- 1 ½ teaspoons baking soda: Our magical leavening agent.
- ¾ teaspoon baking powder: More magic, because we want fluffy, not flat.
- 1 teaspoon salt: Balances everything out and makes the chocolate sing!
- 2 large eggs: Room temperature, please! It helps with emulsification. Science, baby!
- ¾ cup buttermilk: Or regular milk with a splash of vinegar/lemon juice to sour it. Adds tenderness.
- ¼ cup vegetable oil: Our secret weapon for *maximum moistness*. Trust me on this.
- 1 teaspoon vanilla extract: Don’t skip this, it makes everything better.
- ¾ cup hot water or hot coffee: This is where the magic happens for that intense chocolate flavor. Coffee enhances chocolate, FYI.
Step-by-Step Instructions
Ready to bake? Let’s get this party started!
Preheat & Prep: Preheat your oven to 350°F (175°C). Line a 12-cup muffin tin with paper liners. Don’t skip the liners unless you enjoy scraping baked goods off metal. Rookie mistake, my friend.
Combine Dry Ingredients: In a large bowl, whisk together the flour, sugar, cocoa powder, baking soda, baking powder, and salt. Make sure there are no lumps of cocoa powder giving you attitude.
Add Wet Ingredients (Mostly): To your dry mixture, add the room temperature eggs, buttermilk, vegetable oil, and vanilla extract. Give it a good mix with an electric mixer on low speed, or vigorously by hand, until *just* combined. We don’t want to overmix; tough cupcakes are sad cupcakes.
Introduce the Hot Liquid: Now, for the grand finale. Carefully pour the hot water or hot coffee into your batter. Mix on low speed, or gently by hand, until the batter is smooth and a bit thin. This hot liquid helps “bloom” the cocoa, releasing all its glorious flavor.
Fill ‘Em Up: Divide the batter evenly among your prepared cupcake liners. Fill each about two-thirds full. Resist the urge to overfill; nobody likes a muffin top on their cupcake (unless it’s frosting, of course).
Bake to Perfection: Bake for 18-22 minutes, or until a wooden skewer inserted into the center of a cupcake comes out clean (or with a few moist crumbs, but no wet batter). **Don’t overbake!** That’s the enemy of moistness.
Cool Down: Let the cupcakes cool in the muffin tin for about 5-10 minutes before transferring them to a wire rack to cool completely. Patience is a virtue, especially when it comes to frosting.
Common Mistakes to Avoid
Listen up, buttercup! Even the best of us can stumble. Here are some pitfalls to dodge:
- Not preheating the oven: Seriously? That’s like trying to run a marathon without stretching. Your cupcakes deserve a warm welcome, not a cold shock.
- Overmixing the batter: Once you add the wet to the dry, mix *just* until combined. Overmixing develops the gluten too much, leading to tough, chewy cupcakes. And we want tender, luscious ones, right?
- Overfilling the liners: Remember, two-thirds full! More than that, and you’ll have giant, mushroom-topped cupcakes that spill over, make a mess, and might not bake evenly.
- Opening the oven door constantly: Resist the urge to peek every two minutes! It lets out heat and can cause your cupcakes to sink. Only open it when it’s time to check for doneness.
- Overbaking: This is the ultimate sin against moistness. Keep an eye on them; once that skewer comes out clean, pull ’em out!
Alternatives & Substitutions
Feeling adventurous or missing an ingredient? No worries, we can roll with it!
- No Buttermilk? No Problem! If you don’t have buttermilk, just mix ¾ cup of regular milk with 1 tablespoon of white vinegar or lemon juice. Let it sit for 5 minutes until it curds slightly. Voila! Instant buttermilk.
- Oil vs. Butter: I recommend oil for these for maximum moistness, but if you’re a butter purist, you can absolutely use ¾ cup of melted butter instead of vegetable oil. The texture will be slightly different (a bit more cake-like), but still delicious.
- Hot Coffee Power-Up: Using hot coffee instead of hot water is a game-changer for chocolate flavor. It doesn’t make the cupcakes taste like coffee, it just deepens and enriches the chocolate. Try it, you won’t regret it!
- Spice it Up: A pinch of cinnamon or a tiny dash of cayenne pepper can really make the chocolate pop. Don’t go crazy, just a whisper!
- Add-ins: Fold in ½ cup of chocolate chips, mini chocolate chips, or even some chopped nuts (if that’s your thing) at the end of mixing the batter.
FAQ (Frequently Asked Questions)
Got questions? I’ve got answers (and maybe a little sass)!
Can I use margarine instead of vegetable oil? Well, technically yes, but why hurt your soul like that? Margarine can change the texture and flavor, and not always for the better. Stick to oil for that glorious moistness, or butter if you prefer.
Why do you use hot water/coffee? Does it really make a difference? Oh, heck yeah, it does! The hot liquid helps “bloom” the cocoa powder, which basically means it intensifies the chocolate flavor, making it richer and more profound. Plus, it helps thin the batter to the right consistency. It’s a non-negotiable step for truly spectacular chocolate cupcakes.
My cupcakes turned out dry! What did I do wrong? Likely culprits are overmixing the batter or, more commonly, **overbaking** them. Keep a close eye on your oven and start checking for doneness a few minutes before the recipe suggests. Every oven is a unique snowflake!
How should I store these delicious creations? Unfrosted, they’re fine in an airtight container at room temperature for up to 2-3 days. Frosted? Pop them in an airtight container in the fridge for up to 3-4 days, especially if your frosting has dairy in it. Bring them to room temp before serving for best flavor.
Can I make these into a cake instead? You clever cookie! You absolutely can. This recipe typically makes one 9×13 inch sheet cake or two 8-inch round cake layers. Just adjust the baking time – a sheet cake might take 30-35 minutes, round cakes 25-30 minutes. Keep an eye on it!
Final Thoughts
And there you have it, folks! Your new go-to recipe for chocolate cupcakes that are so moist, so chocolaty, and so ridiculously easy, you’ll wonder why you ever bought them from a bakery. Seriously, pat yourself on the back. You just unlocked a new level of baking awesome. Now go impress someone—or yourself—with your new culinary skills. You’ve earned it! Don’t forget to share (or don’t, I won’t tell). Happy baking, my friend!
