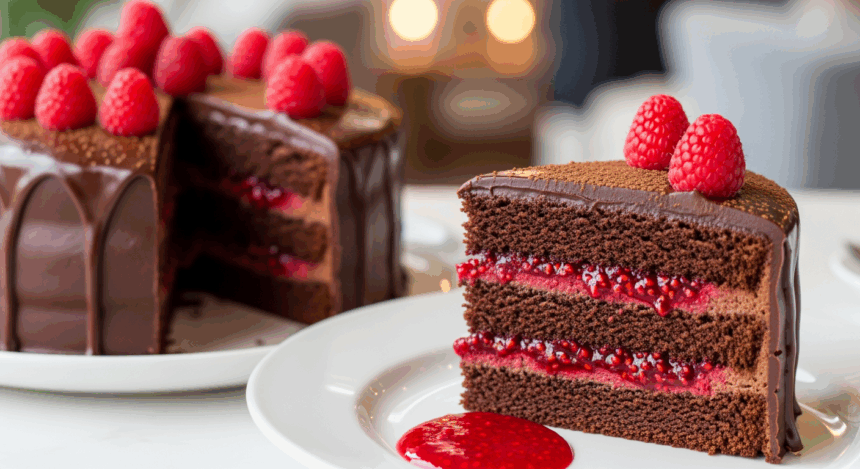
Let me tell you something – there are chocolate desserts, and then there’s Chocolate-Covered Cake With Raspberry Filling. You know, that dessert that makes your guests think you spent all day slaving away when really, you were just binge-watching that new series everyone’s talking about. This cake is like the dessert equivalent of putting on sweatpants after wearing uncomfortable jeans all day – pure, unadulterated bliss.
Why This Recipe is Awesome
First off, chocolate and raspberry? Name a more iconic duo. I’ll wait. The tartness of the raspberries cuts through the richness of the chocolate like a hot knife through butter, creating this perfect balance that’ll make your taste buds do a happy dance. Plus, this cake looks like you ordered it from some fancy bakery, but it’s actually doable without a culinary degree. It’s the ultimate “fake it till you make it” dessert.
Also, this recipe is basically foolproof. I once made it while simultaneously texting, watching a cooking show, and keeping my cat from climbing into the pantry. Still turned out Instagram-worthy. That’s the kind of recipe we all need in our lives, right?
Ingredients You’ll Need
For the cake:
- 2 cups all-purpose flour (the regular stuff, nothing fancy)
- 1½ cups granulated sugar (aka the good stuff)
- ¾ cup unsweetened cocoa powder (the darker, the better for your chocolate soul)
- 2 teaspoons baking soda (not baking powder – they’re not the same thing, trust me on this)
- 1 teaspoon salt (just a pinch to make the sweet sweeter)
- 2 large eggs (from happy chickens if you’re feeling fancy)
- 1 cup buttermilk (regular milk with a spoonful of vinegar works if you’re in a pinch)
- ½ cup vegetable oil (keeps it moist for days)
- 2 teaspoons vanilla extract (the real deal, not that imitation nonsense)
- 1 cup hot coffee (gives the chocolate more depth – and no, the cake won’t taste like your morning brew)
For the raspberry filling:
- 2 cups fresh raspberries (frozen works too if fresh ones are priced like precious gems at your store)
- ½ cup sugar
- 2 tablespoons cornstarch (the magical thickener)
- 2 tablespoons lemon juice (freshly squeezed if you’re showing off)
For the chocolate ganache:
- 2 cups semisweet chocolate chips (or chunks if you’re feeling rebellious)
- 1 cup heavy cream (diet food this is not)
- 2 tablespoons butter (because why not?)
Step-by-Step Instructions
For the cake:
- Preheat your oven to 350°F (175°C). Grease and flour two 9-inch round cake pans. Or use parchment paper if you’re smart and hate cleaning.
- In a large bowl, whisk together flour, sugar, cocoa powder, baking soda, and salt. No need for a fancy mixer here.
- Add eggs, buttermilk, oil, and vanilla. Beat with a mixer on medium speed for about 2 minutes. Your arm should get just tired enough to justify that extra slice later.
- Stir in hot coffee by hand. Warning: Your batter will be super thin. This is normal, not a disaster.
- Pour batter into prepared pans and bake for 30-35 minutes, or until a toothpick comes out clean. If you forget the toothpick test, just gently press the center – if it springs back, you’re golden.
- Cool in pans for 10 minutes, then remove to wire racks to cool completely. Patience is key here – warm cake + filling = sloppy mess.
For the raspberry filling:
- In a saucepan, combine raspberries, sugar, cornstarch, and lemon juice. Mash some of the berries but leave others whole for texture.
- Cook over medium heat until the mixture comes to a boil and thickens, about 5 minutes. It should coat the back of a spoon when ready.
- Remove from heat and let cool completely. Pop it in the fridge to speed things up if you’re as impatient as I am.
For the chocolate ganache:
- Place chocolate chips and butter in a heat-safe bowl.
- Heat heavy cream in a saucepan until it just begins to simmer (tiny bubbles around the edge). Don’t let it boil – we’re making ganache, not a science experiment.
- Pour hot cream over chocolate and let sit for 2-3 minutes. Then stir until smooth and glossy. Try not to face-plant into it.
- Let it cool slightly until it thickens a bit but is still pourable.
Assembly time:
- Place one cake layer on a serving plate. Spoon raspberry filling over the top, leaving about a half-inch border around the edge.
- Gently place the second cake layer on top. Press down slightly – just enough to secure it, not enough to squish filling everywhere.
- Pour ganache over the top, letting it drip down the sides in an artfully messy way. Use a spatula to help it along if needed.
- Garnish with fresh raspberries on top if you’re feeling extra fancy.
- Refrigerate for at least 30 minutes to set the ganache before serving. This also gives you time to clean up the chocolate tornado that just hit your kitchen.
Common Mistakes to Avoid
Rushing the cooling process: I know you’re excited to assemble this masterpiece, but warm cake + filling = slide-y mess. Nobody wants a cake avalanche.
Overmixing the cake batter: This isn’t a workout session. Mix until just combined unless specified otherwise. Your cake will thank you by being tender instead of tough.
Making the ganache too hot: If your cream is boiling, you’ll end up with grainy chocolate. And grainy chocolate is sad chocolate.
Skipping the coffee: “But I don’t like coffee!” I hear you, but you won’t taste it. It just enhances the chocolate flavor. It’s like how salt makes watermelon taste more watermelon-y. Trust the process.
Using a cold plate for assembly: Pop your serving plate in the freezer for a few minutes before assembly. This helps prevent the ganache from setting too quickly when it hits the plate.
Alternatives & Substitutions
Berry flexible: Not a raspberry fan? Strawberries, blackberries, or even cherries work beautifully here. Just adjust the sugar based on the fruit’s natural sweetness.
Make it boozy: Add a splash of raspberry liqueur to the filling or some Kahlúa to the cake batter. I call this “adulting” at its finest.
Gluten concerns? Swap the all-purpose flour for your favorite cup-for-cup gluten-free blend. The texture might be slightly different, but still delicious.
Dairy-free options: Use coconut milk instead of buttermilk in the cake, and coconut cream instead of heavy cream for the ganache. The subtle coconut flavor actually pairs amazingly with the chocolate and raspberry.
In a time crunch? Use a good-quality boxed chocolate cake mix as your base. I won’t tell if you don’t. Sometimes sanity preservation trumps scratch baking, IMO.
FAQ (Frequently Asked Questions)
Can I make this cake ahead of time?
Absolutely! This cake actually tastes better on day two when the flavors have had time to mingle and get friendly with each other. Just store it in the fridge and bring to room temperature before serving.
My ganache split! What do I do?
First, don’t panic. Add a splash of warm heavy cream and gently whisk until it comes back together. If all else fails, turn it into truffles and make a different topping. Adaptability is the mark of a true kitchen warrior.
Can I freeze this cake?
You betcha! Freeze it uncovered until the ganache is solid, then wrap well in plastic wrap and foil. It’ll keep for up to 2 months. Thaw overnight in the refrigerator before serving.
Do I really need two cake pans?
Technically you could bake all the batter in one deep pan and then slice it horizontally later, but that’s advanced cake surgery. Two pans is easier unless you have steady hands and ninja-like slicing skills.
What if my cake layers dome too much?
No biggie! Just slice off the domes with a serrated knife to make them flat. The scraps make excellent snacks while you finish assembling. Consider it the chef’s tax.
Can I use a different type of chocolate for the ganache?
Definitely! Milk chocolate will give you a sweeter, less intense ganache. White chocolate works too, though it makes for a completely different aesthetic. Dark chocolate creates a more sophisticated, less sweet finish. Choose your own adventure!
Final Thoughts
There you have it – a cake that looks like you studied at some fancy Parisian pastry school but actually just required following some simple steps. The beauty of this chocolate-raspberry masterpiece is that it works for practically any occasion – from “It’s Tuesday and I survived another workday” to “Happy milestone birthday, here’s something I definitely slaved over for hours.”
Remember, baking is part science, part art, and part therapy. So don’t stress if things aren’t picture-perfect – taste is what matters, and this cake delivers in that department. Besides, any imperfections can be strategically covered with more raspberries or an artistic chocolate drizzle.
Now go forth and bake! Your friends will be impressed, your family will be delighted, and you’ll have the satisfaction of creating something genuinely delicious without losing your sanity in the process. And if anyone asks for your secret? Just wink mysteriously and change the subject. Some things are worth keeping to yourself.
