So, you’re staring into the fridge, then the pantry, and nothing quite hits that sweet spot of “decadent but also kinda easy,” right? Been there. Many, many times. Today, my friend, we’re not just making cookies; we’re crafting tiny, edible monuments to pure joy: **Chocolate Chip Peanut Butter Cup Cookies!** Get ready to have your mind, and your taste buds, absolutely blown. And don’t worry, you won’t need a culinary degree for this one.
Why This Recipe is Awesome
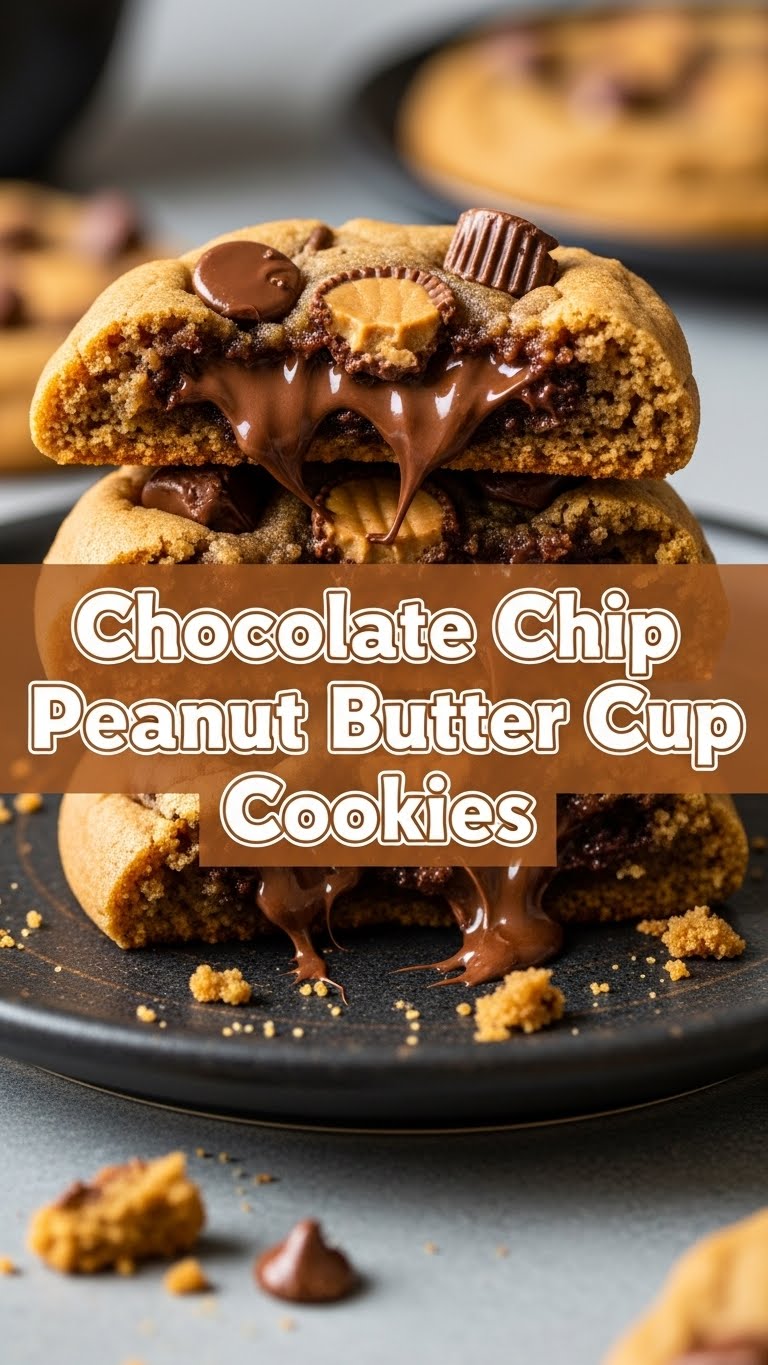
Let’s be real, you’re not here for a lecture on advanced pastry techniques. You’re here because you want something that tastes like a hug from a chocolate-covered, peanut-butter-loving unicorn. And guess what? This recipe delivers! It’s practically **idiot-proof**, I swear. I made them, and my kitchen didn’t spontaneously combust, which is always a good sign. It’s fast, it’s relatively simple, and the payoff? Oh, the payoff is worth every single calorie. Plus, the combination of gooey chocolate and melty peanut butter cups in a soft, chewy cookie? **Seriously, what more could you want out of life?** (Don’t answer that. Just eat the cookies.)
Ingredients You’ll Need
- 1 cup (2 sticks) unsalted butter, softened. Don’t even *think* about using cold butter unless you enjoy a good arm workout.
- ¾ cup granulated sugar. The sweet stuff.
- ¾ cup packed light brown sugar. For that extra chewiness and depth.
- 2 large eggs. Room temp is best, but if you forgot, don’t sweat it too much.
- 1 teaspoon vanilla extract. The soul of almost every good cookie. Don’t skimp!
- 2 ¼ cups all-purpose flour. The main event, holding it all together.
- 1 teaspoon baking soda. Helps them get all puffy and perfect.
- ½ teaspoon salt. Balances out all that sweetness. Crucial!
- 1 cup chocolate chips (milk, semi-sweet, or a mix!). Go wild. Or don’t. Your choice.
- 1 cup mini peanut butter cups, chopped if they’re not mini-mini. Or just smash ’em a bit.
Step-by-Step Instructions
- First things first: **Preheat your oven to 375°F (190°C)**. While it’s heating, line a couple of baking sheets with parchment paper. This makes cleanup a breeze and prevents sticking, which is a total mood killer.
- In a large bowl, cream together your softened butter, granulated sugar, and brown sugar until it’s light and fluffy. This usually takes about 2-3 minutes with an electric mixer. **Don’t rush this step**, it’s important for cookie texture.
- Beat in the eggs, one at a time, making sure each is fully incorporated before adding the next. Then, stir in the vanilla extract. Your kitchen should start smelling amazing already.
- In a separate, medium bowl, whisk together the flour, baking soda, and salt. Make sure it’s all well combined so you don’t get a rogue pocket of baking soda in one cookie (trust me, it’s not fun).
- Gradually add the dry ingredients to the wet ingredients, mixing on low speed until just combined. **Do not overmix!** Overmixing develops gluten, leading to tough cookies, and nobody wants a tough cookie.
- Gently fold in your chocolate chips and chopped peanut butter cups. Try not to eat them all before they make it into the dough. It’s a challenge, I know.
- Drop rounded tablespoons of dough onto your prepared baking sheets, leaving about 2 inches between each cookie. These beauties need their space to spread out and get perfectly golden.
- Bake for 9-11 minutes, or until the edges are golden brown and the centers are still slightly soft. They might look a little underdone, but they’ll continue to cook as they cool.
- Let them cool on the baking sheets for 5 minutes before transferring them to a wire rack to cool completely. Or, if you’re like me, eat one while it’s still warm and gooey. Just try not to burn your tongue!
Common Mistakes to Avoid
- Not preheating the oven: Seriously, this isn’t a suggestion; it’s a command. Rookie mistake that leads to unevenly baked cookies. Don’t be that person.
- Overmixing the dough: As mentioned, tough cookies are sad cookies. Mix until just combined, then back away from the mixer.
- Melting your butter: Softened, not melted! Melted butter changes the dough consistency and can lead to flat, greasy cookies. Yuck.
- Eating all the peanut butter cups before they hit the dough: Okay, maybe not a *mistake* in the grand scheme of things, but your cookies will be less glorious. Exercise some self-control, friend.
- Baking too long: The key to a chewy cookie is pulling them out when they look slightly underbaked in the center. They’ll firm up as they cool, I promise.
Alternatives & Substitutions
Feeling adventurous? Or just out of something? No stress!
- No mini peanut butter cups? Use regular-sized ones and chop ’em up. Or swap for other chocolate candies like M&M’s, Rolo pieces, or even chopped Snickers. **Life’s too short for boring cookies!**
- Different chocolate chips: Mix it up! White chocolate chips, dark chocolate chunks, butterscotch chips – whatever floats your boat. A mix of semi-sweet and milk chocolate is my personal fave, FYI.
- Nut butter swaps: If someone has a peanut allergy, you can totally use sunflower seed butter cups or almond butter cups if you can find them. Just make sure to adjust for taste and texture if swapping out the actual peanut butter in the dough (which this recipe doesn’t have, so you’re good!).
- A dash of spice: A pinch of cinnamon or a tiny bit of espresso powder can really elevate the chocolate flavor. Go on, be fancy!
FAQ (Frequently Asked Questions)
Got questions? I probably do too, but here are some answers to the most common ones:
- **Can I freeze the cookie dough?** Absolutely! Scoop the dough onto a parchment-lined sheet, freeze until solid, then transfer to an airtight container or freezer bag. Bake from frozen, adding a couple of minutes to the baking time. So convenient for future cravings!
- **How long do these cookies stay fresh?** If they last that long (doubtful, IMO), they’ll keep in an airtight container at room temperature for about 3-4 days.
- **My cookies spread too much! What happened?** A few culprits: your butter might have been too soft (melted, even), your oven might not be at the correct temperature, or your flour measurement might have been off. **Precision matters a little here!**
- **Can I make them gluten-free?** You can try! Swap the all-purpose flour for a 1:1 gluten-free baking flour blend. Results may vary slightly, but it’s worth a shot!
- **Do I really need to use parchment paper?** I mean, you *can* grease the pan, but parchment paper is your best friend for easy removal and minimal cleanup. Why make life harder?
- **What if I don’t have an electric mixer?** You can totally do this by hand with a sturdy spoon and a lot of elbow grease, especially for creaming the butter and sugar. Just be prepared for a bit of a workout!
Final Thoughts
There you have it! A recipe so good, it should probably be illegal. These Chocolate Chip Peanut Butter Cup Cookies are more than just a dessert; they’re an experience. A chewy, melty, utterly blissful experience. So go on, get baking! You’ve earned this moment of pure, unadulterated cookie happiness. Now go impress someone—or yourself—with your new culinary skills. **You’ve earned it!** And maybe save one for me? Just kidding… mostly.


