Ever had one of those days where you just *need* something utterly decadent, but the thought of a culinary marathon makes you want to curl up and cry? Yeah, me too. Good news: I’ve got your back with these Chocolate Chip Lava Cookies. They’re basically a hug in cookie form, filled with molten chocolate goodness. Trust me, your taste buds are about to throw a party.
Why This Recipe is Awesome
Okay, so why bother with *these* cookies when the world is full of perfectly good cookies? Because these aren’t just good, they’re life-changing. Seriously.
- Ridiculously easy: If you can stir, you can make these. My cat probably could, if she had opposable thumbs.
- Molten chocolate core: It’s like a surprise party for your mouth, every single bite. Pure magic.
- Instant gratification: Minimal chill time, maximum deliciousness. Who has time to wait an hour for dough to chill when chocolate cravings hit? Not me, BTW.
- They make you a hero: Serve these warm, and prepare for adoration. You’re welcome.
Ingredients You’ll Need
Gather your troops! These aren’t fussy, but quality counts (especially for that lava center!).
- Unsalted Butter: 1.5 sticks (170g), softened. Don’t even *think* about margarine. Your cookies deserve better.
- Granulated Sugar: 1/2 cup (100g). For that perfect crisp edge and sweetness.
- Brown Sugar (packed): 1 cup (200g). This is where the chewiness magic happens. Dark brown is my fave, but light works too.
- Large Eggs: 2. Room temp, if you’re feeling fancy. If not, it’s fine, we’re not baking for the Queen.
- Vanilla Extract: 1 teaspoon. Don’t skimp! Good vanilla makes *all* the difference.
- All-Purpose Flour: 1¾ cups (210g). The backbone of our cookie empire.
- Baking Soda: 1/2 teaspoon. Helps them puff up beautifully.
- Salt: 1/2 teaspoon. Balances the sweetness – absolutely essential!
- Chocolate Chips (for the dough): 1 cup (170g) – semi-sweet or milk, your call.
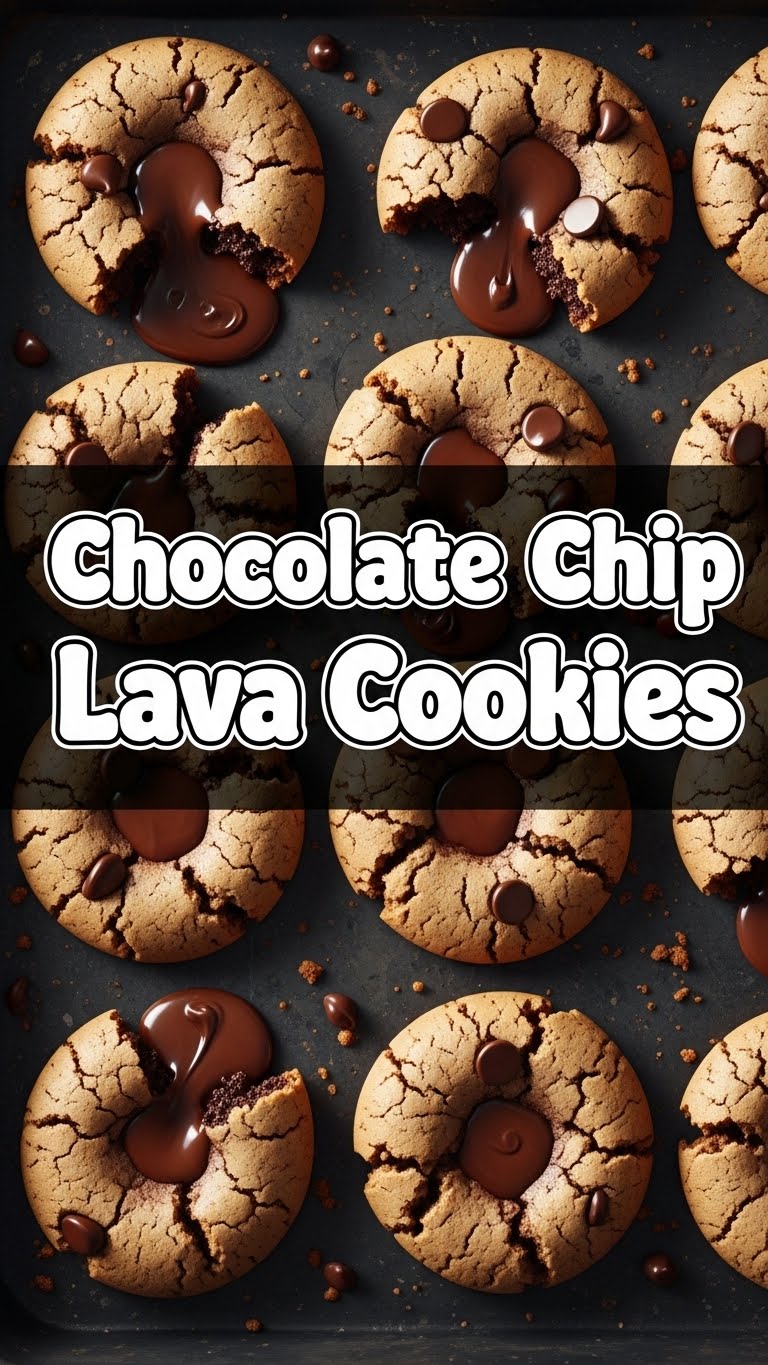
- Chocolate Chunks/Squares (for the lava center): About 4 oz (115g) of good quality chocolate. Think Ghirardelli squares, Hershey’s Kisses (unwrapped, obviously), or even just a chopped-up chocolate bar. This is the “lava” and it needs to be melty perfection!
Step-by-Step Instructions
- Preheat & Prep: Get your oven cranked up to 375°F (190°C). Line two baking sheets with parchment paper. Trust me, parchment is your friend here – makes cleanup a breeze and prevents sticking.
- Cream the Goods: In a large bowl, cream together the softened butter, granulated sugar, and brown sugar until it’s light and fluffy. A stand mixer is great, but a hand mixer works too. Or a strong arm!
- Egg-cellent Addition: Beat in the eggs, one at a time, until fully incorporated. Then stir in that glorious vanilla extract. Make sure everything is well combined before moving on.
- Dry Mix Fun: In a separate, smaller bowl, whisk together the flour, baking soda, and salt. Whisking ensures everything is evenly distributed – no one wants a salty patch in their cookie, right?
- Combine Forces: Gradually add the dry ingredients to the wet ingredients, mixing on low speed (or by hand) until just combined. Don’t overmix! Overmixing leads to tough cookies, and we want soft, chewy perfection.
- Chocolate Chip Party: Fold in the chocolate chips. Because more chocolate is always a good idea, right?
- Lava Time! Scoop about two tablespoons of dough and flatten it slightly in your palm. Place one chocolate chunk in the center. Now, carefully wrap the dough around the chocolate, sealing it completely. It should look like a little dough ball with a secret chocolate heart. Repeat, leaving about 2 inches between cookies on the baking sheet.
- Bake ‘Em Up: Pop those beauties into the preheated oven for 9-12 minutes. You’re looking for edges that are set and lightly golden, while the centers still look a tiny bit soft. Overbaking is the enemy of molten lava!
- Cool Down (A Little): Let them cool on the baking sheets for 5 minutes before transferring them to a wire rack. They’ll continue to set up as they cool, and you’ll avoid cookie carnage. Now, if you can resist long enough, grab a warm one and prepare for the lava flow!
Common Mistakes to Avoid
Even the best of us can mess up, but here are some pitfalls to dodge for perfect lava cookies:
- Not preheating the oven: Rookie mistake, seriously. Your cookies won’t bake evenly, and you’ll end up with flat, sad discs. Be patient!
- Overmixing the dough: Remember what I said? Tough cookies. We want tender and chewy. Mix until *just* combined, then stop.
- Skimping on the lava chocolate: If you use too little, you won’t get that glorious ooey-gooey center. Go big or go home!
- Not fully sealing the chocolate chunk: If it’s exposed, the lava will, well, *lava out* all over your baking sheet. Still tasty, but less visually appealing. Think of it as a chocolate explosion, but usually a contained one.
- Opening the oven door constantly: Patience, grasshopper! Let them bake without interruption for the first 8-9 minutes.
- Baking them too long: This is the #1 lava killer! Take them out when they look slightly underdone in the middle. The residual heat will finish them off.
Alternatives & Substitutions
Feeling creative? Here are some ways to shake things up:
- Butter: As I mentioned, unsalted butter is best. IMO, margarine is a crime against humanity in baking, but if you *must*, use a good quality stick margarine. Just don’t tell me.
- Chocolate: Get wild! Instead of semi-sweet, try milk chocolate, dark chocolate, white chocolate, or even peanut butter chips in the dough. For the lava center, mini Reese’s peanut butter cups would be *insane*, or even a dollop of Nutella (freeze it first for easier handling!).
- Flour: All-purpose works beautifully, but if you’re feeling adventurous, you could swap a tiny bit (say, 2 tablespoons) for cornstarch for an even softer cookie.
- Add-ins: A pinch of cinnamon, a dash of espresso powder (enhances chocolate flavor!), or a handful of chopped nuts can elevate these. Maybe some sea salt on top before baking for a sweet and salty kick?
FAQ (Frequently Asked Questions)
- My cookies are flat! What went wrong?
Likely culprits: Your butter was too soft (or melted), your baking soda is old (check the date!), or your oven wasn’t hot enough. Make sure your butter is softened but still holds its shape, and your baking soda is fresh! - Can I make the dough ahead of time?
Absolutely! You can chill the dough for up to 3 days. Just let it sit at room temperature for 15-20 minutes before scooping, or it’ll be a pain to work with. - What kind of chocolate is best for the lava center?
Good quality chocolate bars (chopped into chunks), Ghirardelli squares, Lindt truffles (if you’re feeling fancy!), or even Hershey’s Kisses work wonders. Just make sure it’s chocolate that melts well. Avoid cheap chocolate that turns gritty. - How do I get that perfect “lava” effect?
Don’t overbake! The key is to take them out when the edges are set but the centers are still soft and gooey. Also, enjoy them warm for maximum lava flow. Microwaving a cooled cookie for 10-15 seconds helps too! - Can I freeze these cookies?
Yes! You can freeze the baked cookies in an airtight container for up to a month. Reheat briefly in the microwave or a low oven for that warm, gooey center. You can also freeze raw cookie dough balls (with the lava inside!) and bake from frozen, adding a few minutes to the bake time. - Is this recipe *really* idiot-proof?
Well, I made them without burning the house down, so I’d say pretty close! Just follow the steps, read the tips, and you’ll be golden. Unless you forget to put the chocolate inside… then you just have really good chocolate chip cookies, which isn’t the worst fate.
Final Thoughts
There you have it, future cookie master! These Chocolate Chip Lava Cookies are your new secret weapon for impressing guests, making a rainy day better, or just treating your glorious self. Now go forth, get baking, and prepare for pure chocolate bliss. You’ve earned it! Seriously, go make ’em. You won’t regret it. Unless you eat the whole batch yourself, then maybe a *little* regret… but totally worth it. Happy baking!


