So you’re craving something warm, gooey, chocolatey, and utterly divine but the thought of a messy kitchen or cookies spreading into one giant blob fills you with dread, huh? Same, friend, same. We’ve all been there, dreaming of perfectly uniform cookies that practically bake themselves. Good news! Today, we’re diving headfirst into the magical world of Chocolate Chip Cookies in Silicone Molds. Get ready to elevate your cookie game without, you know, actually *trying* too hard.
Why This Recipe is Awesome
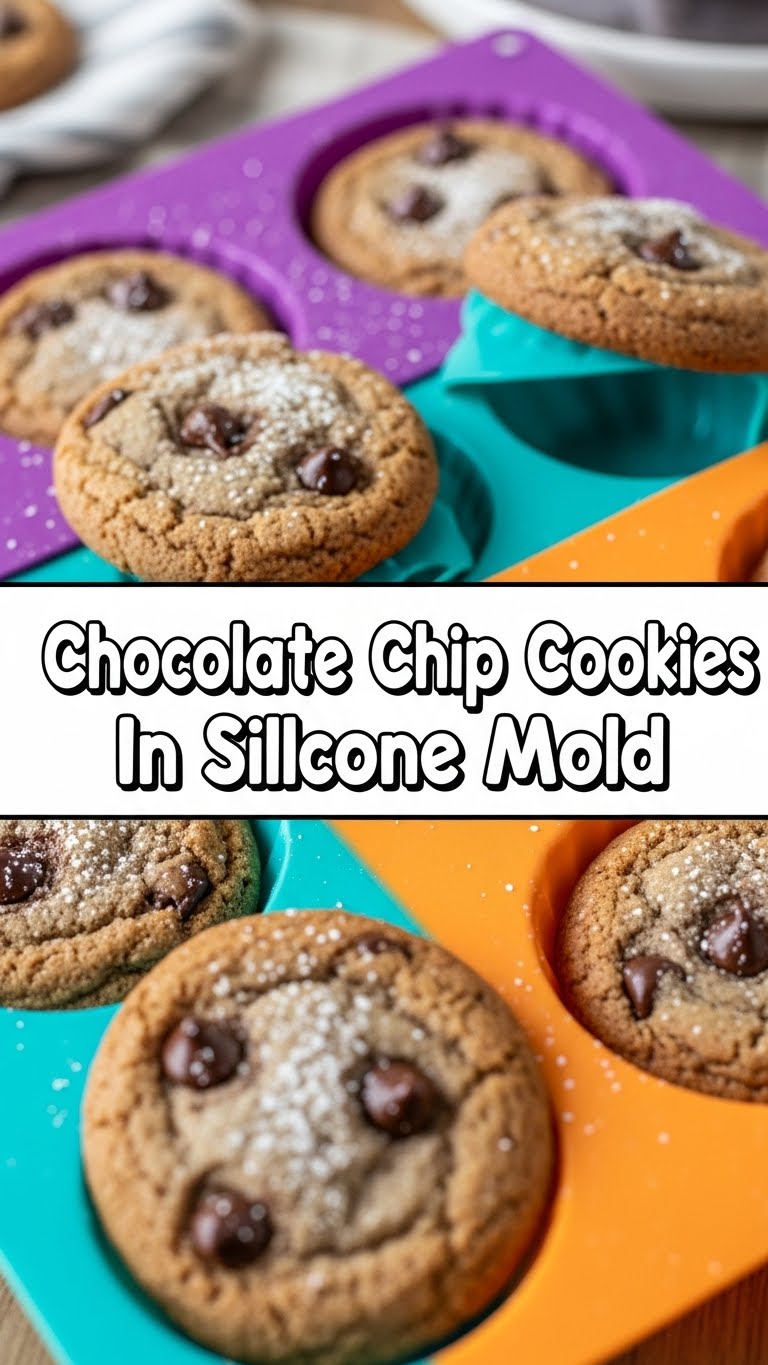
Let’s be real, most cookie recipes are pretty straightforward. But this one? It’s next level awesome, primarily because we’re introducing a superhero into the mix: the silicone mold. This isn’t just about preventing your cookies from looking like abstract art (though that’s a huge bonus). It’s about achieving **perfectly uniform, consistently baked, and gloriously chewy-in-the-middle, crispy-on-the-edges cookies every single time.** Plus, cleanup is a breeze! No more scraping burnt bits off a baking sheet – just pop ’em out and give the mold a quick rinse. It’s almost idiot-proof; even I manage to pull off bakery-worthy results. Seriously, this method is a game-changer for anyone who values consistency and minimal effort. You’re welcome.
Ingredients You’ll Need
- 1/2 cup (113g) Unsalted Butter, softened. Because, butter makes everything better. Don’t even think about margarine unless you’re trying to punish yourself.
- 1/2 cup (100g) Granulated Sugar. For that sweet, sweet goodness.
- 1/4 cup (50g) Packed Light Brown Sugar. This is where the chewiness comes from, don’t skip it!
- 1 Large Egg. The binder, the unifier, the reason your cookie doesn’t crumble into oblivion.
- 1 teaspoon Vanilla Extract. Pure gold in liquid form. Splash it in!
- 1 1/4 cups (150g) All-Purpose Flour. The foundation of our delicious empire.
- 1/2 teaspoon Baking Soda. Our little leavening friend, making sure our cookies aren’t flat pancakes.
- 1/4 teaspoon Salt. Crucial for balancing all that sweetness. Don’t be a hero and leave it out.
- 1 cup (170g) Chocolate Chips or Chunks. The star of the show! Milk, semi-sweet, dark – pick your poison.
Step-by-Step Instructions
- First things first, preheat that oven to **350°F (175°C)**. It’s a non-negotiable step, trust me. Grab your trusty silicone mold and set it aside; no greasing needed, which is another win!
- In a large bowl, cream together the softened butter, granulated sugar, and brown sugar until it’s light and fluffy. This usually takes about 2-3 minutes with an electric mixer. You want it to look almost whipped.
- Beat in the egg until it’s fully incorporated, then stir in the vanilla extract. Scrape down the sides of the bowl to make sure everything gets mixed evenly.
- In a separate, smaller bowl, whisk together the flour, baking soda, and salt. Then, gradually add the dry ingredients to the wet ingredients, mixing on low speed until *just* combined. Don’t overmix! Overmixing leads to tough cookies, and nobody wants a tough cookie.
- Fold in those glorious chocolate chips. Use a spatula for this part; gentle is the name of the game.
- Now for the fun part! Take spoonfuls of cookie dough and press them gently into the individual cavities of your silicone mold. Fill them about two-thirds full. The silicone will hold them perfectly.
- Pop that mold onto a baking sheet (this makes it easier to transfer in and out of the oven) and slide it into your preheated oven.
- Bake for **12-15 minutes**, or until the edges are golden brown and the centers are still looking a little soft. This is where the magic happens, so keep an eye on ’em!
- Once baked, let the cookies cool in the mold for about 5-10 minutes. This helps them set up. Then, gently pop them out – they should release like a dream! Transfer them to a wire rack to cool completely (if you can wait that long, you’re a stronger person than me).
Common Mistakes to Avoid
- Thinking you don’t need to preheat the oven. Rookie mistake. A cold oven equals unevenly baked, sad cookies. Don’t do it.
- Overmixing the dough. We talked about this! It develops the gluten too much, resulting in a chewy cookie becoming a hockey puck. Mix until just combined, no more.
- Not using a baking sheet under your silicone mold. Silicone is flexible, which is great for popping out cookies, but terrible for structural integrity when hot. You’ll spill hot dough everywhere. Learn from my past mishaps!
- Eating all the dough before it makes it to the oven. Okay, maybe not a *mistake* per se, but you’ll have fewer cookies. Just sayin’.
Alternatives & Substitutions
Feeling adventurous? Good! This recipe is pretty forgiving.
- Chocolate Choices: Not a semi-sweet fan? Go nuts with milk chocolate, dark chocolate, white chocolate chips, or even a mix! Mini M&M’s also work wonders for a pop of color and extra fun.
- Flour Power: While all-purpose is standard, you can experiment with half whole wheat flour for a nuttier flavor, though it might make the cookies a tad denser. Gluten-free? A 1:1 gluten-free baking blend usually works, but results can vary slightly.
- Nutty Additions: Want to get extra fancy? Toss in half a cup of chopped walnuts, pecans, or almonds with your chocolate chips. Adds a lovely crunch and depth of flavor.
- Butter Alternatives: While I always advocate for real butter, if you *must* use a plant-based alternative, look for a solid stick butter substitute that bakes well (like Miyoko’s Kitchen). Avoid soft tub margarines. Just don’t expect the exact same flavor profile, okay?
FAQ (Frequently Asked Questions)
- Can I use margarine instead of butter? Well, technically yes, but why hurt your soul like that? Butter provides the best flavor and texture. If you must use margarine, make sure it’s a stick variety for best results.
- Do I need to grease the silicone mold? Nope! That’s the beauty of silicone. The non-stick surface means your cookies will pop right out, no extra fat or parchment paper required. IMO, this is the best part.
- My cookies are sticking! What did I do wrong? Are you sure it’s a good quality silicone mold? Sometimes very cheap molds can be less non-stick. Also, ensure you’re letting them cool for a few minutes in the mold before attempting to remove them. Patience, young grasshopper!
- Can I freeze the cookie dough in the molds? Absolutely! Press the dough into the molds, then freeze until solid. Pop out the frozen dough pucks and store them in an airtight container or freezer bag. When you’re ready to bake, place them back in the mold (or on a baking sheet) and add a few extra minutes to the baking time. FYI, this is perfect for future cravings.
- How do I clean silicone molds? Super easy! A quick wash with warm, soapy water. For stubborn bits, a soft brush can help. They’re often dishwasher safe too, but always check your manufacturer’s instructions.
- My cookies aren’t perfectly round; some look a bit flat. What gives? Could be a few things! Your butter might have been too soft (melted, even), or your oven temperature isn’t accurate. Also, ensuring your baking soda isn’t expired is crucial for that perfect lift.
Final Thoughts
There you have it! A ridiculously easy (and fun!) way to bake perfect chocolate chip cookies using the magic of silicone molds. Say goodbye to wonky, uneven cookies and hello to uniform, delicious perfection that will make everyone wonder if you secretly opened a bakery. Now go impress someone—or yourself—with your new culinary skills. You’ve earned it!


