Alright, buckle up, buttercup, because we’re about to make some magic happen in your kitchen. You’re craving something warm, gooey, and chocolatey but the thought of scooping individual cookie dough balls for what feels like an eternity just isn’t hitting right, huh? Same. That’s why we’re taking our beloved chocolate chip cookies for a joyride… straight into a muffin tin! Get ready for maximum deliciousness with minimum fuss. You in?
Why This Recipe is Awesome
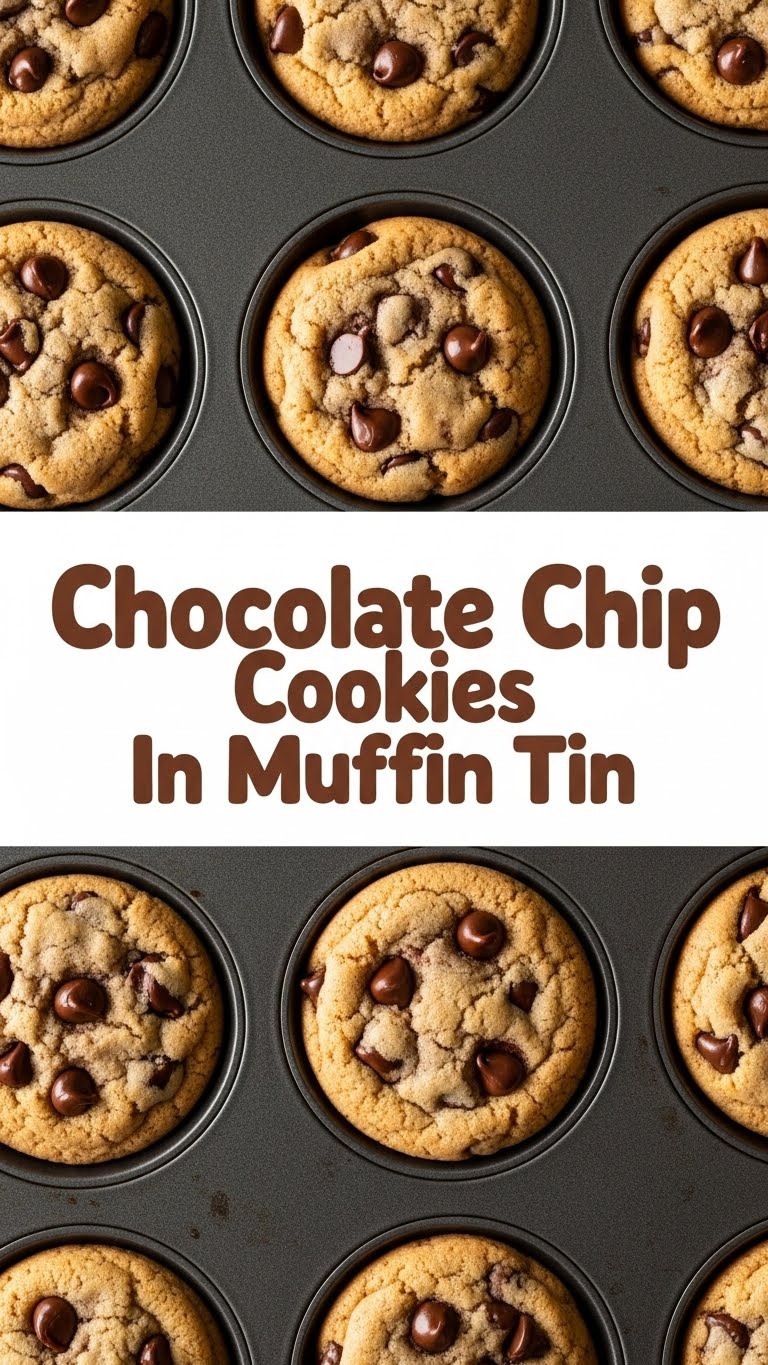
Let’s be real, sometimes you want a cookie, but you want a *better* cookie. A cookie that respects itself, has boundaries, and doesn’t spread into a giant, amorphous blob that you then have to awkwardly cut. Enter: the muffin tin cookie. This isn’t just a gimmick; it’s a lifestyle choice. Why is it awesome, you ask?
- It’s practically **idiot-proof**. Seriously, even I, a notorious kitchen disaster magnet, didn’t mess this up.
- **Perfect portions every time.** No more arguing with your inner cookie monster about whether that’s “one” cookie or three. Each one is a delightful, thick, chewy nugget of joy.
- **Less spread, more chew.** Because they’re contained, these cookies bake up thicker and chewier in the middle with those coveted slightly crispy edges. It’s the best of both worlds!
- **Great for sharing (or not!).** They look fancy, so you can totally impress guests, or just hoard them all for yourself. No judgment here.
Ingredients You’ll Need
Gather your troops, folks! These are the usual suspects, ready for a muffin tin adventure.
- 1/2 cup (1 stick) Unsalted Butter, softened (not melted! We’re not making soup here, just cookies.)
- 1/2 cup Granulated Sugar (for sweetness and a little crisp)
- 1/4 cup Packed Light Brown Sugar (hello, chewiness and depth of flavor!)
- 1 Large Egg (the binder, the glue, the reason it all sticks together)
- 1 teaspoon Vanilla Extract (Don’t skip it! It’s the soul of the cookie.)
- 1 1/4 cups All-Purpose Flour (the foundation of our cookie empire)
- 1/2 teaspoon Baking Soda (our little lift-off agent)
- 1/4 teaspoon Salt (enhances all those sweet flavors, trust me)
- 1 cup Semi-Sweet Chocolate Chips (or whatever chocolate makes your heart sing. Go wild!)
- Non-stick cooking spray or butter for greasing the muffin tin (crucial, unless you want cookie-shaped regrets).
Step-by-Step Instructions
Get ready to become a cookie-muffin master!
- Preheat & Prep: Set your oven to **350°F (175°C)**. Grab a 12-cup standard muffin tin and spray each cup generously with non-stick spray, or butter it up good. This is a non-negotiable step.
- Cream the Dream: In a large bowl, using an electric mixer, cream together the softened butter, granulated sugar, and brown sugar until it’s light and fluffy. This usually takes about 2-3 minutes. Don’t rush it!
- Wet Ingredients In: Beat in the egg and vanilla extract until just combined. Scrape down the sides of the bowl to make sure everything gets mixed.
- Dry Goods Unite: In a separate, smaller bowl, whisk together the flour, baking soda, and salt. Now, gradually add the dry ingredients to the wet ingredients, mixing on low speed until *just* combined. Don’t overmix! Overmixing leads to tough cookies, and nobody wants that.
- Chip, Chip, Hooray!: Fold in those glorious chocolate chips by hand using a spatula. Distribute them evenly throughout the dough.
- Scoop & Fill: This is where the magic happens! Scoop about **2-3 tablespoons of cookie dough** into each prepared muffin cup. You want them to fill the bottom, but not necessarily overflow the top.
- Bake It Up: Pop the muffin tin into your preheated oven and bake for **12-15 minutes**. You’re looking for the edges to be golden brown and the centers to look set but still slightly soft. Ovens vary, so keep an eye on them!
- Cool Down: Once baked, let the cookies cool in the muffin tin for about 5-10 minutes. This helps them firm up and makes them easier to remove.
- Release the Goodness: Carefully run a knife or a thin spatula around the edges of each cookie, then gently lift them out onto a wire rack to cool completely. Or, you know, eat one (or three) while they’re still warm and gooey. You’ve earned it.
Common Mistakes to Avoid
Even the pros make mistakes, but you don’t have to!
- Not Greasing the Muffin Tin: This is the absolute cardinal sin. Unless you want your delicious cookies to be permanently enshrined in the tin, **grease it generously!**
- Overfilling the Muffin Cups: Resist the urge to cram too much dough in there. Too much dough means overflow, messy ovens, and weirdly shaped cookies.
- Overmixing the Dough: We talked about this. A tough cookie is a sad cookie. Mix until just combined, then stop.
- Using Cold Butter: Room temperature butter creams better with sugar, leading to a lighter, fluffier dough. Cold butter won’t incorporate properly, and melted butter changes the texture completely. **FYI!**
- Baking for Too Long: Keep an eye on your oven. Cookies go from perfectly chewy to dry and crumbly fast. Pull them out when the edges are golden and the center looks just set.
Alternatives & Substitutions
Feeling adventurous? Let’s spice things up!
- Chocolate Choices: Not a semi-sweet fan? Go for milk chocolate, dark chocolate, white chocolate, or even a mix! Peanut butter chips or butterscotch chips are also fantastic.
- Add-Ins: Throw in a handful of chopped nuts (walnuts, pecans), shredded coconut, or even a sprinkle of sea salt on top before baking for a gourmet touch.
- Butter Swaps: You *can* use margarine, but **IMO**, butter just tastes better. For a slightly different flavor, try browning your butter before letting it cool and soften. It adds an amazing nutty depth!
- Flour Power: For a chewier cookie, you can substitute a tablespoon or two of the all-purpose flour with bread flour.
FAQ (Frequently Asked Questions)
Got questions? I’ve got (casual) answers!
- **Can I use mini muffin tins?** Absolutely! Just adjust the baking time. They’ll likely need closer to 8-10 minutes. Keep a close eye on them!
- **My cookies are sticking to the tin, help!** Did you grease it properly? If yes, try letting them cool a bit longer in the tin before attempting to remove. Sometimes a few extra minutes work wonders.
- **Can I freeze the dough?** Yes, you clever baker! Scoop the dough into the muffin cups, then freeze the whole tin until the dough is solid. Pop out the frozen dough pucks and store them in a freezer-safe bag for up to 3 months. Bake from frozen, adding a few extra minutes to the baking time.
- **Why did my cookies spread too much?** Could be several reasons: butter was too warm/melted, not enough flour, or overmixing the dough developed too much gluten. Ensure your butter is just soft, not greasy.
- **Can I make these gluten-free?** You can definitely try! Use a 1:1 gluten-free baking flour blend that contains xanthan gum. Results can vary, but generally, it works quite well for cookies!
- **My cookies are dry and crumbly, what gives?** Most likely, you overbaked them. Remember, they continue to cook a little bit after they come out of the oven. A slightly underbaked center is better than an overbaked one for chewiness.
Final Thoughts
So there you have it, my friend. A ridiculously easy, incredibly delicious, and surprisingly elegant way to bake your favorite cookies. No more flat, sad cookies for you! These muffin tin marvels are guaranteed to bring a smile to your face and a happy dance to your taste buds.
Now go forth and conquer that cookie craving. You’ve just upped your baking game without even breaking a sweat (or at least, not much of one). Go impress someone—or yourself—with your new culinary skills. You’ve earned it!


