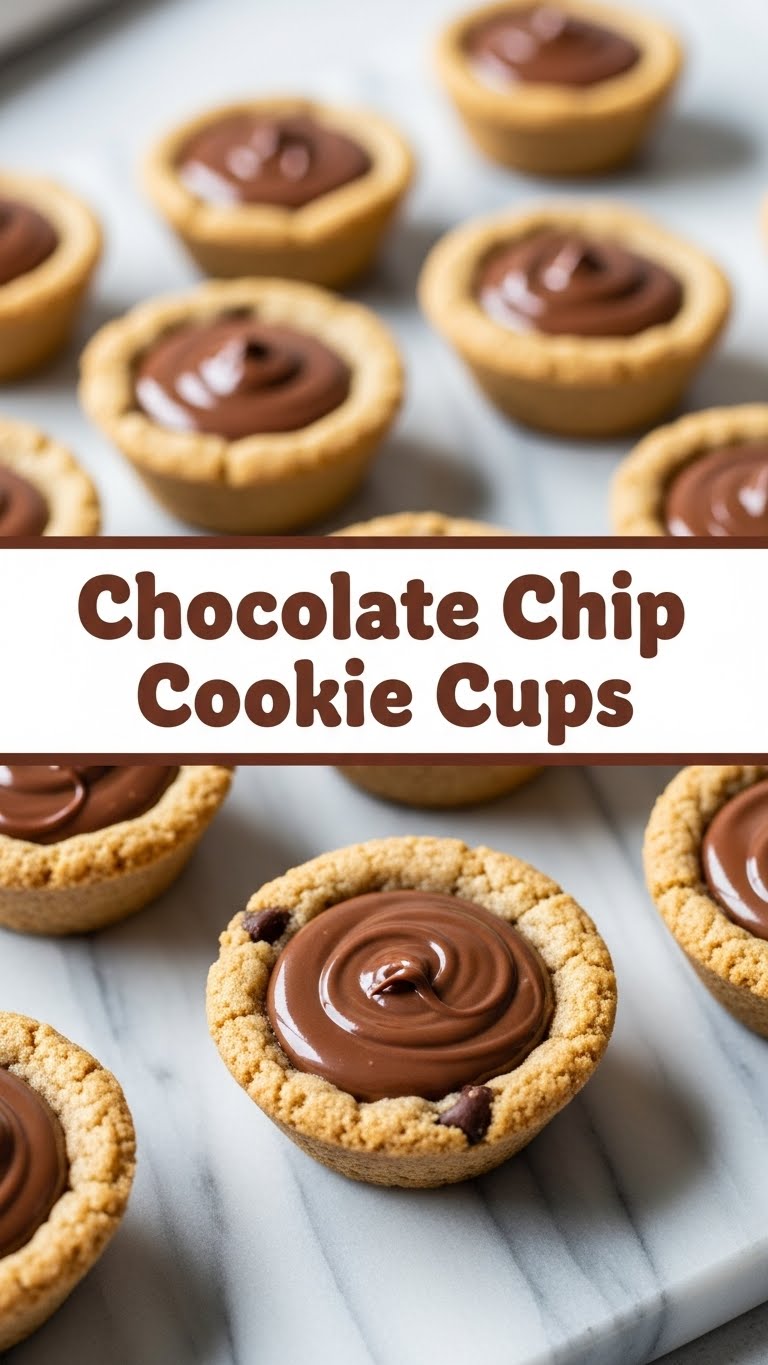
So, you’re craving something ridiculously tasty, chocolatey, and comforting, but the thought of scooping endless individual cookies just makes you want to crawl back into bed? Been there, done that, bought the T-shirt. My friend, allow me to introduce you to your new best culinary buddy: Chocolate Chip Cookie Cups! They’re like the best parts of a cookie, but in a cute, contained little package that practically screams, “Eat me now!”
Why This Recipe is Awesome
Listen, I get it. Life’s busy. You want maximum deliciousness for minimum effort, right? This recipe is basically the lazy genius’s guide to happiness. It’s **super forgiving**, meaning even if you usually burn water, you’ve got this. Seriously, it’s pretty much idiot-proof. Plus, these little cups are portion control *pre-made* (or at least that’s what I tell myself after eating three). No more wrestling with baking sheets or debating if your “cookie” is actually a giant blob. These are consistently perfect, every single time. And did I mention they look adorable? Perfect for pretending you’re a fancy baker without, you know, actually being one. 😉
Ingredients You’ll Need
Gather ’round, my sweet-toothed companions! Here’s what you’ll need to whip up these little bundles of joy. Nothing too wild, I promise!
- **1/2 cup (1 stick) unsalted butter**, softened. Not melted, not rock-hard, just perfectly soft. This is key, trust me.
- **1/2 cup granulated sugar**. The white stuff.
- **1/4 cup packed light brown sugar**. Hello, chewiness and flavor! Don’t skip this, it’s the secret sauce.
- **1 large egg**. Straight from the fridge is fine, no need to overthink it.
- **1 teaspoon vanilla extract**. The good stuff, please. It makes a difference!
- **1 1/4 cups all-purpose flour**. The backbone of our cookie cups.
- **1/2 teaspoon baking soda**. Helps them get nice and puffy.
- **Pinch of salt**. Just a little something to balance all that sweetness.
- **1 cup chocolate chips**. Semi-sweet, milk, dark, a mix – your call! Live your best chocolate life.
Step-by-Step Instructions
Alright, apron on (or not, I’m not judging), let’s get baking!
- **Preheat Your Oven & Prep Your Pan:** First things first, get that oven to 375°F (190°C). Then, grab a 12-cup muffin tin and either grease it really well or use those cute paper liners. I prefer greasing directly for that perfect “cup” shape.
- **Cream the Butter & Sugars:** In a medium bowl, combine your softened butter, granulated sugar, and brown sugar. Beat them together with an electric mixer (or a strong arm!) until the mixture is light and fluffy. This usually takes about 2-3 minutes.
- **Add Egg & Vanilla:** Crack in that egg and pour in the vanilla extract. Beat again until everything is just combined. Don’t overdo it!
- **Combine Dry Ingredients:** In a separate, smaller bowl, whisk together your flour, baking soda, and salt. This ensures everything is evenly distributed and you don’t get a random salty bite.
- **Mix Wet & Dry:** Gradually add the dry ingredients to the wet ingredients, mixing on low speed until just combined. **Stop mixing** as soon as you see no more dry streaks of flour. Overmixing is the enemy of tender cookies!
- **Fold in Chocolate Chips:** Now for the best part! Gently fold in those chocolate chips with a spoon or spatula. Make sure they’re spread throughout the dough.
- **Fill the Muffin Tin:** Scoop roughly 2 tablespoons of dough into each cup of your prepared muffin tin. Don’t press them down too hard; just let them settle.
- **Bake ‘Em Up!** Pop that muffin tin into your preheated oven and bake for 10-12 minutes, or until the edges are golden brown and the centers are just set. They might look a little underdone in the middle, but that’s what makes them chewy!
- **Cool & Enjoy:** Let the cookie cups cool in the muffin tin for about 5-10 minutes. This is crucial as they’ll continue to set up. Then, carefully remove them to a wire rack to cool completely. Or, if you’re like me, eat one while it’s still warm and gooey. 😉
Common Mistakes to Avoid
Nobody’s perfect, but we can avoid these rookie blunders together!
- **Not Greasing the Pan (or Using Liners):** Thinking you can just plop the dough in there and they’ll magically pop out? Good luck with that! Grease generously or use liners unless you enjoy scraping.
- **Overmixing the Dough:** Once the flour goes in, mix only until just combined. Overmixing develops the gluten too much, leading to tough, chewy (in a bad way) cookie cups instead of soft ones.
- **Baking Too Long:** Resist the urge to bake until they look “done” like a cake. Cookie cups should be slightly soft in the middle when you pull them out. They firm up as they cool, so **don’t overbake!**
- **Not Cooling in the Pan:** Yanking them out of the hot pan too soon is a recipe for crumbled cookie chaos. Let them chill for a few minutes; they need to set their structure!
Alternatives & Substitutions
Feeling a little adventurous, or just out of one ingredient? No worries, we can totally get creative!
- **Butter vs. Margarine:** Can you use margarine? Technically, yes. But IMO, butter gives these cookies an unbeatable flavor and texture. Margarine can make them a bit flatter and less rich. Stick with butter if you can!
- **Chocolate Chip Varieties:** Mix it up! Try white chocolate chips, dark chocolate chunks, peanut butter chips, or even M&M’s for a burst of color.
- **Add-ins:** Feeling fancy? Stir in some chopped nuts (walnuts or pecans are great!), a sprinkle of sea salt on top before baking, or even a dash of espresso powder for a deeper chocolate flavor.
- **Flour Power:** While all-purpose is standard, you *could* experiment with a small amount of whole wheat pastry flour for a slightly nuttier flavor, but stick mostly to AP flour for best results.
FAQ (Frequently Asked Questions)
- **Can I make these gluten-free?** You betcha! Just swap out the all-purpose flour for a 1:1 gluten-free baking flour blend. Make sure it has xanthan gum in it for the best texture.
- **How long do these cookie cups last?** If you manage not to eat them all in one sitting (impressive!), they’ll stay fresh in an airtight container at room temperature for up to 3-4 days.
- **Can I freeze them?** Absolutely! Once they’re completely cooled, pop them into a freezer-safe bag or container. They’ll last for up to 2-3 months. Just thaw at room temp, or zap ’em in the microwave for a few seconds for that warm, gooey goodness.
- **My cookie cups are sticking! What went wrong?** Did you grease your muffin tin thoroughly? Or maybe you tried to remove them too soon? **Patience is a virtue!** Make sure they cool for at least 5-10 minutes in the pan before attempting to remove.
- **Can I use a mini muffin tin?** Yep! Just reduce the baking time to about 7-9 minutes and keep a close eye on them. They’ll be adorable little bite-sized treats!
Final Thoughts
So there you have it, my friend! Your new favorite (and ridiculously easy) way to get your chocolate chip cookie fix. These little cups are perfect for parties, lunchboxes, or just a Tuesday night when you need a hug in dessert form. Now go impress someone—or yourself, which is arguably more important—with your new culinary skills. You’ve earned it! Happy baking, you rockstar!

