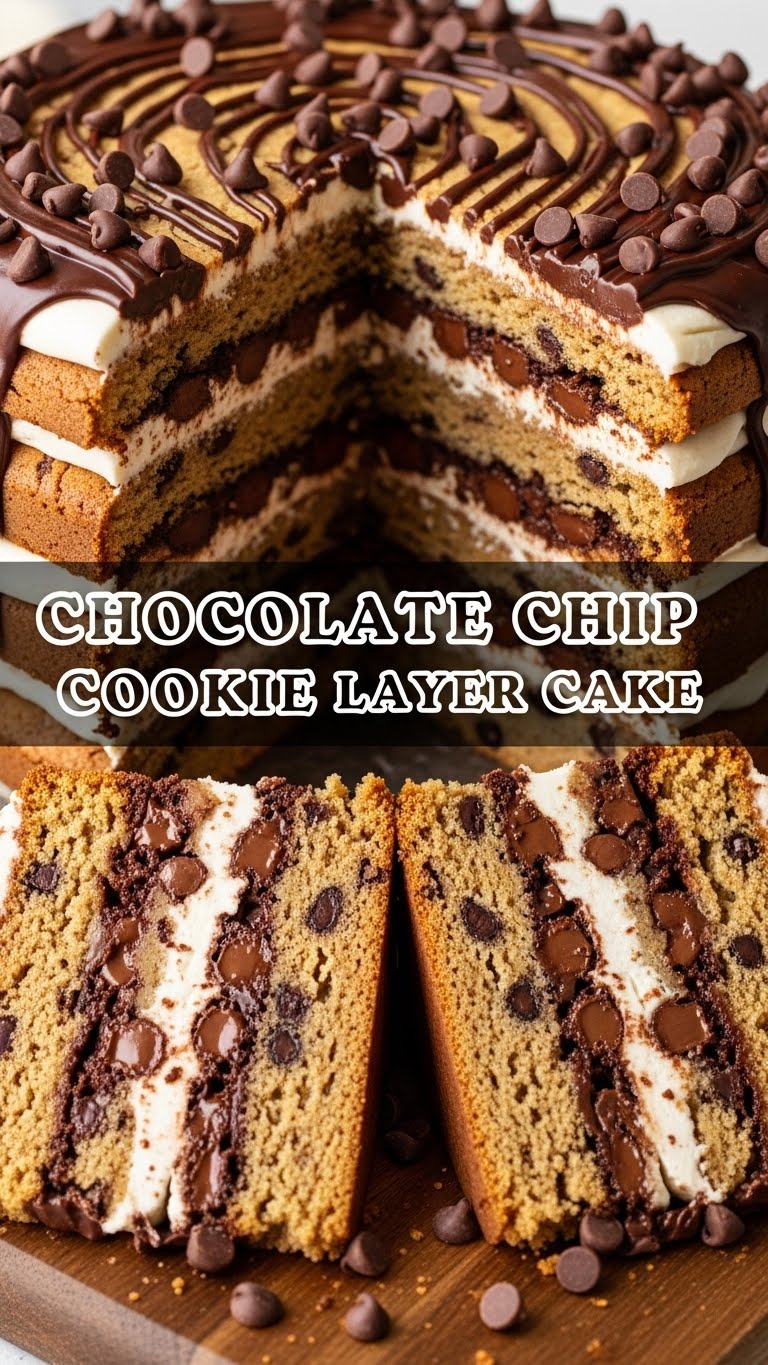
So, you’re staring at your sad, empty dessert plate, dreaming of something epic but also kind of want to binge-watch that new show? Same, friend, same. We’ve all been there – that deep, soul-crushing craving for a cookie that’s *more* than just a cookie. Like, a cookie that went to finishing school and learned to stand tall and proud. Enter: the Chocolate Chip Cookie Layer Cake. It’s basically a giant, fancy stack of your favorite comfort food, ready to impress (or just fulfill your deepest cookie desires).
Why This Recipe is Awesome
Let’s be real, life is too short for bland desserts. And it’s definitely too short for desserts that require a PhD in pastry arts. This bad boy? It’s the culinary equivalent of putting on sweatpants but still looking fabulous. You get all the chewy, melty goodness of a chocolate chip cookie, but layered up with luscious frosting, making it feel super fancy without, you know, actually being difficult. It’s practically idiot-proof. Seriously, if I can do it without setting off the smoke alarm, you’re golden. Plus, it serves a crowd, so you can share… or not. No judgment here.
Ingredients You’ll Need
Gather your troops! Here’s what you’ll need to transform some basic stuff into a dessert legend:
- For the Cookie Layers:
- 1 cup (2 sticks) unsalted butter, softened (aka, leave it out for a bit, don’t microwave it into oblivion)
- ¾ cup granulated sugar (the regular white stuff)
- ¾ cup packed light brown sugar (adds that chewy goodness)
- 2 large eggs (preferably not from grumpy chickens)
- 2 teaspoons vanilla extract (the good stuff, please)
- 2 ¼ cups all-purpose flour (no fancy ancient grains needed)
- 1 teaspoon baking soda (the leavening magic)
- ½ teaspoon salt (don’t skip this, it balances everything)
- 1 ½ cups semi-sweet chocolate chips (or milk, or dark, your party!)
- For the Vanilla Buttercream Frosting:
- 1 cup (2 sticks) unsalted butter, softened (again, chill out with the microwave)
- 3-4 cups powdered sugar (confectioners’ sugar, the super fine kind)
- 1-2 tablespoons milk (any kind works, even oat if you’re feeling hip)
- 1 teaspoon vanilla extract (because vanilla makes everything better)
- Pinch of salt (to cut through the sweetness)
- Optional Toppings: More chocolate chips, chocolate shavings, sprinkles (because sprinkles make everything festive).
Step-by-Step Instructions
Alright, apron on (or not, live dangerously!), let’s get this party started:
- **Preheat & Prep:** Preheat your oven to 350°F (175°C). Grease and flour two 8 or 9-inch round cake pans. You can also line the bottoms with parchment paper for easy release. **Seriously, don’t skip the greasing!**
- **Cream the Butter & Sugars:** In a large bowl, cream together the softened butter, granulated sugar, and brown sugar until light and fluffy. This usually takes about 2-3 minutes with an electric mixer.
- **Add Eggs & Vanilla:** Beat in the eggs one at a time, making sure each is fully incorporated before adding the next. Stir in the vanilla extract.
- **Mix Dry Ingredients:** In a separate medium bowl, whisk together the flour, baking soda, and salt.
- **Combine Wet & Dry:** Gradually add the dry ingredients to the wet ingredients, mixing on low speed until *just* combined. Don’t overmix!
- **Fold in Chocolate Chips:** Gently fold in the chocolate chips with a spatula.
- **Divide & Bake:** Divide the cookie dough evenly between your two prepared cake pans. Spread it out with an offset spatula or the back of a spoon.
- **Bake the Layers:** Bake for 20-25 minutes, or until the edges are golden brown and a toothpick inserted into the center comes out with moist crumbs (not raw batter!). They might look a little soft in the middle, but they’ll firm up as they cool.
- **Cool Down:** Let the cookie layers cool in the pans for about 10-15 minutes before carefully inverting them onto a wire rack to cool completely. This is key, otherwise they’ll break.
- **Make the Buttercream:** While the cookies cool, beat the softened butter in a medium bowl until creamy. Gradually add the powdered sugar, a cup at a time, alternating with splashes of milk and the vanilla extract. Beat until light and fluffy, adding more milk if needed to reach a spreadable consistency. Stir in a pinch of salt.
- **Assemble the Cake:** Once the cookie layers are completely cool, place one layer on your serving plate. Spread about half of the buttercream evenly over the top. Carefully place the second cookie layer on top. Frost the top and sides of the entire cake with the remaining buttercream.
- **Decorate & Devour:** Decorate with extra chocolate chips, sprinkles, or whatever your heart desires. Slice it up and enjoy your masterpiece!
Common Mistakes to Avoid
Look, we all make mistakes. It’s how we learn… or how we end up with a dessert fail. Let’s try to avoid the latter, shall we?
- **Overmixing the Dough:** This is the #1 culprit for tough, dry cookies. Once you add the flour, mix until *just* combined. Think “gentle caress,” not “aggressive wrestle.”
- **Warm Cookie Layers:** Trying to frost warm cookies is like trying to ice skate uphill—futile and messy. Wait until they are completely cool! I mean it.
- **Guessing with Ingredients:** Baking is a science, not an art project (unless you’re decorating). Measure your flour and sugar properly. A kitchen scale is your BFF here.
- **Not Greasing the Pans Properly:** Rookie mistake! Your beautiful cookie layers will stick and crumble. Grease and flour, or parchment paper it up.
- **Impatient Oven Peeking:** Opening the oven door every two minutes drops the temperature and messes with your bake. Resist the urge!
Alternatives & Substitutions
Feeling creative? Or just missing an ingredient? No stress, we can totally adapt!
- **Chocolate Chip Varieties:** Swap out semi-sweet for milk chocolate, dark chocolate, white chocolate, or even a mix! Peanut butter chips or butterscotch chips would also be divine.
- **Add-ins:** Fold in some chopped nuts (pecans, walnuts), a handful of M&M’s, or even a sprinkle of sea salt flakes over the frosting for a gourmet touch.
- **Frosting Fun:** Not a fan of vanilla buttercream? Try a cream cheese frosting for a tangier vibe, or a chocolate buttercream for a double chocolate whammy. You can even use store-bought frosting if you’re feeling extra lazy – no shame in that game!
- **Gluten-Free:** You can experiment with a 1:1 gluten-free baking flour blend. Results may vary slightly, but it’s definitely doable.
- **Dairy-Free:** Use dairy-free butter alternatives and milk for both the cookies and frosting. Just make sure your chocolate chips are also dairy-free.
FAQ (Frequently Asked Questions)
Got questions? I’ve got answers (mostly, don’t ask me about astrophysics).
- **”Can I make the cookie dough ahead of time?”** Absolutely! You can refrigerate the dough for up to 3 days. Just bring it to room temperature for about 30 minutes before spreading into the pans.
- **”What if I only have one cake pan?”** You can bake one layer at a time. Just make sure to re-grease and flour the pan for the second batch. Or, bake it all in one large cookie cake, then carefully slice it horizontally into two layers (requires a steady hand, FYI).
- **”How should I store this majestic creation?”** Keep it covered tightly at room temperature for up to 2-3 days, or in the fridge for up to 5 days. Let it come to room temp before serving for the best texture.
- **”Can I freeze the cake?”** You bet! Wrap individual slices or the whole unfrosted layers tightly in plastic wrap, then foil, and freeze for up to 2 months. Thaw in the fridge overnight.
- **”My cookie layers are crumbly, what gives?”** Likely overbaked or overmixed. Next time, pull them from the oven when they still look a *little* underdone in the center. Remember, they continue to cook a bit as they cool.
- **”Is it okay if my frosting isn’t perfectly smooth?”** Hun, it’s a homemade cookie cake, not a wedding cake! The rustic look is charming. Embrace the imperfections. It’s all about the taste!
Final Thoughts
There you have it, folks! Your new favorite dessert that looks like you spent hours slaving away, but secretly you just watched an entire season of your favorite show while it all came together. Go forth and conquer those cookie cravings! Now go impress someone—or yourself—with your new culinary skills. You’ve earned it!


