Short, Catchy Intro
So, you’ve got that craving, right? The one that screams “CHOCOLATE!” but also whispers “CARAMEL!” and then yells “BUT MAKE IT CAKE, DAMMIT!” And you want it now, without spending your entire Saturday in a flour-dusted war zone. Been there, friend, many, many times. Good news: I’ve got your back with a Chocolate Caramel Cake that’s so ridiculously easy and delicious, you might just wonder if you accidentally swapped your baking pan for a magic wand. Spoiler alert: you didn’t. It’s just that good.
Why This Recipe is Awesome
Okay, so why should this be your go-to recipe when your sweet tooth is having a full-blown meltdown? First off, it’s **insanely delicious**. We’re talking moist chocolate cake, gooey caramel, and dreamy frosting all getting along perfectly. Seriously, it’s a party in your mouth and everyone’s invited. Second, and perhaps most importantly for us mere mortals, it’s pretty much **idiot-proof**. I’ve personally tested this theory multiple times (don’t ask), and unless you intentionally try to set your oven on fire, you’re golden. Plus, it looks super impressive, making you look like a culinary wizard with minimal effort. Win-win, right?
Ingredients You’ll Need
No crazy, hard-to-find stuff here. Just the good ol’ basics with a caramel twist. Grab your apron and let’s do this!
- For the Chocolate Cake:
- 2 cups all-purpose flour (the basic stuff, no fancy business)
- 1 ¾ cups granulated sugar (because happiness is sweet)
- ¾ cup unsweetened cocoa powder (go dark for extra drama, if you dare)
- 1 ½ teaspoons baking soda (the secret to fluffy goodness)
- 1 teaspoon salt (don’t skip this, it makes everything pop!)
- 2 large eggs (room temp, if you’re feeling fancy)
- 1 cup whole milk (or buttermilk for extra tenderness – your choice!)
- ½ cup vegetable oil (or any neutral oil)
- 1 tablespoon vanilla extract (the more, the merrier, IMO)
- 1 cup boiling water (or hot coffee for next-level chocolate richness!)
- For the Caramel Layer & Drizzle:
- 1 can (14 oz) dulce de leche or your favorite store-bought caramel sauce (let’s keep it easy, okay?)
- For the Chocolate Buttercream Frosting:
- 1 cup (2 sticks) unsalted butter, softened (this is non-negotiable for creamy dreams)
- 4 cups powdered sugar (sifted, if you want super smooth frosting)
- ½ cup unsweetened cocoa powder
- ¼ cup whole milk or heavy cream (add more if needed, tablespoon by tablespoon)
- 1 teaspoon vanilla extract
- Pinch of salt (again, essential!)
Step-by-Step Instructions
Ready to bake some magic? Follow these simple steps and try not to eat all the batter. (I said *try*.)
- Preheat & Prep: Get your oven to **350°F (175°C)**. Grease and flour two 9-inch round cake pans. Or, line them with parchment paper circles if you’re a pro. Trust me, you don’t want your cake to stick.
- Mix Dry Ingredients: In a large bowl, whisk together the flour, sugar, cocoa powder, baking soda, and salt. Give it a good whisk to make sure everything’s evenly distributed.
- Add Wet Ingredients (Almost!): Create a little well in the center of your dry ingredients. Pour in the eggs, milk, oil, and vanilla extract. Beat with an electric mixer on medium speed for about 2 minutes until just combined and smooth. **Don’t overmix!**
- Bring on the Heat: Carefully, and gradually, pour the boiling water (or hot coffee!) into the batter while mixing on low speed. The batter will be thin – don’t panic! It’s supposed to be like that.
- Bake It Up: Divide the batter evenly between your two prepared pans. Bake for 30-35 minutes, or until a wooden skewer inserted into the center comes out clean. Let them cool in the pans for 10-15 minutes before flipping them onto a wire rack to cool completely. This is the hardest part – waiting!
- Whip Up the Frosting: While the cakes cool, beat the softened butter in a large bowl with an electric mixer until light and fluffy. Gradually add the powdered sugar and cocoa powder, alternating with the milk/cream and vanilla, beating until smooth and creamy. Add a pinch of salt. If it’s too thick, add a tiny bit more milk; too thin, add more powdered sugar.
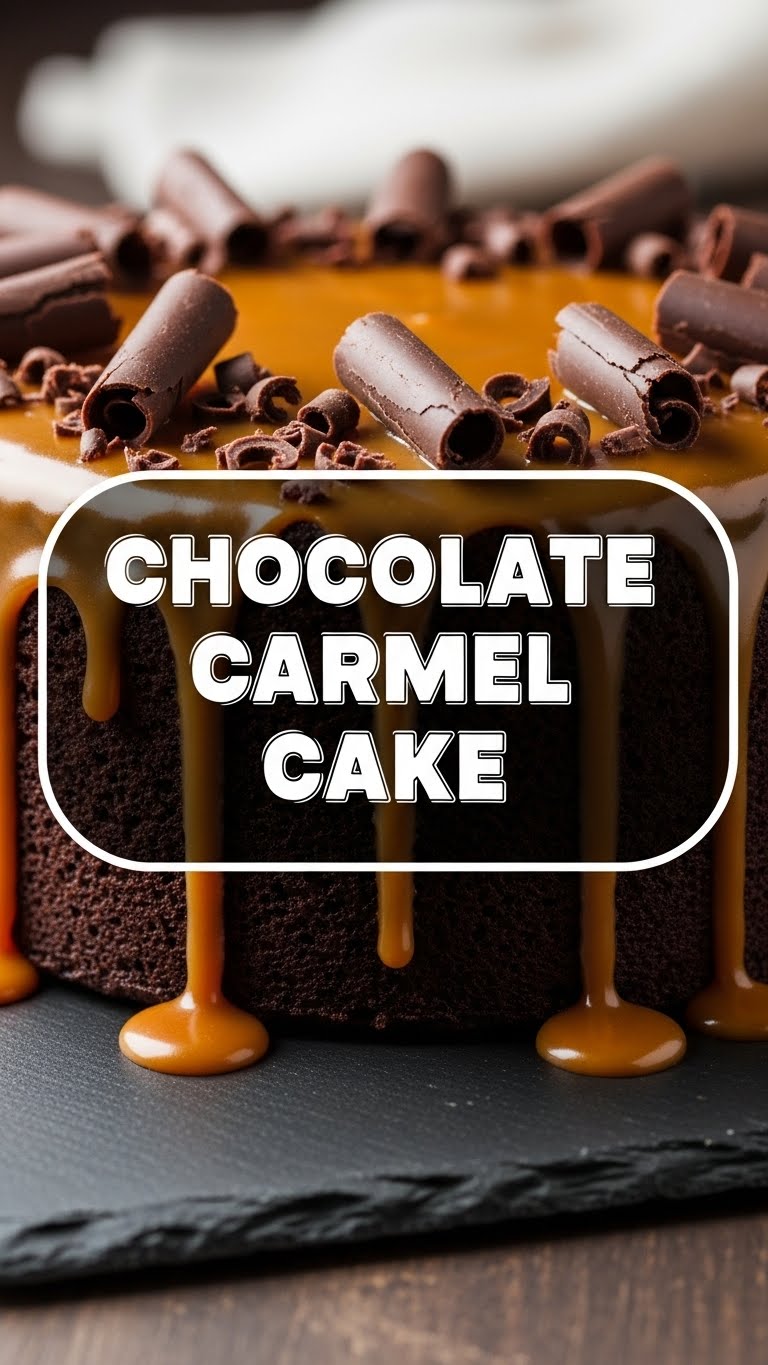
- Assemble the Dream: Once the cakes are completely cool (this is crucial, folks!), place one layer on your serving plate. Spread about half of the caramel sauce evenly over the top. Then, spread a generous layer of chocolate buttercream over the caramel. Place the second cake layer on top.
- Frost & Drizzle: Frost the entire cake with the remaining chocolate buttercream. Now for the fun part: gently warm the rest of your caramel sauce (a few seconds in the microwave works wonders) and **drizzle it artfully over the top** of the frosted cake. Get creative!
Common Mistakes to Avoid
Even us pros (read: enthusiastic amateurs) stumble sometimes. Here’s how to avoid rookie errors:
- Thinking you don’t need to preheat the oven. Rookie mistake, seriously. That even heat is vital for a good rise.
- Overmixing the batter. This is the quickest way to a tough, dry cake. Mix until just combined, then stop. Walk away. No, really.
- Not cooling the cake completely before frosting. Unless you’re going for a melted, sliding-off-the-sides disaster, let those cakes chill out entirely. Warm cake + frosting = sad mess.
- Eyeballing ingredients. Baking is a science, my friend. Precision matters! Save your improv skills for dinner.
- Licking the mixer beaters and then remembering you have to share. Okay, maybe not a *mistake*, but definitely a common predicament. YOLO, right?
Alternatives & Substitutions
Feeling adventurous or just missing an ingredient? Here are some ideas:
- Caramel Sauce: If you’re feeling ambitious (or just a little bit extra), you can totally make your own caramel from scratch. But honestly, good quality store-bought dulce de leche is a lifesaver and tastes amazing. **No judgment here!**
- Cake Flavor: Not a fan of chocolate? You could adapt this with a vanilla or yellow cake base. Just swap the cocoa powder for more flour, and maybe add a little extra vanilla.
- Frosting: A cream cheese frosting would be divine here if you want to cut some of the sweetness. Or, for a super decadent twist, try a ganache!
- Add-ins: Throw in some chocolate chips, a sprinkle of sea salt flakes on the caramel drizzle (hello, salted caramel!), or even chopped nuts (pecans, walnuts) between the layers for extra texture.
FAQ (Frequently Asked Questions)
Q: Can I use margarine instead of butter? A: Well, technically yes, but why hurt your soul (and your frosting’s texture) like that? For the best, creamiest buttercream, **stick to real butter**. Your taste buds will thank you.
Q: How long does this cake last? A: If stored properly in an airtight container at room temperature, about 3-4 days. In the fridge, maybe a bit longer. But let’s be real, it won’t last that long. It’s too tasty!
Q: Can I make this cake ahead of time? A: Absolutely! You can bake the cake layers a day in advance, wrap them tightly in plastic wrap, and store them at room temp. Frosting can also be made a day ahead and refrigerated; just bring it to room temp and re-whip before using. Assemble the day you plan to serve for maximum freshness.
Q: My frosting is too stiff/too runny, help! A: For too stiff, add milk/cream a teaspoon at a time until it’s perfect. For too runny, add powdered sugar a tablespoon at a time until it thickens up. It’s all about finding that sweet spot!
Q: What if I don’t have two cake pans? A: No problem! You can bake the layers one at a time. Just make sure to wash and prep the pan again for the second batch. Or, make it a single-layer bundt cake (adjust baking time!) and just pile the frosting and caramel on top.
Q: Can I use instant coffee instead of brewing hot coffee? A: Yep! Just dissolve 1-2 tablespoons of instant coffee granules in your cup of boiling water. It enhances the chocolate flavor without making the cake taste like coffee, FYI.
Final Thoughts
There you have it! A Chocolate Caramel Cake that’s guaranteed to earn you rave reviews, major brownie points (or cake points, in this case), and probably requests for seconds. It’s a little bit of effort for a whole lot of delicious payoff. Now go impress someone – or just yourself – with your new culinary superpowers. You’ve earned it! Seriously, go forth and bake!

