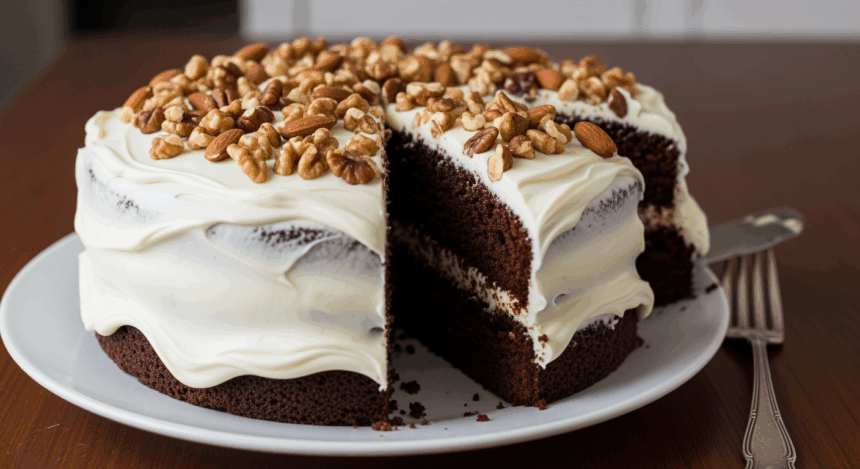
Alright, chocolate cake lovers, gather ’round! Ever had one of those days when you’re craving something so decadent and chocolatey that nothing else will do? Well, put down that store-bought nonsense because I’m about to rock your world with a chocolate cake that’s so good, you might shed a tear (or two). This isn’t just any chocolate cake—it’s THE chocolate cake with cloud-like white frosting and perfectly toasted nuts that’ll make your taste buds do a happy dance!
Why This Recipe is Awesome
Let’s cut to the chase—this cake is basically happiness in edible form. It’s ridiculously moist (yes, I said that word, deal with it) on the inside, with a frosting so fluffy you could practically nap on it. The contrast between the dark chocolate cake and the sweet white frosting is basically the yin and yang of desserts.
And those nuts? They’re not just there to look pretty. They add this amazing crunch that takes this cake from “Oh, that’s nice” to “WHERE HAS THIS BEEN ALL MY LIFE?!” Plus, this recipe is surprisingly forgiving—even if you’re the type who usually burns water. No fancy techniques required, just good ol’ mixing and baking.
Ingredients You’ll Need
For the cake:
- 2 cups all-purpose flour (the regular stuff, nothing fancy)
- 2 cups granulated sugar (because we’re not here to count calories)
- ¾ cup unsweetened cocoa powder (the darker, the better)
- 2 teaspoons baking soda (not baking powder—they’re different, trust me)
- 1 teaspoon salt (to make the sweetness pop)
- 2 large eggs (room temperature, because cold eggs are party poopers)
- 1 cup buttermilk (or regular milk with a splash of vinegar if you’re not that fancy)
- ½ cup vegetable oil (keeps it moist—there’s that word again)
- 2 teaspoons vanilla extract (the real deal, not that imitation nonsense)
- 1 cup hot coffee (don’t worry, it won’t taste like coffee)
For the white frosting:
- 1 cup unsalted butter, softened (patience, grasshopper—really let it soften)
- 4 cups powdered sugar (yes, FOUR cups, we’re not playing around here)
- ¼ cup heavy cream (the stuff dreams are made of)
- 2 teaspoons vanilla extract (again, the real deal)
- Pinch of salt (trust me on this one)
For the nutty finish:
- 1½ cups chopped nuts (walnuts or pecans work best, but you do you)
- A sprinkle of extra chopped nuts for decorating (because we’re fancy like that)
Step-by-Step Instructions
- Prep your battle station. Preheat your oven to 350°F (175°C). Grease and flour two 9-inch round cake pans, or line them with parchment paper if you’re feeling extra cautious.
- Mix the dry ingredients. In a large bowl, whisk together flour, sugar, cocoa powder, baking soda, and salt. Make sure there are no cocoa clumps—nobody wants a surprise powder pocket.
- Add the wet team. Throw in the eggs, buttermilk, oil, and vanilla. Mix until just combined—don’t go all Hulk on it.
- Coffee time! Slowly add the hot coffee. The batter will be thin, like suspiciously thin, but I promise that’s normal. The coffee brings out the chocolate flavor without making it taste like your morning brew.
- Bake it till you make it. Pour the batter evenly into your prepared pans and bake for 30-35 minutes, or until a toothpick inserted in the center comes out clean. If it comes out with batter, keep baking. If it comes out with crumbs, you’re golden!
- Cool your jets. Let the cakes cool in pans for about 10 minutes, then transfer to wire racks to cool completely. Seriously, don’t rush this step unless you want a frosting avalanche.
- Toast those nuts. While the cakes are cooling, spread your nuts on a baking sheet and toast them in the oven for 8-10 minutes at 350°F. They should smell fragrant and look slightly darker. Let them cool before chopping.
- Whip up that frosting. Beat the softened butter until creamy. Gradually add powdered sugar, alternating with cream. Add vanilla and salt, then beat until fluffy—about 3-5 minutes. You want it so light it practically floats.
- Assemble the masterpiece. Place one cake layer on your serving plate, spread a thick layer of frosting on top, sprinkle with a generous amount of chopped nuts, then top with the second cake layer.
- Frost like a boss. Cover the top and sides with the remaining frosting. Don’t stress about making it perfect—we’re going for “homemade with love,” not “robot precision.”
- Go nuts! Press the remaining chopped nuts onto the sides of the cake and sprinkle some on top. Get creative with your nut placement or just throw ’em on there—it’ll taste amazing either way.
Common Mistakes to Avoid
Let’s keep you from sabotaging this delicious creation, shall we?
- Opening the oven every 5 minutes to “check.” Your cake will sink faster than my motivation on Monday mornings. Keep that door closed!
- Frosting a warm cake. Unless you’re going for the “melted snowman” look, be patient and wait until it’s completely cool.
- Skipping the coffee. “But I don’t like coffee!” I hear you, but you won’t taste it. It just makes the chocolate flavor more intense. If you absolutely refuse, use hot water instead, but know that I’m judging you a little.
- Burning the nuts. They go from “perfectly toasted” to “charcoal briquettes” in about 30 seconds. Set a timer and watch them like a hawk.
- Undermixing the frosting. If your arm isn’t at least a little tired, you haven’t mixed enough. Fluffy frosting requires some effort, people!
Alternatives & Substitutions
Not everyone’s pantry is stocked like a professional bakery (shocking, I know), so here are some swaps that won’t ruin everything:
Buttermilk substitute: No buttermilk? No problem. Mix 1 tablespoon of white vinegar or lemon juice with 1 cup of milk and let it sit for 5 minutes. Boom—fake buttermilk!
Nut options: Walnuts and pecans are my top picks, but almonds or hazelnuts work great too. If you’re serving this to someone with nut allergies, toasted coconut flakes make a delicious (and less deadly) alternative.
Gluten-free version: Swap the all-purpose flour for a 1:1 gluten-free baking flour. IMO, the ones with xanthan gum already included work best.
Coffee alternatives: Not a coffee fan? Use hot chocolate instead. It’ll make it even more chocolatey, which is never a bad thing.
Frosting colors: Want to jazz it up? Add a drop or two of food coloring to your white frosting. Pink, blue, whatever floats your boat—just don’t go overboard unless you’re aiming for that “unicorn threw up” aesthetic.
FAQ (Frequently Asked Questions)
Can I make this cake ahead of time?
Absolutely! The cake layers can be made a day in advance, wrapped in plastic wrap, and stored at room temperature. The frosting can also be made ahead and refrigerated—just bring it to room temperature before frosting. The fully assembled cake is best within 2-3 days, stored in the fridge.
Will this work as cupcakes instead?
You bet! Fill cupcake liners about 2/3 full and bake for 18-20 minutes. This recipe should make about 24 cupcakes. Perfect for when you don’t want to share a whole slice!
Do I really need to use hot coffee?
Are you still hung up on this? Fine. The hot liquid helps bloom the cocoa powder, making the chocolate flavor more intense. Hot water works too, but coffee adds depth without making it taste like coffee. Trust the process!
My frosting is too runny/too stiff. Help!
Too runny? Add more powdered sugar, a few tablespoons at a time. Too stiff? Add a splash more cream. Frosting is forgiving—you can keep adjusting until it’s just right.
Can I freeze leftovers?
Leftovers? What leftovers? But yes, you can freeze individual slices wrapped tightly in plastic wrap and foil for up to 3 months. Thaw overnight in the refrigerator before eating. Though honestly, I’ve eaten it partially frozen and it’s like a weird ice cream cake situation. Not bad!
Final Thoughts
There you have it—a chocolate cake that’s basically a love letter to your taste buds. The combo of rich chocolate cake, pillowy white frosting, and toasty nuts is pretty much unbeatable. It’s perfect for birthdays, Tuesday nights, breakups, job celebrations, or just because you made it through another day without telling your annoying coworker what you really think of them.
The best part? This cake makes you look like you know what you’re doing in the kitchen, even if your cooking skills usually peak at microwaving leftovers. So go ahead, bake this beauty and watch people’s eyes light up when they take that first bite. You can tell them it was complicated and took hours, I won’t tell.
Now go preheat that oven and unleash your inner pastry chef. Your chocolate cake destiny awaits!
