Short, Catchy Intro
So, your sweet tooth is doing the Macarena and demanding chocolate, but your motivation to spend all day in the kitchen is doing a slow fade into oblivion? Been there, baked that! We’re talking about a chocolate cake with vanilla frosting that’s so ridiculously easy, you’ll wonder if you secretly hired a professional baker. Get ready to bake like a boss, without, you know, actually *being* one.
Why This Recipe is Awesome
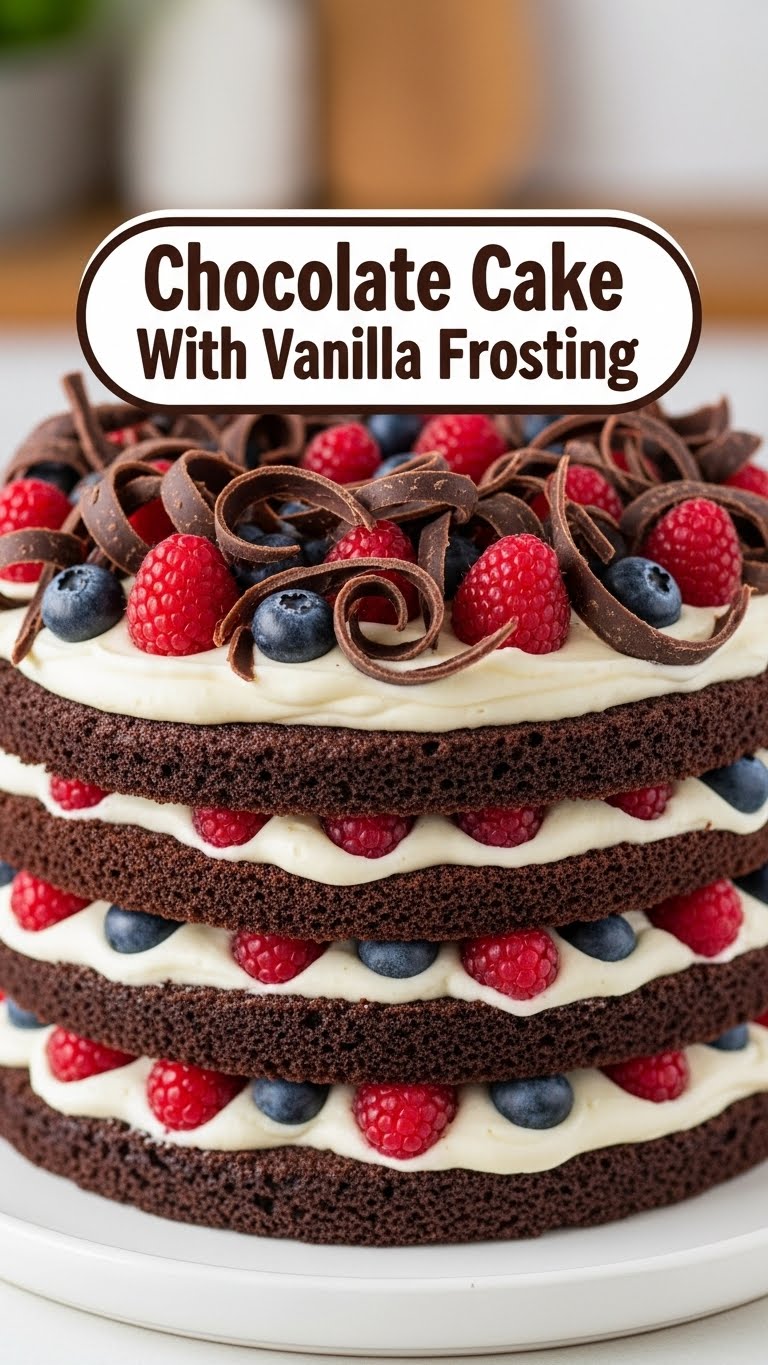
Okay, let’s be real. This isn’t just *any* chocolate cake. This is “I-can’t-believe-I-made-this-and-it’s-this-good” chocolate cake. It’s **idiot-proof**, seriously. Even if your culinary skills usually involve calling for takeout, you’ve totally got this. It’s moist, rich, and the frosting is literally a cloud of vanilla perfection that will make you question all other frostings. Plus, it comes together quicker than you can find a parking spot on a Saturday. Your friends will think you slaved all day. *Wink, wink.* You’re welcome.
Ingredients You’ll Need
Gather your culinary comrades! We’re keeping it simple here, no fancy-pants ingredients required.
**For the Ultra-Moist Chocolate Cake:**
- 2 cups All-purpose flour: The classic, all-rounder.
- 2 cups Granulated sugar: For that sweet, sweet goodness.
- ¾ cup Unsweetened cocoa powder: Make it a good quality one for deep chocolate vibes.
- 2 teaspoons Baking soda: Our little lift-off agent, don’t skip!
- 1 teaspoon Salt: A pinch of magic to make everything pop.
- 1 cup Milk (any kind, but whole milk makes it extra lush): Don’t worry, it won’t bite.
- ½ cup Vegetable oil (or any neutral oil): Keeps things moist, moist, moist.
- 2 large Eggs: Happy little binders, at room temperature if you can swing it.
- 2 teaspoons Vanilla extract: A splash of joy.
- 1 cup Hot water (or hot coffee for a deeper, richer flavor): **This is the secret weapon!** Seriously, don’t skip the hot liquid.
**For the Dreamy Vanilla Buttercream Frosting:**
- 1 cup (2 sticks) Unsalted butter: Room temp, please! No cold, hard blocks of sadness.
- 4 cups Powdered sugar (confectioners’ sugar): The fluffy kind, sifted if you’re feeling fancy.
- 2 teaspoons Vanilla extract: Extra vanilla for extra vanilla-ness.
- 2-4 tablespoons Milk (or heavy cream): Just a splash to get the right consistency.
- Pinch of salt: Balances the sweet, don’t forget it!
Step-by-Step Instructions
Alright, aprons on, let’s do this!
**For the Cake:**
- **Preheat & Prep:** Go ahead and preheat your oven to **350°F (175°C)**. Grease and flour two 8 or 9-inch round cake pans. Or, line them with parchment paper. Whatever floats your boat!
- **Dry Mix Magic:** In a large bowl, whisk together the flour, granulated sugar, cocoa powder, baking soda, and salt. Give it a good whisk to make sure everything is buddies.
- **Wet Ingredients Join the Party:** Add the milk, oil, eggs, and vanilla extract to your dry ingredients. Mix on medium speed with an electric mixer (or with serious arm power) for about 2 minutes, until just combined and smooth. **Don’t overmix!**
- **The Hot Secret:** Carefully pour the hot water (or coffee) into the batter. Mix on low speed until just combined. The batter will be thin – don’t panic, this is normal and part of the magic for that super moist crumb.
- **Bake Time!** Divide the batter evenly between your two prepared cake pans. Pop them in the preheated oven and bake for **30-35 minutes**, or until a wooden skewer inserted into the center comes out clean.
- **Cool Down:** Let the cakes cool in their pans for about 10-15 minutes before inverting them onto a wire rack to cool completely. **This is crucial!** Frosting a warm cake is a one-way ticket to a melted mess.
**For the Dreamy Vanilla Buttercream Frosting:**
- **Butter Up:** In a large bowl, beat the softened butter with an electric mixer on medium speed until it’s light and fluffy, about 2-3 minutes.
- **Sugar Rush:** Gradually add the powdered sugar, one cup at a time, beating well after each addition. Start on low speed to avoid a sugar cloud eruption in your kitchen, then increase to medium.
- **Flavor Time:** Stir in the vanilla extract and the pinch of salt. Beat until combined.
- **Get It Just Right:** With the mixer on low, gradually add the milk (or cream), one tablespoon at a time, until the frosting reaches your desired consistency – smooth, creamy, and spreadable. Beat on medium-high for another minute or two until it’s super fluffy.
- **Frost Away!** Once your cakes are completely cool (we mean it, completely!), spread that glorious vanilla buttercream between the layers and all over the top and sides. Decorate with sprinkles if you’re feeling extra!
Common Mistakes to Avoid
Look, we all make mistakes. But these are the ones you can totally sidestep to ensure cake success!
- **Not preheating the oven:** Rookie mistake! Your oven needs to be at the correct temperature *before* the cake goes in for even baking.
- **Overmixing the batter:** This is a big no-no. Overmixing develops the gluten too much, leading to a tough, dense cake. Mix until just combined, then stop.
- **Not cooling the cake completely:** As mentioned, trying to frost a warm cake is a recipe for disaster. Patience, young padawan!
- **Using cold butter for frosting:** Your butter absolutely needs to be at room temperature for that smooth, creamy buttercream. Cold butter will give you lumpy, sad frosting.
- **Eyeballing ingredients (especially for baking):** Baking is a science, my friend. Precision matters. Grab those measuring cups and spoons!
Alternatives & Substitutions
Feeling adventurous? Or just out of something? Here are some tweaks you can make.
- **Milk:** Any dairy or non-dairy milk (almond, soy, oat) will work for the cake. For the frosting, heavy cream makes it extra rich, but any milk is fine.
- **Oil:** While vegetable oil gives the best moistness IMO, you *can* use melted coconut oil or even melted unsalted butter if you prefer. Just know the texture might be slightly different.
- **Hot Water:** Seriously, try **hot coffee** instead of water. It deepens the chocolate flavor without making the cake taste like coffee. It’s next-level!
- **Frosting:** Not a buttercream fan? This cake also plays wonderfully with a simple ganache (equal parts chocolate and heavy cream, melted together) or even a luscious cream cheese frosting.
- **Cocoa Powder:** We recommend natural unsweetened cocoa for this recipe. If you only have Dutch-processed, it’s fine, but the texture might be slightly denser as it reacts differently with the baking soda.
FAQ (Frequently Asked Questions)
Got questions? I’ve got answers! (Mostly.)
- **Can I make this dairy-free?** Absolutely! Use your favorite non-dairy milk and butter substitute for both the cake and frosting.
- **My cake is dry! What went wrong?** Usually, a dry cake is an overbaked cake. Check your oven temperature with an oven thermometer and pull the cake out as soon as the skewer comes out clean. Also, ensure you’re using the hot liquid – it’s key for moisture!
- **Can I bake this in a different size pan?** You bet! If using a 9×13 inch pan, bake for about 30-35 minutes. For cupcakes, bake for 18-22 minutes. Just keep an eye on it, as baking times will vary.
- **How long does this cake last?** At room temperature, covered, it’s good for 2-3 days. In the fridge, it’ll happily hang out for up to a week. Just bring it to room temp before serving for best flavor.
- **Why the hot water/coffee? Does it really make a difference?** Oh, you bet your sweet bottom it does! The hot liquid helps to bloom the cocoa powder, intensifying the chocolate flavor, and also helps create that incredibly moist crumb. FYI, it’s pretty essential for this recipe’s amazing texture.
- **Can I use margarine instead of butter for the frosting?** Well, technically yes, but why hurt your soul like that? Butter just tastes better and gives a superior texture. But in a pinch, margarine can work.
- **My frosting is too thin/thick! Help!** No worries! If it’s too thick, add more milk (½ teaspoon at a time) until it’s perfect. If it’s too thin, gradually beat in more powdered sugar until it firms up. You’re the boss!
Final Thoughts
So there you have it, folks! Your new go-to recipe for when you want to impress without the stress, or just when you need a little chocolate hug. This cake is ridiculously good, super simple, and guaranteed to bring a smile to anyone’s face (especially yours). Go ahead, take a bow. You’ve earned it. Now go impress someone—or yourself—with your new culinary skills. Maybe even share a slice… or not. No judgment here! Enjoy every single, glorious bite.

