Ever had one of those days when you need chocolate cake so badly you’d consider trading your favorite streaming service subscription for just one slice? Well, put down that barter sign because I’ve got something better—a ridiculously delicious chocolate cake topped with a cloud of toasted meringue that’ll make your taste buds do a happy dance. It’s like having a s’more and a chocolate cake had a beautiful baby. And the best part? You get to use a kitchen torch. Who doesn’t love playing with fire… legally?
Why This Recipe is Awesome
Let me count the ways this cake will change your life (or at least your weekend):
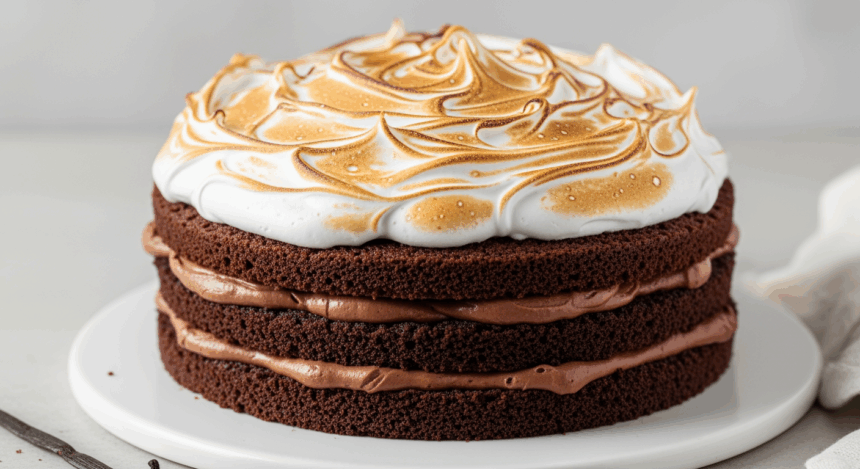
First, it’s a show-stopper that actually tastes as good as it looks. No Instagram food disappointments here! The contrast between the rich, moist chocolate cake and the light, toasty meringue is basically the yin and yang of desserts.
Second, that meringue topping is way easier than frosting. Seriously. No steady hand required—just whip, plop, torch, and voilà! Instant “I should have my own baking show” vibes.
Third, you get to use a kitchen torch. Did I mention that already? Well, it bears repeating because it makes you feel like a dessert scientist conducting delicious experiments.
Ingredients You’ll Need
For the Chocolate Cake:
- 2 cups all-purpose flour (the regular stuff, nothing fancy)
- 2 cups granulated sugar (you know, the white crystal-y stuff)
- ¾ cup unsweetened cocoa powder (the darker, the better—like my soul on Monday mornings)
- 2 teaspoons baking soda (not baking powder, they’re different—trust me on this one)
- 1 teaspoon salt (preferably not the stuff from your tears)
- 2 large eggs (from chickens, not dinosaurs, sadly)
- 1 cup buttermilk (or regular milk with a splash of vinegar if you forgot to buy buttermilk… again)
- ½ cup vegetable oil (keeps it moist, unlike that store-bought cake you regretted last week)
- 2 teaspoons vanilla extract (the real stuff, not the imitation that smells like plastic)
- 1 cup hot coffee (or hot water if you’ve already maxed out your caffeine for the day)
For the Meringue Topping:
- 4 egg whites (room temperature—important!)
- 1 cup granulated sugar (more of the white stuff)
- ¼ teaspoon cream of tartar (that weird ingredient you buy and use once a year)
- 1 teaspoon vanilla extract (yes, more vanilla because we’re not savages)
- Pinch of salt (just a tiny one—be nice)
Step-by-Step Instructions
For the Chocolate Cake:
- Preheat your oven to 350°F (175°C). Don’t skip this step, even though you want to. Grease and flour two 9-inch round cake pans or one 13×9 pan if you’re feeling rectangular today.
- In a large bowl, whisk together the flour, sugar, cocoa powder, baking soda, and salt. Make a little well in the center like you’re preparing for a tiny chocolate swimming pool.
- Add the eggs, buttermilk, oil, and vanilla to your dry ingredient pool party. Mix until just combined—no need to beat it to death.
- Now for the magic: Pour in the hot coffee or water and mix again. The batter will be thin, almost suspiciously so. Don’t panic—this is correct! It’s supposed to look like you messed up.
- Pour the batter into your prepared pan(s) and bake for 30-35 minutes, or until a toothpick inserted in the center comes out mostly clean. If it comes out with wet batter, keep baking. If it comes out with a few moist crumbs, you’re golden.
- Let the cake(s) cool completely in the pan for about 10 minutes, then turn out onto a wire rack to finish cooling. If you’re impatient (like me), you’ll ignore this advice and have a slightly broken cake. Learn from my mistakes.
For the Meringue:
- Once your cake is completely cool (I mean it this time), prepare the meringue. In a clean, dry bowl (any hint of grease will ruin everything), add your egg whites, sugar, and cream of tartar.
- Place this bowl over a pot of simmering water, creating a double boiler situation. Whisk constantly until the sugar dissolves and the mixture is warm to the touch (about 160°F if you’re getting technical).
- Remove from heat and beat with an electric mixer on high speed until stiff, glossy peaks form (about 5-7 minutes). Add the vanilla and pinch of salt during the last minute of beating.
- Pile the meringue on top of your cake like a fluffy cloud mountain. Get creative! Make peaks and valleys with the back of a spoon. This is your artistic moment.
- Now for the fun part: torch that meringue with a kitchen torch until golden brown in spots. No torch? Use your oven’s broiler for about 30 seconds, watching it like a hawk on caffeine.
Common Mistakes to Avoid
Even though this recipe is pretty forgiving (unlike my ex), here are some pitfalls to sidestep:
- Using cold eggs for meringue – They won’t whip properly, and you’ll end up with sad, flat topping. Room temperature, people!
- Overmixing the cake batter – This isn’t a test of your arm strength. Mix just until combined unless you enjoy rubber cake.
- Not letting the cake cool completely – Meringue + warm cake = slidey, melty mess. Patience is a virtue, or whatever.
- Getting yolk in your egg whites – Even a speck will sabotage your meringue dreams. Separate those eggs carefully!
- Holding the torch too close – Unless you’re going for “cremated” as your flavor profile, keep that flame moving and a few inches away from the meringue.
Alternatives & Substitutions
Because we all forget ingredients or have dietary restrictions (or are just plain contrary):
Gluten-free? Swap the all-purpose flour for a gluten-free blend. The cake will be slightly denser, but hey, more fudgy isn’t exactly a problem.
No buttermilk? Add 1 tablespoon of lemon juice or vinegar to 1 cup of regular milk and let it sit for 5 minutes. Boom—fake buttermilk!
Dairy-free? Use almond or oat milk with the acid trick above, and replace butter with coconut oil. The slight coconut flavor actually works with chocolate, IMO.
Hate coffee? First of all, who are you? Second, use hot water instead. You won’t taste the coffee in the finished cake anyway—it just enhances the chocolate flavor (trust the process).
No kitchen torch and scared of your broiler? You can skip toasting altogether, or sprinkle crushed graham crackers on top for that s’mores vibe without the fire hazard.
FAQ (Frequently Asked Questions)
Can I make this cake ahead of time?
You can make the cake layers a day ahead, but add the meringue right before serving. Unless you enjoy soggy meringue, which… are you OK?
Will this meringue weep or deflate?
It might after a few hours. That’s why it’s a “make and eat immediately” kind of topping. But let’s be real—this cake isn’t lasting that long anyway.
Can I use a hand mixer instead of a stand mixer?
Absolutely! Your arm might feel like it’s going to fall off during the meringue-whipping stage, but consider it your workout for the day. You’re burning calories to consume calories—it’s the circle of life.
Do I really need cream of tartar?
It stabilizes the egg whites, but if you don’t have it, a few drops of lemon juice will do in a pinch. The baking police won’t come for you.
Is this cake worth the effort?
Is the sky blue? Does coffee make Mondays bearable? Will your friends suddenly want to visit more often when they see your Instagram post of this cake? YES to all.
Final Thoughts
Look at you, about to make a chocolate cake that looks like it belongs in a fancy bakery window! The combination of deep chocolate flavor and toasty, marshmallow-like meringue is honestly worth the extra step beyond a regular frosted cake.
And FYI, this cake makes you look way more impressive than your baking skills might actually warrant—which is the whole point of dessert, right? To trick people into thinking you have your life together.
Now go forth and create your masterpiece! And when you’re torching that meringue, take a moment to enjoy the little pyromaniac thrill—it’s the simple pleasures that make baking fun. Just, you know, don’t burn down your kitchen. That would significantly decrease the enjoyment factor.

