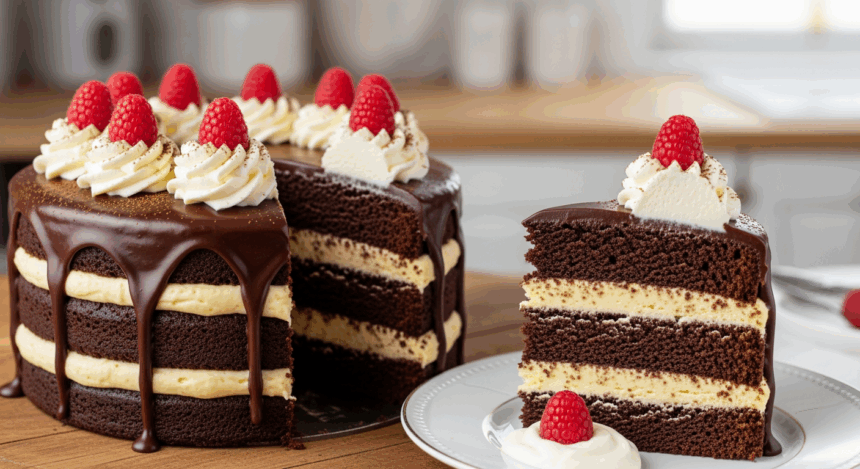
Let me tell you something – there’s nothing quite like the moment when chocolate cake meets tangy sour cream filling. It’s like that perfect rom-com moment when the unlikely couple finally gets together and everyone’s like, “Well DUH, what took you so long?” Ready to create some dessert magic that’ll make your taste buds do a happy dance? Let’s dive into this chocolate-sour cream love story!
Why This Recipe is Awesome
Look, I could pretend this cake is special because it has some fancy French technique or rare Himalayan ingredients, but let’s be real. This cake rocks because it’s the perfect balance between “looks impressive enough to post on Instagram” and “won’t make you throw your spatula across the kitchen in frustration.”
The chocolate cake itself is ridiculously moist (sorry if you hate that word, but there’s just no better description), and the sour cream filling adds this unexpected tangy kick that cuts through the sweetness. It’s basically the dessert equivalent of finding money in your old jacket pocket – a delightful surprise that makes everything better!
Ingredients You’ll Need
For the Chocolate Cake:
- 2 cups all-purpose flour (the regular stuff, nothing fancy)
- 2 cups granulated sugar (because, duh, it’s cake)
- ¾ cup unsweetened cocoa powder (the darker, the better – like my soul on Monday mornings)
- 2 teaspoons baking soda (not baking powder – they’re not the same thing, trust me on this one)
- 1 teaspoon salt (to make the sweet even sweeter, it’s science or something)
- 2 large eggs (room temperature, because cold eggs are party poopers)
- 1 cup buttermilk (or regular milk with a splash of vinegar if you forgot to buy buttermilk… again)
- ½ cup vegetable oil (keeps everything moist – there’s that word again)
- 2 teaspoons vanilla extract (the real stuff, not that imitation nonsense)
- 1 cup hot coffee (don’t worry, you won’t taste it – it just makes chocolate more chocolatey)
For the Sour Cream Filling:
- 1½ cups sour cream (full-fat, because we’re not here to count calories)
- ½ cup powdered sugar (sifted if you’re feeling fancy)
- 1 teaspoon vanilla extract (again, the real deal)
- Pinch of salt (trust me on this one)
For the Chocolate Frosting:
- 1 cup unsalted butter, softened (patience, grasshopper – truly softened butter is key)
- 3½ cups powdered sugar (yes, that much)
- ½ cup cocoa powder (more chocolate because… why not?)
- ¼ cup heavy cream (makes everything silky smooth)
- 2 teaspoons vanilla extract (are you sensing a theme here?)
- Pinch of salt (balances sweetness like a boss)
Step-by-Step Instructions
Prep Work (aka The Boring But Necessary Stuff):
- Preheat your oven to 350°F (175°C). Don’t skip this step! Your future cake depends on it.
- Grease and flour two 9-inch round cake pans. Or use parchment paper if you’re fancy (or just hate cleaning stuck-on cake bits).
- Brew that cup of coffee. It can be instant, leftover from breakfast, whatever – just make sure it’s hot.
For the Cake:
- In a large bowl, whisk together flour, sugar, cocoa, baking soda, and salt. Mix thoroughly – lumps are not your friends here.
- In another bowl, beat eggs, buttermilk, oil, and vanilla until well combined. It’ll look weird and that’s completely normal.
- Gradually add the wet ingredients to the dry ingredients, mixing on medium speed. The batter will be thick – again, totally normal!
- Pour in the hot coffee and mix until just combined. The batter will suddenly become thin and liquid-y. Don’t panic! This is exactly what we want.
- Divide the batter evenly between your prepared pans and bake for 30-35 minutes, or until a toothpick inserted in the center comes out clean (or with a few moist crumbs).
- Let the cakes cool in their pans for about 10 minutes, then turn them out onto wire racks to cool completely. If you try to fill them while warm, you’ll end up with a delicious disaster.
For the Sour Cream Filling:
- In a medium bowl, whisk together sour cream, powdered sugar, vanilla, and salt until smooth.
- Refrigerate for about 30 minutes to firm up slightly. Don’t skip this – nobody wants runny filling!
For the Chocolate Frosting:
- Beat the softened butter until creamy and smooth. If your butter isn’t truly softened, just stop now and wait. Seriously.
- Gradually add powdered sugar and cocoa powder, alternating with heavy cream. Your mixer might sound like it’s struggling – offer words of encouragement.
- Beat in vanilla and salt until the frosting is fluffy and spreadable. If it’s too thick, add a tiny bit more cream. If it’s too thin, add a little more powdered sugar. You’re the boss here!
Assembly (The Fun Part!):
- Place one cake layer on your serving plate. Pro tip: put strips of parchment paper under the edges to keep your plate clean during frosting.
- Spread the sour cream filling evenly over the cake, leaving about half an inch border around the edge (the filling will spread when you add the second layer).
- Gently place the second cake layer on top.
- Frost the top and sides with the chocolate frosting. Get creative here – smooth and sophisticated or rustic and swirly, it’s your cake!
- Remove those parchment strips (if you used them) and marvel at your clean cake plate. You fancy thing, you.
Common Mistakes to Avoid
Overmixing the batter: This isn’t a workout session. Once everything is combined, STOP mixing. Otherwise, you’ll end up with a cake that’s tougher than last week’s leftover steak.
Skipping the coffee: “But I don’t like coffee!” I hear you cry. Trust me, you won’t taste it. The coffee just enhances the chocolate flavor. It’s like coffee is chocolate’s personal hype man.
Not waiting for the cake to cool completely: Patience, young padawan. If you try to fill or frost a warm cake, you’ll end up with a melty, slidey mess that belongs on a baking fail compilation.
Making the filling too thin: If your sour cream filling isn’t chilled enough, it’ll ooze out the sides like a sad volcano. Nobody wants a sad volcano cake.
Forgetting the pinch of salt: It seems minor, but salt is the secret weapon in desserts. It’s like that friend who doesn’t say much but when they do, it’s always perfect.
Alternatives & Substitutions
Buttermilk substitute: No buttermilk? No problem! Mix 1 cup of milk with 1 tablespoon of lemon juice or white vinegar and let it sit for 5 minutes. Boom – DIY buttermilk.
Coffee alternatives: If you’re really anti-coffee, you can use hot water instead. But seriously, reconsider the coffee. It makes the chocolate taste more chocolatey without adding coffee flavor. Magic? Perhaps.
Filling variations: Want to jazz up the filling? Add some lemon zest for extra zing, or fold in some mini chocolate chips for texture contrast. Live your best cake life!
Frosting options: Not in a chocolate mood? (Who are you even?) You could swap the chocolate frosting for cream cheese frosting or even a vanilla buttercream. But IMO, chocolate-on-chocolate is where it’s at.
Gluten-free version: Replace the all-purpose flour with your favorite cup-for-cup gluten-free flour blend. The texture might be slightly different, but it’ll still be delicious.
FAQ (Frequently Asked Questions)
Can I make this cake ahead of time?
Absolutely! The cake layers can be made 1-2 days in advance – just wrap them well and store at room temperature. The assembled cake (with filling and frosting) will keep in the fridge for up to 3 days. Just let it come to room temperature before serving for maximum flavor.
Do I really need to use room temperature eggs?
Could you use cold eggs? Sure. Will your cake be as light and fluffy? Probably not. Room temp eggs incorporate more air into the batter. Take them out of the fridge 30 minutes before baking, or put them in warm (not hot) water for 5 minutes if you’re in a hurry.
Can I turn this into cupcakes?
You bet! Fill cupcake liners about 2/3 full and bake for 18-22 minutes. For the filling, core out a small portion of each cupcake and fill with the sour cream mixture before frosting. Bonus: the cake scraps are chef’s treats.
How do I store leftovers? (As if there will be any…)
Keep any leftovers in an airtight container in the refrigerator because of the sour cream filling. The cake will stay good for 3-4 days, though the texture is best in the first 48 hours. Let slices come to room temperature before eating for the best flavor.
Can I freeze this cake?
The unfilled, unfrosted cake layers freeze beautifully for up to 2 months. The completed cake? Not so much. The sour cream filling doesn’t love the freezer. If you must freeze the whole thing, know that the texture might change slightly upon thawing.
Help! My cake sank in the middle! What did I do wrong?
First, don’t panic. Second, it’s probably one of these reasons: your leavening agents were old, you opened the oven door too early, or you overmixed the batter. But honestly? Just cover that dip with extra filling and call it a “cake feature.”
Final Thoughts
There you have it – a chocolate cake that’s not just another chocolate cake. That tangy sour cream filling is the plot twist that makes this dessert memorable. It’s like the dessert equivalent of a really good indie film – not flashy, but deeply satisfying and something you’ll want to experience again.
Don’t stress if it doesn’t look Pinterest-perfect on your first try. Even lopsided, this cake will taste amazing, and isn’t that what really matters? (The answer is yes. Yes, it is.)
Now go forth and bake! This cake isn’t going to make itself, though wouldn’t that be nice? And when your friends and family are fighting over the last slice, just remember: sharing is caring, but saving a piece for yourself for breakfast tomorrow is self-care. You’re welcome.
