“`html
So, you’ve got a hankering for something wickedly delicious, a treat that’s as fun to look at as it is to devour? And you’re thinking, “But I don’t have a degree in cake artistry!” Relax, my friend, because I’ve got your back. We’re diving headfirst into the glorious world of chocolate cake, but with a spooky, awesome twist: a skull design! Because who says dessert can’t have a little edge?
Why This Recipe is Awesome
Okay, let’s be real. Most of us aren’t Martha Stewart. This recipe is designed for folks like you and me – people who love the idea of making something impressive without needing a personal pastry chef. It’s surprisingly simple, ridiculously rich, and the skull design? It’s easier than it looks, I promise. Think of it as edible art that tastes like pure happiness. Plus, it’s chocolate. Do I need to say more? It’s basically foolproof. Even I haven’t managed to turn it into a charcoal briquette… yet.
Ingredients You’ll Need
- All-purpose flour: The backbone of our cake. Don’t overthink it.
- Granulated sugar: For that sweet, sweet life.
- Unsweetened cocoa powder: The darker, the better. Let’s get serious about chocolate.
- Baking soda & Baking powder: The dynamic duo for lift. Don’t skip these!
- Salt: Just a pinch to make everything pop.
- Eggs: Preferably room temperature, but who has time for that?
- Milk (or buttermilk for extra richness): Your choice, but buttermilk is the VIP.
- Vegetable oil: For that super moist crumb. No dry cake allowed.
- Vanilla extract: The magical essence of all things good.
- Hot water or hot coffee: Coffee makes chocolate taste *more* like chocolate. Mind blown.
- For the Skull:
- Powdered sugar: The canvas for our spooky masterpiece.
- Milk or water: To get the right icing consistency.
- Cocoa powder (or black food coloring): For that eerie, skull-like color.
Step-by-Step Instructions
- Preheat & Prep: Crank your oven to 350°F (175°C). Grease and flour your cake pan(s). A little butter and flour never hurt anyone.
- Dry Ingredients Party: In a big bowl, whisk together the flour, sugar, cocoa powder, baking soda, baking powder, and salt. Make sure there are no clumps. Think of it as giving your dry ingredients a good shake-up.
- Wet Ingredients Shenanigans: In a separate bowl (yes, another bowl, we’re serious bakers now!), whisk together the eggs, milk, oil, and vanilla.
- Combine the Forces: Pour the wet ingredients into the dry ingredients. Mix until just combined. Don’t go crazy overmixing; nobody likes a tough cake.
- The Hot Stuff: Slowly add the hot water or coffee to the batter. It’ll seem thin, but trust the process. This is where the magic happens for that super-moist texture.
- Bake it Up: Pour the batter into your prepared pan(s). Bake for 30-35 minutes, or until a toothpick inserted into the center comes out clean.
- Cool Down: Let the cake cool in the pan for about 10 minutes before inverting it onto a wire rack to cool completely. Patience is a virtue, especially when cake is involved.
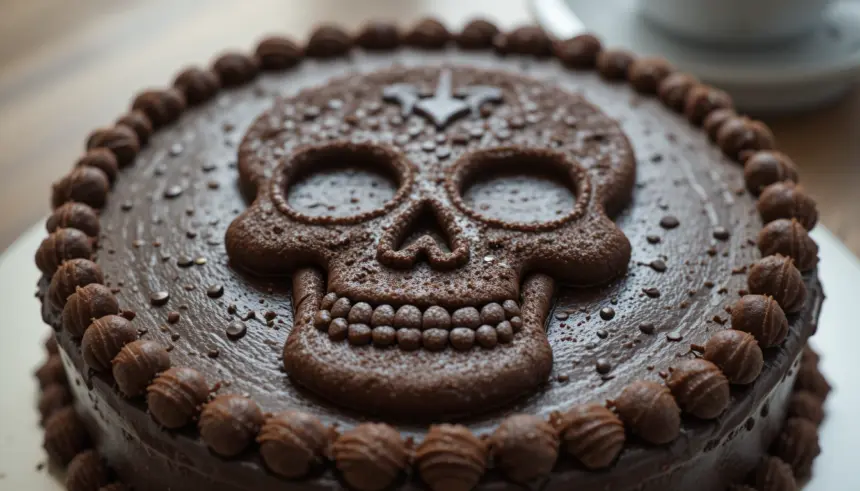
- Skull Time! Once the cake is totally cool, whip up your “icing.” Mix powdered sugar with a tiny bit of milk or water until it’s a thick but pourable consistency. Add cocoa powder or food coloring to get that skull shade. You can freehand a skull with a spoon, or if you’re feeling fancy, use a piping bag with a round tip. Don’t stress about perfection; a slightly messy skull is still a cool skull.
Common Mistakes to Avoid
- Oven Guesswork: Not preheating your oven? Rookie mistake. Your cake will be sad and flat.
- Overmixing Meltdown: Seriously, just stir until it’s combined. Too much mixing equals a tough, dense cake. No one wants that.
- Cooling Calamity: Trying to ice a warm cake? You’ll end up with a melted mess. Let it cool completely, or at least mostly cool.
- Dry Ingredient Disasters: Not sifting your cocoa powder? You might end up with bitter lumps. Nobody wants a chocolate lump.
Alternatives & Substitutions
Feeling adventurous? You can totally swap things up.
- Buttermilk Blues? No buttermilk? No problem. Just add a tablespoon of lemon juice or vinegar to regular milk and let it sit for 5 minutes. Instant buttermilk, baby!
- Coffee Craving? If you’re not a coffee person, hot water works just fine. But seriously, coffee elevates chocolate like nothing else.
- Vegan Vibes? You can usually sub in a flax egg (1 tbsp flaxseed meal + 3 tbsp water, let sit for 5 mins) and a plant-based milk. Check the recipe notes for more advanced vegan adaptations if you’re feeling ambitious.
FAQ (Frequently Asked Questions)
Q: Can I make this in a different pan?
A: Yep! Cupcakes are a great option – just adjust the baking time (usually 18-22 minutes). A bundt pan works too, but might need a bit longer to bake through.
Q: My skull icing looks weird. What did I do?
A: Don’t panic! Cake decorating is an art, not a science. Try adding a tiny bit more powdered sugar to thicken it, or a splash more liquid to thin it. Or just embrace the abstract skull. It’s unique!
Q: How do I store this masterpiece?
A: Keep it in an airtight container at room temperature for up to 3 days. If it’s super hot where you are, the fridge is okay, but let it come back to room temp before serving for the best texture.
Q: Can I make the cake ahead of time?
A: Absolutely! Bake it a day in advance, let it cool completely, wrap it well, and then ice it when you’re ready to party.
Q: What if I don’t have cocoa powder for the skull?
A: Use a tiny bit of black or brown food coloring to get your desired skull hue. Or go wild with a bright color if you’re feeling rebellious!
Q: Is this recipe good for beginners?
A: 100%! It’s seriously forgiving. If I can do it, you can definitely do it.
Final Thoughts
There you have it! A chocolate cake that’s not just delicious, but also a total conversation starter. Who knew baking could be this fun and a little bit spooky? Now go forth and bake! Don’t be afraid to get a little messy, a little creative, and most importantly, have a blast doing it. Now go impress someone—or yourself—with your new culinary skills. You’ve earned it! Happy baking (and spooky decorating)!
“`
