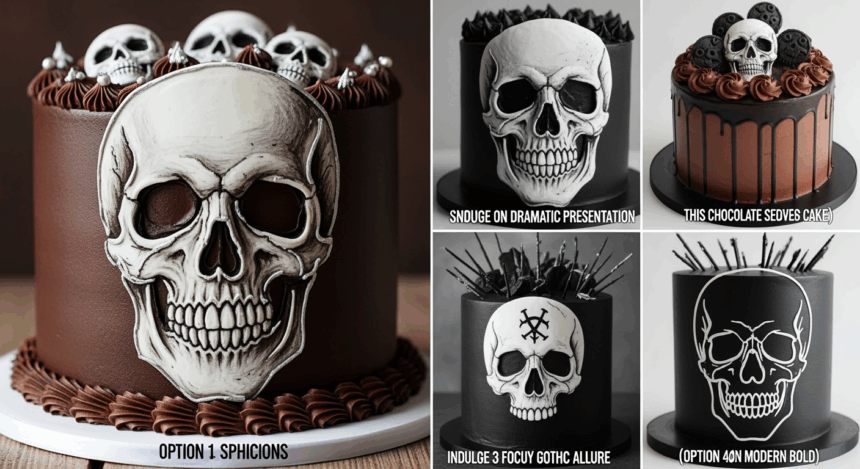
Alright, spooky baking enthusiasts! Ever wanted to make a dessert that’s both delicious AND looks like it could star in a Tim Burton movie? Say hello to this Chocolate Cake with Skull Design – perfect for Halloween parties, goth birthdays, or just freaking out your overly sensitive aunt at the family reunion. This cake doesn’t just taste like heaven; it looks like the coolest path to the underworld!
Why This Recipe is Awesome
Let’s be real – anybody can make a regular chocolate cake. Yawn. But a chocolate cake with a jaw-dropping skull design? Now that’s conversation starter material! This recipe is awesome because it combines rich, moist chocolate goodness with some serious “wow” factor decoration that’s actually easier than it looks. You’ll get maximum impressiveness with minimal artistic talent required – promise! Plus, the contrast between the dark cake and the white skull design is Instagram gold. #SpookyBakerGoals
Ingredients You’ll Need
For the cake:
- 2 cups all-purpose flour (the regular boring stuff)
- 2 cups granulated sugar (sweet death in crystal form)
- ¾ cup unsweetened cocoa powder (the darker, the better – like your soul)
- 2 teaspoons baking powder (the magic rising dust)
- 1½ teaspoons baking soda (powder’s underrated cousin)
- 1 teaspoon salt (just a pinch, not enough to preserve a body)
- 2 large eggs (chicken contributions, not dinosaur-sized)
- 1 cup buttermilk (regular milk that’s gone slightly bad, but in a good way)
- ½ cup vegetable oil (keeps things moist – worst word ever, I know)
- 2 teaspoons vanilla extract (the fancy stuff if you’re showing off)
- 1 cup hot coffee (the stronger the better, like your will to finish this cake)
For the skull decoration:
- 4 cups powdered sugar (for buttercream that’s smooth as a freshly dug grave)
- 1 cup unsalted butter, softened (leave it out while you contemplate mortality)
- 3-4 tablespoons milk (cow juice)
- 1 teaspoon vanilla extract (again with the fancy stuff)
- Black food coloring (to make it extra goth)
- A skull stencil or template (printable online, unless you’re a forensic artist)
Step-by-Step Instructions
- Prep your tomb – I mean oven! Preheat to 350°F (175°C). Grease and flour two 9-inch round cake pans. If you’re feeling extra, line the bottoms with parchment paper.
- Mix the dry ingredients. In a large bowl, whisk together flour, sugar, cocoa, baking powder, baking soda, and salt until they’re as well-combined as the Addams Family.
- Add the wet ingredients. Toss in eggs, buttermilk, oil, and vanilla. Beat with an electric mixer on medium speed for about 2 minutes. Your batter should look like a delicious mud pit at this point.
- Add coffee gradually. Pour in the hot coffee (carefully, unless you want third-degree burns to complete your monster look). The batter will be thin – that’s normal! It’s supposed to look like a witch’s potion.
- Bake until dead – er, done. Pour the batter into your prepared pans and bake for 30-35 minutes, or until a toothpick inserted in the center comes out clean. The cakes should spring back when lightly touched.
- Cool those babies down. Let cakes cool in pans for 10 minutes, then remove to wire racks to cool completely. If they crack a little, no worries – it adds to the spooky vibe!
- Make your bone-white frosting. Beat butter until creamy, then gradually add powdered sugar, milk, and vanilla. Beat until smooth and spreadable. Set aside about ⅔ of the frosting for your skull design.
- Create your dark background. Add black food coloring to the remaining frosting. Cover the entire outside of your cake with this black frosting. Smooth it as much as possible – think “midnight sky,” not “chimney sweep’s nightmare.”
- Add the skull design. Once your black frosting has set slightly, position your skull stencil on top of the cake. Use the white frosting to carefully fill in the stencil design, then gently lift away the template. For a 3D effect, add extra white frosting to build up certain areas like the cheekbones and eye sockets.
- Finishing touches. Use a small piping tip or toothpick to add details to your skull – cracks, teeth definition, or even some red food coloring for blood if you’re feeling extra macabre!
Common Mistakes to Avoid
Let’s prevent your cake from becoming a true disaster of the dead:
- Using hot frosting on your cake. Unless your goal is a landslide of skeletal remains, make sure your cake is COMPLETELY cool before frosting.
- Rushing the skull design. This isn’t a race, Speedy Gonzales. Take your time with the stencil work – your Instagram feed will thank you.
- Forgetting to grease the pans. Want to see a real horror show? Try removing an ungreased cake from a pan. It’s like trying to remove a mummy from its sarcophagus without the proper tools.
- Making the coffee too weak. The coffee enhances the chocolate flavor, so wimpy coffee = wimpy flavor. Brew it strong enough to raise the dead!
- Overmixing the batter. You’re making cake, not cement. Overmixed batter leads to tough cake, and nobody wants to chew their dessert like beef jerky.
Alternatives & Substitutions
Not everyone has a fully-stocked witch’s pantry, so here are some swaps:
- No buttermilk? Mix 1 tablespoon of vinegar or lemon juice with regular milk and let it sit for 5 minutes. Voilà – fake buttermilk that’ll fool even your snobbiest friend.
- Don’t do caffeine? Replace the coffee with hot water. The cake won’t be quite as rich, but it’ll still be better than anything store-bought (no shade to grocery store bakeries… actually, full shade).
- No black food coloring? Mix blue, red, and green food coloring to create black. Or go for a dark purple or blue instead – still spooky, just more “cosmic horror” than “traditional skeleton.”
- Don’t have a skull stencil? Use a printed template and carefully cut it out, or go freehand if you’re feeling brave. You can also use alphabet cookie cutters to spell out “R.I.P” or other creepy phrases.
- Gluten-free guests? Swap in your favorite cup-for-cup gluten-free flour blend. The texture might be slightly different, but hey, “crumbly” works for a death-themed dessert!
FAQ (Frequently Asked Questions)
Can I make this cake ahead of time?
Absolutely! The cake layers can be made 1-2 days in advance. Just wrap them well in plastic wrap and store at room temperature. The decoration is best done within 24 hours of serving, though, unless you want your skull looking like it’s been decomposing (which, come to think of it, could be a look).
How do I transport this masterpiece without destroying it?
First, chill the cake thoroughly to set the frosting. Then, use a cake carrier if you have one, or carefully place toothpicks around the design and loosely wrap with plastic wrap to protect it. FYI, transporting cakes is basically an Olympic sport – expect anxiety levels to rival those of a bomb disposal technician.
Can I use a box cake mix instead?
Are you seriously asking me this? *Deep breath* Yes, you can. While I’ll silently judge your life choices, a box mix will work fine. Just add a bit of extra cocoa powder to intensify the chocolate flavor and follow the decoration instructions as written.
Will kids be scared of this cake?
Depends on the kid! Some little ones might find it too spooky, while others will think it’s the coolest thing ever. Know your audience – or don’t, and enjoy the chaos. Either way, remember that all children will happily eat cake regardless of what horrors may decorate its surface.
How do I get a super smooth black frosting background?
The secret is a crumb coat, my friend! Apply a thin layer of frosting first, chill the cake for 20 minutes, then apply your final coat. For that Insta-worthy finish, heat a metal spatula under hot water, dry it off, and then glide it over your frosting. It’s like Botox for your cake.
Can I make cupcake versions?
Heck yes! Make the cake batter as directed, then fill cupcake liners about 2/3 full. Bake at 350°F for 18-22 minutes. For the decoration, you can either use mini skull stencils on each cupcake or create a skull design that spans across multiple cupcakes arranged together (perfect for those “pull-apart” cupcake cakes).
Final Thoughts
There you have it – a chocolate cake that tastes divine but looks like it came straight from the underworld. Perfect for Halloween parties, Day of the Dead celebrations, heavy metal birthdays, or just because you want to remind everyone of their mortality while they’re enjoying dessert (you dark, wonderful human, you).
Don’t stress if your first skull design looks more like a blob with eye holes – practice makes perfect, and even imperfect skull cakes taste amazing. Plus, you can always claim it’s an “abstract interpretation” or a “post-modern take” on mortality. Fancy art words fix everything!
Now go forth and bake something that would make both master chefs and cemetery caretakers proud! And remember – we all end up as skeletons eventually, so we might as well eat cake along the way. Bon appétit, my macabre-loving friends!
