
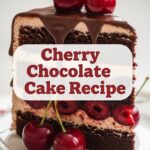
So, you’re craving something delicious, dramatically beautiful, but *definitely* not going to make you spend your entire weekend tethered to the kitchen, huh? Same, friend, same. We’re talking about a chocolate cake that looks like it stepped out of a fancy patisserie window but tastes like pure, unadulterated comfort. And get this: it’s adorned with roses. Because why not be extra without *being* extra? This isn’t just a cake; it’s a mood. It’s a statement. It’s chocolatey art you can eat.
Why This Recipe is Awesome
Listen, I get it. “Chocolate Cake” can sound like a whole thing. But this isn’t your grandma’s 17-step, flour-sift-three-times kind of cake (unless your grandma was a rebel, then maybe it is!). This bad boy is idiot-proof. Seriously, even I, who once mistook baking soda for baking powder in a moment of existential crisis, managed not to mess it up. It’s incredibly moist, deeply chocolatey, and the frosting? Oh, the frosting is a cloud of buttery heaven that pipes like a dream. Plus, you get to tell everyone you made a “Chocolate Cake with Roses,” which sounds way more impressive than “I just made a box mix and slapped some sprinkles on it.” No judgment, but this one elevates your game significantly with minimal effort. Win-win, if you ask me!
Ingredients You’ll Need
Gather your troops, folks! Here’s what you’ll need to transform into a culinary wizard:
For the Cake:
- 1 ½ cups All-Purpose Flour: The basic building block. Don’t overthink it.
- 1 ½ cups Granulated Sugar: For sweetness, duh.
- ¾ cup Unsweetened Cocoa Powder: The MVP of chocolate flavor. Go for a good quality one; it makes a difference!
- 1 ½ tsp Baking Soda: Our leavening friend, making things fluffy.
- ¾ tsp Salt: Don’t skip this! It enhances all the flavors.
- ¾ cup Milk: Any kind, but whole milk makes it extra lush.
- ¾ cup Vegetable Oil: Keeps it super moist. Canola oil works too.
- 1 ½ tsp Vanilla Extract: The soul of baking. Don’t be shy.
- 2 Large Eggs: Room temp if you’re feeling fancy, but straight from the fridge works too, TBH.
- ¾ cup Boiling Water: This is the secret weapon for super chocolatey goodness!
For the Buttercream Frosting:
- 1 cup (2 sticks) Unsalted Butter: Softened, but not melted. Think “squishy but still holding shape.”
- 4 cups Powdered Sugar: The powdered kind, for smooth frosting.
- 1 tsp Vanilla Extract: More vanilla, because why not?
- 2-4 tbsp Milk or Heavy Cream: To get that perfect consistency. Start with less, add more.
- Food Coloring (optional): Gel colors work best for vibrant roses. Pinks, reds, purples, greens – get creative!
Step-by-Step Instructions
- Prep Your Battleground: Preheat your oven to 350°F (175°C). Grease and flour two 8-inch round cake pans. Or, line with parchment circles. Your choice, just don’t skip it!
- Mix the Dry Stuff: In a large bowl, whisk together the flour, sugar, cocoa powder, baking soda, and salt. Make sure there are no lumpy bits.
- Wet Ingredients Unite: Add the milk, oil, vanilla, and eggs to the dry mixture. Beat with an electric mixer on medium speed for about 2 minutes until everything is well combined and looking smooth.
- The Boiling Water Bomb: Carefully pour in the boiling water. The batter will be thin, and that’s totally okay! Stir it gently until just combined.
- Into the Pans: Divide the batter evenly between your two prepared cake pans.
- Bake It Up: Bake for 30-35 minutes, or until a wooden skewer inserted into the center comes out clean. Don’t overbake, or you’ll have dry cake and sad feelings.
- Cool Down: Let the cakes cool in the pans for about 10-15 minutes, then invert them onto a wire rack to cool completely. This is crucial! Trying to frost warm cake is a one-way ticket to melted frosting disaster.
- Whip Up the Frosting: In a large bowl, beat the softened butter with an electric mixer until creamy and light. Gradually add the powdered sugar, one cup at a time, beating well after each addition. Stir in the vanilla extract.
- Achieve Frosting Perfection: Slowly add milk or heavy cream, one tablespoon at a time, until your frosting reaches a spreadable, pipeable consistency. If you’re coloring it, divide the frosting into separate bowls and mix in your gel food coloring now.
- Frost the Cake: Once the cakes are completely cool, place one layer on your serving plate. Spread a generous amount of frosting on top. Place the second cake layer on top and frost the entire cake, top and sides, with your base color of frosting. This is your canvas!
- Pipe Those Roses: Load your colored frostings into piping bags fitted with a rose tip (like 1M or 2D). Pipe beautiful roses all over the top of your cake, or just in specific areas. Have fun with it! If you mess up, scrape it off and try again. No biggie.
- Admire and Devour: Step back and behold your masterpiece! Then, cut a slice and enjoy your stunning, delicious creation. You earned it!
Common Mistakes to Avoid
- Not Preheating the Oven: Rookie mistake! Your cake won’t rise properly, and it’ll bake unevenly. Always preheat.
- Overmixing the Batter: Once you add the flour, mix until just combined. Overmixing develops gluten, leading to a tough, dry cake. Nobody wants that.
- Not Letting Cakes Cool Completely: We talked about this! Warm cake + frosting = sad, sliding mess. Patience is a virtue here.
- Skimping on Good Cocoa: Cheap cocoa means bland chocolate flavor. Invest a little in quality cocoa, your taste buds will thank you.
- Underestimating the Power of Salt: It’s not just for savory dishes! Salt balances sweetness and brings out the chocolate flavor. Don’t skip it, even if it feels weird.
- Ignoring Frosting Consistency: Too thick, and it’s hard to pipe. Too thin, and it won’t hold shape. Adjust with milk/powdered sugar as needed.
Alternatives & Substitutions
Life’s too short for rigid rules, right? Here are a few ways to tweak this recipe:
- Milk Swap: Don’t have regular milk? Buttermilk or even coffee (yes, coffee!) instead of milk for an even deeper chocolate flavor. IMO, coffee enhances chocolate like nothing else.
- Oil Alternatives: You can use melted butter instead of vegetable oil for a slightly richer flavor, but the oil really makes it super moist.
- Flour Power: Want to make it gluten-free? Swap out the all-purpose flour for a good quality 1:1 gluten-free baking flour blend.
- Frosting Flavors: Not a vanilla fan? Add a different extract to your buttercream – almond, peppermint, or even a touch of orange zest could be amazing! Or, for a super rich vibe, add a few tablespoons of melted, cooled chocolate to your buttercream.
- Rose Garnish Cheat: Feeling totally overwhelmed by piping? Don’t stress! You can just frost the cake smoothly and then buy some fresh, food-safe roses (or other edible flowers) and gently place them on top for an equally stunning effect. Just make sure they haven’t been sprayed with pesticides!
FAQ (Frequently Asked Questions)
- Can I use margarine instead of butter for the frosting? Well, technically yes, but why hurt your soul like that? Butter is key for that rich, creamy texture and flavor. Margarine just doesn’t cut it for a truly dreamy buttercream.
- My cake stuck to the pan, what gives? Did you grease AND flour? Or use parchment? It’s usually about proper pan prep. Next time, be extra diligent, maybe even use baking spray with flour in it for extra insurance.
- Can I make this cake into cupcakes? Absolutely! Just fill cupcake liners about 2/3 full and bake for a shorter time, usually around 18-22 minutes. Keep an eye on them!
- My frosting is too runny! Help! Don’t panic! Add more powdered sugar, a tablespoon at a time, until it thickens up to your desired consistency.
- My frosting is too stiff! What now? Easy-peasy! Add milk or cream, a teaspoon at a time, until it loosens up and becomes smooth and pipeable.
- How far in advance can I make this? The cake layers can be baked a day or two ahead, wrapped well, and stored at room temp (or frozen!). The frosting can be made a day ahead and stored in the fridge, then re-whipped before use. Assembled cake is best eaten within 2-3 days.
Final Thoughts
So there you have it, your new go-to chocolate cake recipe that’s as impressive as it is delicious. You’ve navigated the flour, conquered the cocoa, and tamed the buttercream beast. Now go forth and impress someone—or yourself—with your new culinary skills. You’ve earned those bragging rights (and that delicious slice of cake!). Happy baking, my friend!
