Alright, chocolate lovers, gather ’round! You know those days when you can’t decide between cake and candy? Well, stop torturing yourself because I’ve got the ultimate solution: a ridiculously decadent chocolate cake STUFFED with Reese’s cups. It’s basically therapy in dessert form. And no, you don’t need to be some fancy pastry chef to pull this off—if I can make it while binge-watching reality TV, you’ve totally got this!
Why This Recipe is Awesome
Let me count the ways this cake will change your life. First, it combines two of the greatest inventions in human history: chocolate cake and peanut butter cups. I mean, whoever thought of putting these two together deserves a Nobel Prize or something.
Second, this cake is seriously impressive-looking but secretly super easy to make. Your friends will think you spent hours laboring in the kitchen when really you were just throwing things in a bowl while scrolling through TikTok. The best kind of recipe, IMO.
And finally, it’s customizable! Don’t like Reese’s cups? (Who are you and are you okay?) You can substitute with other candy. But honestly, why would you?
Ingredients You’ll Need
For the cake:
- 2 cups all-purpose flour (the regular boring kind, nothing fancy)
- 2 cups granulated sugar (because adulting is hard enough without measuring different sugars)
- ¾ cup unsweetened cocoa powder (the darker, the better—like my soul)
- 2 teaspoons baking soda (not baking powder—don’t mess this up!)
- 1 teaspoon salt (just a pinch to make the sweet sweeter, like compliments in a toxic relationship)
- 2 large eggs (room temperature, not straight from the fridge like a barbarian)
- 1 cup buttermilk (or regular milk with a splash of vinegar if you’re not fancy)
- ½ cup vegetable oil (keeps it moist—sorry if you hate that word)
- 2 teaspoons vanilla extract (the real stuff, not that imitation nonsense)
- 1 cup hot coffee (or hot water if you don’t want the caffeine boost)
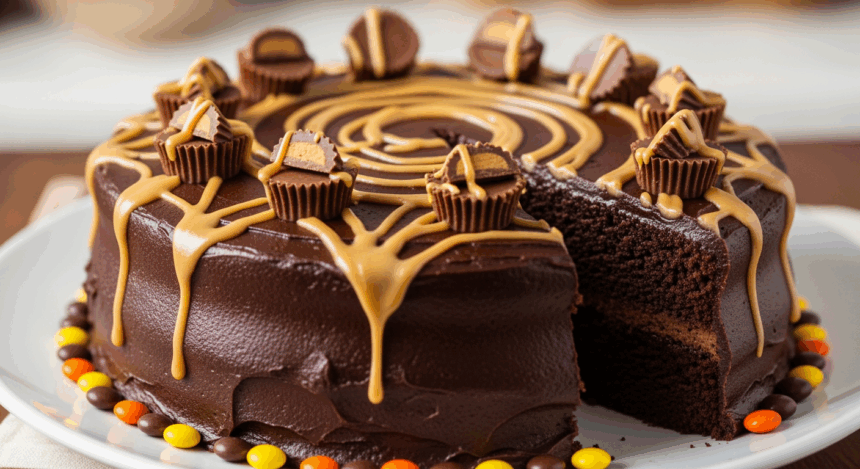
- 12-15 Reese’s Peanut Butter Cups (mini or regular, chopped up—plus extra for decorating because YOLO)
For the frosting:
- 1 cup butter, softened (leave it out for an hour, or microwave it for 10 seconds if you’re impatient like me)
- 1 cup creamy peanut butter (chunky works too if you like living dangerously)
- 4 cups powdered sugar (yes, FOUR cups—this isn’t health food, people)
- ¼ cup milk (add more if needed, we’re not making cement here)
- 1 teaspoon vanilla extract (again, the real stuff)
Step-by-Step Instructions
- Prep your battlefield. Preheat your oven to 350°F (175°C). Grease and flour two 9-inch round cake pans. Or use parchment paper if you’re fancy/smart/don’t want to cry when the cake sticks.
- Mix the dry ingredients. In a large bowl, whisk together flour, sugar, cocoa powder, baking soda, and salt. Make a little well in the center like you’re creating a sad volcano science project.
- Add the wet team. Pour in eggs, buttermilk, oil, and vanilla. Mix until just combined—don’t beat it to death.
- Coffee time! Stir in the hot coffee (or water). Yes, the batter will be thin. No, you didn’t mess up. It’s supposed to look like that.
- Divide and conquer. Pour half the batter into one pan. Unwrap those Reese’s cups and place them evenly across the batter. Pour the remaining batter over the top. For the second pan, just pour in plain batter.
- Bake those babies. Slide them into the oven for 30-35 minutes, or until a toothpick comes out clean. If you don’t have toothpicks, a spaghetti noodle works in a pinch. Don’t judge me.
- Cool your jets. Let the cakes cool in the pans for 10 minutes, then transfer to a wire rack to cool completely. If you frost them while hot, you’ll create a delicious disaster.
- Frosting magic time! Beat together butter and peanut butter until smooth. Gradually add powdered sugar, milk, and vanilla. Keep beating until it’s fluffy and you’re tempted to eat it by the spoonful.
- Assemble the masterpiece. Place the Reese’s-filled cake layer on your serving plate. Slather a thick layer of frosting on top. Add the second cake layer, then frost the top and sides.
- Decoration station. Chop up those extra Reese’s cups and sprinkle them all over the top. You can also drizzle some melted chocolate if you’re feeling extra.
Common Mistakes to Avoid
Let’s be real—even I’ve messed this up a few times. Here’s how not to join the cake fail club:
- Skipping the parchment paper. Unless you enjoy serving cake chunks instead of slices, use the dang paper.
- Opening the oven door too early. I know you’re excited, but your cake will sink faster than my motivation on Monday mornings.
- Frosting a warm cake. The frosting will melt and slide off, creating what I call “the sad puddle effect.”
- Not chopping the Reese’s for the top. Whole cups are too heavy and will sink into your frosting like they’re trying to escape.
- Forgetting the coffee. You won’t taste it, but it makes the chocolate flavor pop like nothing else. Trust the process.
Alternatives & Substitutions
Not everyone has every ingredient on hand (or maybe you’re just rebellious). Here are some swaps that won’t ruin everything:
No buttermilk? Add a tablespoon of lemon juice or white vinegar to regular milk and let it sit for 5 minutes. Boom—fake buttermilk.
Hate coffee? Use hot water instead, but add an extra tablespoon of cocoa powder to maintain that deep chocolate flavor.
Out of Reese’s cups? First, I’m sorry for your loss. Second, try Snickers, Milky Ways, or even Oreos. Different vibe, still delicious.
Gluten issues? Swap in your favorite gluten-free flour blend. The cake might be slightly denser, but with all that chocolate and peanut butter, who’s really going to notice?
Cutting sugar? You’re reading the wrong recipe, friend. But you can reduce the sugar by about ¼ cup without major texture issues.
FAQ (Frequently Asked Questions)
Can I make this cake ahead of time?
Absolutely! The cake actually tastes better on day two when the flavors have had time to mingle and get to know each other. Just store it in the fridge and bring to room temperature before serving.
Will the Reese’s cups melt inside the cake?
They’ll get soft and gooey, but they won’t completely disappear. It’s like finding little pockets of peanut buttery treasure in your cake. Who doesn’t want that?
Can I use natural peanut butter for the frosting?
You can, but why would you do that to yourself? The oil separation makes for a weird frosting texture. Stick with the processed stuff for this recipe—this isn’t the time for health food heroics.
How do I store leftovers? (As if there will be any…)
On the off chance you don’t devour this in one sitting, store it in an airtight container in the fridge for up to 5 days. The cake might dry out a bit, but that’s what microwave reheating is for.
Can I turn these into cupcakes?
Heck yes! Put a mini Reese’s cup in the center of each cupcake before baking. Reduce the baking time to about 18-22 minutes.
Is this kid-friendly to make?
If you don’t mind chocolate handprints on every surface of your kitchen, sure! Kids love pressing the Reese’s cups into the batter and decorating the top. Just hide some of the candy beforehand unless you want to witness a sugar-induced meltdown.
Final Thoughts
Look, we all need a showstopper dessert in our back pocket—something that makes people think we’ve got our lives together. This Reese’s-stuffed chocolate cake is that dessert. It’s indulgent, it’s impressive, and most importantly, it’s nearly impossible to mess up completely.
The best part? Even if it doesn’t look perfect, it’ll still taste amazing. Because let’s be honest, has anyone ever complained about the aesthetics of chocolate cake with peanut butter cups? No, they’re too busy shoving it in their faces.
So go ahead, make this cake. Take that Instagram-worthy photo (with the right filter, of course). Accept the compliments graciously. And maybe, just maybe, save the biggest slice for yourself. You deserve it for reading this entire recipe!
