So, you’ve got that undeniable craving for something sweet, something chocolatey, but also something that looks ridiculously adorable? And let’s be honest, you’d rather spend your time admiring your handiwork than wrestling with a soufflé. Well, my friend, you’ve stumbled into the right place. Get ready to bake your way to panda-monium with this ridiculously easy and surprisingly impressive chocolate cake!
Why This Recipe is Awesome
Honestly, this recipe is a winner because it’s practically idiot-proof. Even if your baking skills are currently limited to “toast is too hard,” you can nail this. It requires minimal fuss, uses stuff you probably already have lurking in your pantry, and the end result? Pure, unadulterated joy in cake form. Plus, who doesn’t love a panda? It’s scientifically proven to increase happiness by at least 87%. FYI, I may have made that statistic up, but it *feels* true.
Ingredients You’ll Need
- 1 ½ cups all-purpose flour (the fluffy stuff, not the cement kind)
- 1 cup granulated sugar (for that sweet kiss)
- ⅓ cup unsweetened cocoa powder (the darker, the more dramatic, IMO)
- 1 teaspoon baking soda (the magic ingredient that makes things rise)
- ½ teaspoon salt (to balance out all that sweetness)
- 1 cup milk (any kind will do, don’t overthink it)
- ½ cup vegetable oil (or any neutral oil, for moisture)
- 1 large egg (the binder of dreams)
- 1 teaspoon vanilla extract (essential for that “mmm” factor)
- 1 teaspoon white vinegar (don’t ask, just trust the science!)
- For the Panda Decoration:
- Ready-made black frosting or melted dark chocolate (for those sleepy panda eyes and ears)
- Shredded coconut or white frosting (for the panda’s cute snout)
- A little bit of pink frosting or a red M&M (for a cheeky panda nose)
Step-by-Step Instructions
- Preheat your oven to 350°F (175°C). Grease and flour a round cake pan. You know, the usual jazz.
- In a large bowl, whisk together the flour, sugar, cocoa powder, baking soda, and salt. Give it a good stir, like you’re mixing a potion of pure deliciousness.
- In a separate bowl (or a jug, because who needs more dishes?), whisk together the milk, oil, egg, and vanilla extract.
- Now, pour the wet ingredients into the dry ingredients. Add the white vinegar. Mix until *just* combined. Seriously, don’t go crazy here; overmixing is the enemy of fluffy cake.
- Pour that batter into your prepared pan. It should look a little… thin. Don’t panic! That’s what we want.
- Bake for 30-35 minutes, or until a toothpick inserted into the center comes out clean. Let it cool in the pan for 10 minutes, then invert it onto a wire rack to cool completely. Patience, young grasshopper!
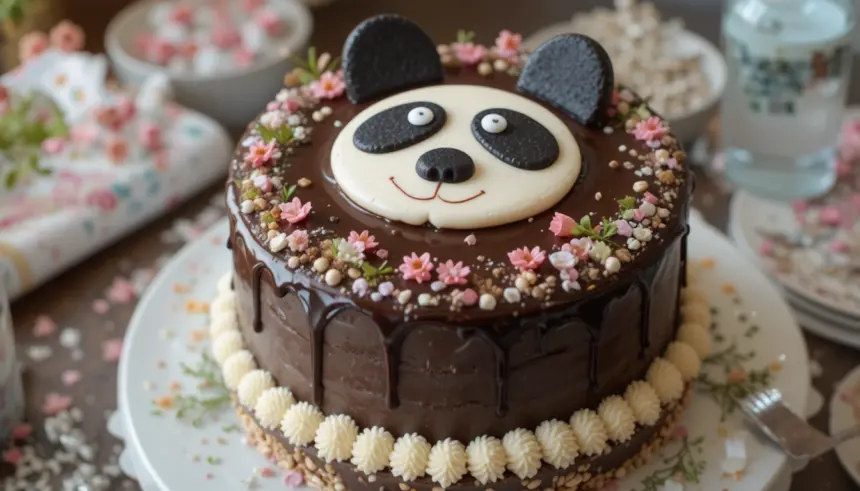
- Once your cake is totally cool (this is crucial, folks!), it’s time for the fun part: panda time! Smear a thin layer of black frosting or chocolate over the top and sides of the cake. This is your panda’s base coat.
- Now, get creative! Use your black frosting or melted chocolate to draw those iconic panda eye patches and ears. A little dollop for each eye, and two cute little half-circles on top for ears.
- For the snout, spread a small amount of white frosting or shredded coconut in the center of the face.
- Finally, add a tiny pink dot or a red M&M for the nose. And voilà! You have a panda cake that’s almost too cute to eat. Almost.
Common Mistakes to Avoid
- Using cold milk: Room temperature is your friend for better emulsification.
- Forgetting the vinegar: It reacts with the baking soda to give you that extra lift. Don’t skip it!
- Overmixing the batter: This is a classic “oops” moment that leads to a tough cake. Mix until *just* combined.
- Decorating a warm cake: Frosting will slide off like a greased lightning bolt. Wait ’til it’s totally cool.
- Overbaking: Dry cake is sad cake. Keep an eye on it towards the end of the baking time.
Alternatives & Substitutions
Feeling a little adventurous? Or maybe you’re out of something crucial? No sweat!
- Milk: Buttermilk works wonders for extra tenderness, or even a plant-based milk like almond or soy.
- Vegetable Oil: Melted butter is a perfectly acceptable (and delicious!) substitute. Just make sure it’s cooled slightly.
- Cocoa Powder: If you only have sweetened cocoa, you might want to slightly reduce the sugar in the recipe. But honestly, unsweetened is usually best for this kind of thing.
- Decoration: If black frosting is a no-go, use dark chocolate ganache. For the snout, cream cheese frosting is also a great option! Get creative with what you have!
FAQ (Frequently Asked Questions)
Q: Can I make this cake gluten-free?
A: You bet! Just swap out the all-purpose flour for your favorite gluten-free blend. You might need to adjust the liquid slightly, so keep an eye on the batter consistency.
Q: My cake looks a bit dense. What did I do wrong?
A: Probably overmixing! Next time, be gentler with that batter. Also, ensure your baking soda is fresh – old baking soda is like a deflated balloon.
Q: Can I use margarine instead of butter for the decoration?
A: Well, technically yes, but why hurt your soul like that? Butter (or proper frosting) has a superior flavor and texture for decorating.
Q: How long will this panda cake last?
A: Stored in an airtight container at room temperature, it should be good for about 2-3 days. But let’s be real, it won’t last that long.
Q: Can I make cupcakes instead of a cake?
A: Absolutely! Bake them for about 18-22 minutes. Then you can have a whole army of mini pandas!
Q: My panda eyes look wonky. Is it ruined?
A: NO WAY! Imperfect pandas are still adorable pandas. Embrace the wobbly charm! No one is going to judge your artistic skills.
Final Thoughts
There you have it! A chocolate cake that’s as fun to make as it is to eat, topped with the cutest panda decoration. It’s perfect for birthdays, parties, or just a Tuesday when you need a little bit of joy. Now go impress someone—or yourself—with your new culinary skills. You’ve earned it! Happy baking!

