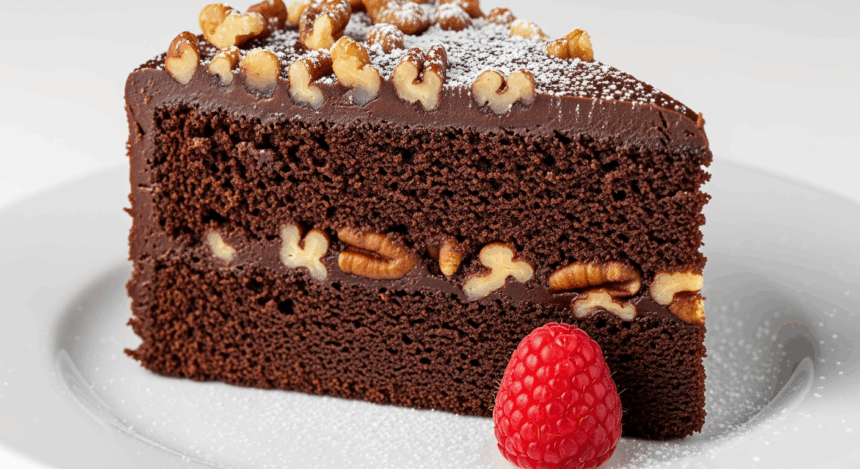
Have you ever stared at your boring, nut-free dessert plate and thought, “Wow, this is about as exciting as watching paint dry”? Well, friend, your dessert doldrums are officially OVER. Today we’re making a chocolate cake so good, you’ll want to introduce it to your parents. And yes, we’re throwing nuts on that bad boy because we’re fancy like that. This isn’t just any chocolate cake – it’s the “I can’t believe I made this myself” chocolate cake that’s about to become your signature dish.
Why This Recipe is Awesome
Let me count the ways this chocolate cake recipe rules your dessert kingdom:
First off, it’s basically foolproof. Unless you literally set your kitchen on fire, you’ve got this. Second, the contrast between rich, moist chocolate cake and crunchy nuts is like the culinary version of a perfect relationship – opposites that bring out the best in each other. Third, it looks Instagram-worthy without requiring art school training. Just toss those nuts on top, and suddenly you’re a “food stylist.” Magic!
Oh, and did I mention it works for practically any occasion? Tuesday night? Chocolate cake. Birthday? Chocolate cake. Broke up with someone? DEFINITELY chocolate cake with extra nuts (interpret that however you want).
Ingredients You’ll Need
- 2 cups all-purpose flour (the regular stuff, nothing fancy)
- 2 cups granulated sugar (you know, the sweet crystallized happiness)
- ¾ cup unsweetened cocoa powder (the good kind, not the hot chocolate mix – I see you thinking about it)
- 2 teaspoons baking powder
- 1½ teaspoons baking soda
- 1 teaspoon salt
- 2 large eggs (from chickens, preferably)
- 1 cup whole milk (cow juice at its finest)
- ½ cup vegetable oil (or canola – I’m not policing your oils)
- 2 teaspoons vanilla extract (the real deal, not that imitation nonsense)
- 1 cup hot coffee (yes, COFFEE – trust me on this one)
- 1½ cups mixed nuts – walnuts, pecans, almonds (chopped but not pulverized into dust)
- Chocolate frosting (homemade or store-bought – no judgment here)
Step-by-Step Instructions
- Prep your battlefield. Preheat your oven to 350°F (175°C). Grease and flour two 9-inch round cake pans. If you’re feeling extra, line the bottoms with parchment paper. Your future self will thank you.
- Mix the dry squad. In a large bowl, whisk together flour, sugar, cocoa, baking powder, baking soda, and salt. Make sure there are no cocoa clumps – nobody wants to bite into a dry pocket of sadness.
- Assemble the wet team. In another bowl, beat the eggs, then add milk, oil, and vanilla. Beat this mixture like it owes you money (but gently – we’re not savages).
- Create cake harmony. Slowly add the wet ingredients to the dry ingredients while mixing. Once combined, stir in the hot coffee. Yes, the batter will be thin – that’s normal! Don’t panic and add more flour. This isn’t bread, people.
- Bake it good. Pour the batter evenly into your prepared pans and bake for 30-35 minutes, or until a toothpick inserted in the center comes out clean (or with a few moist crumbs – we’re not making desert dry cake here).
- Cool your jets. Let the cakes cool in pans for 10 minutes, then transfer to wire racks to cool completely. Patience, grasshopper. Frosting warm cake = disaster movie.
- Frost like a boss. Once cooled, frost the top of one layer, stack the second layer, and frost the top and sides. No need for perfection – we’re going for “rustic charm” here.
- Make it rain. Press those chopped nuts all over the top and around the sides if you’re feeling extra nutty. Pro tip: do this over a baking sheet to catch the fallout.
- Plate and impress. Slice that beauty and serve it on your favorite plate. Take a picture for the ‘gram before everyone devours it!
Common Mistakes to Avoid
Even the best of us mess up sometimes. Here’s how not to sabotage your chocolate masterpiece:
- Skipping the coffee – “But I don’t like coffee!” I hear you cry. Relax, you won’t taste it. The coffee just enhances the chocolate flavor. It’s like chocolate’s hype man.
- Over-mixing the batter – This isn’t a workout session. Once everything’s combined, stop! Unless you’re going for rubber cake texture.
- Opening the oven door too early – I know you’re excited, but your cake will sink faster than your hopes of winning the lottery. Keep that door closed for at least 25 minutes.
- Frosting a warm cake – Unless you’re aiming for a Jackson Pollock-style frosting disaster, be patient and let it cool completely.
- Chopping nuts into dust – We want texture, people! Roughly chopped is the goal, not nut powder.
Alternatives & Substitutions
Because we’re all special snowflakes with different pantries:
Don’t have coffee? Use hot water instead. It won’t be as rich, but it’ll work in a pinch. Think of it as chocolate cake’s less interesting cousin.
Nut allergies? Try using toasted coconut flakes, crushed pretzels, or even broken-up chocolate cookies instead. The goal is texture contrast, not a trip to the ER.
Need it dairy-free? Swap the milk for almond milk, soy milk, or any plant-based milk that floats your boat. FYI, coconut milk adds a nice subtle flavor twist.
Want to fancy it up? Add a tablespoon of espresso powder to the dry ingredients or a splash of your favorite liqueur (Baileys, Kahlúa, or rum all work wonders) to the wet ingredients. I won’t tell if you won’t.
FAQ (Frequently Asked Questions)
Can I make this cake ahead of time?
Absolutely! This cake actually tastes better the next day. It’s like the flavors have a little slumber party and wake up amazing. Store it covered at room temperature for up to 3 days.
Will this cake impress my in-laws?
Unless they’re professional pastry chefs or generally unimpressed by deliciousness, yes. If it doesn’t work, maybe the problem isn’t the cake. Just saying.
Can I use a different pan size?
Sure thing! A 9×13 pan works great for about 35-40 minutes. Cupcakes? About 20-25 minutes. Just keep an eye on them – the toothpick test never lies.
My nuts keep falling off! What’s the deal?
Press them gently but firmly into the frosting while it’s still a bit tacky. If your frosting has already set, brush the sides lightly with a bit of honey or corn syrup as “glue.”
Is this cake worth the calories?
Is breathing worth the oxygen? Yes. Next question.
Can I freeze this cake?
You bet! Freeze slices wrapped individually in plastic wrap, then aluminum foil. They’ll keep for up to 3 months. Future You will be very grateful to Current You.
Final Thoughts
Look at you, about to rock a chocolate cake that’s basically wearing a nut tuxedo! This isn’t just dessert – it’s a statement piece that happens to be edible. The combo of rich, moist chocolate cake with that nutty crunch is basically the definition of “having your cake and eating it too.”
Remember, baking is part science, part art, and part whatever-makes-you-happy. If you mess up, call it a “rustic interpretation” and own it. The chocolate-nut police aren’t going to break down your door.
Now go forth and bake! May your cake rise evenly and your nuts stay crunchy. And if anyone asks for the recipe, just wink mysteriously and say it’s a family secret. (Or send them this link. Your call.)
