Let me guess – you’ve got a chocolate craving that just won’t quit, and scrolling through those perfect Instagram cake photos isn’t helping. Well, put the phone down and preheat that oven, friend! This chocolate cake with nuts and chocolate decorations is about to become your new obsession. It’s the kind of cake that makes people think you’ve got your life together (even if you’re secretly wearing mismatched socks and haven’t done laundry in a week). Let’s make some chocolate magic happen!
Why This Recipe is Awesome
First off, this cake is basically foolproof. Seriously, I once made it while simultaneously binge-watching an entire season of my favorite show and it still turned out amazing. The chocolate-to-nut ratio is absolutely perfect – enough nuts to give you that satisfying crunch without feeling like you’re eating trail mix. And those chocolate decorations? They’re the culinary equivalent of putting on mascara before leaving the house – minimal effort, maximum impact.
Plus, this cake has that magical quality where it actually tastes better the next day, which means you can make it ahead of time and still impress the pants off your dinner guests. Or just eat it all yourself over the course of three days. No judgment here.
Ingredients You’ll Need
For the cake:
- 2 cups all-purpose flour (the regular stuff, nothing fancy)
- 1¾ cups granulated sugar (because 2 cups would be sugar overkill, even for us)
- ¾ cup unsweetened cocoa powder (the good stuff, not the sad dusty kind)
- 1½ teaspoons baking powder
- 1½ teaspoons baking soda
- 1 teaspoon salt (to make all that sweetness pop)
- 2 large eggs (room temperature, because cold eggs are party poopers)
- 1 cup buttermilk (or regular milk with a splash of vinegar if you forgot to buy buttermilk, again)
- ½ cup vegetable oil (keeps it moist – sorry if you hate that word)
- 2 teaspoons vanilla extract (real vanilla, not that fake stuff)
- 1 cup hot coffee (or hot water if caffeine makes you weird)
- 1 cup chopped nuts (walnuts, pecans, or almonds – dealer’s choice!)
For the frosting:
- 1 cup butter (softened, not melted into sad butter soup)
- 4 cups powdered sugar (yes, it’s a lot. No, you can’t reduce it much)
- ¾ cup cocoa powder
- 4-5 tablespoons milk
- 2 teaspoons vanilla extract
- ¼ teaspoon salt (trust me on this one)
For decorations:
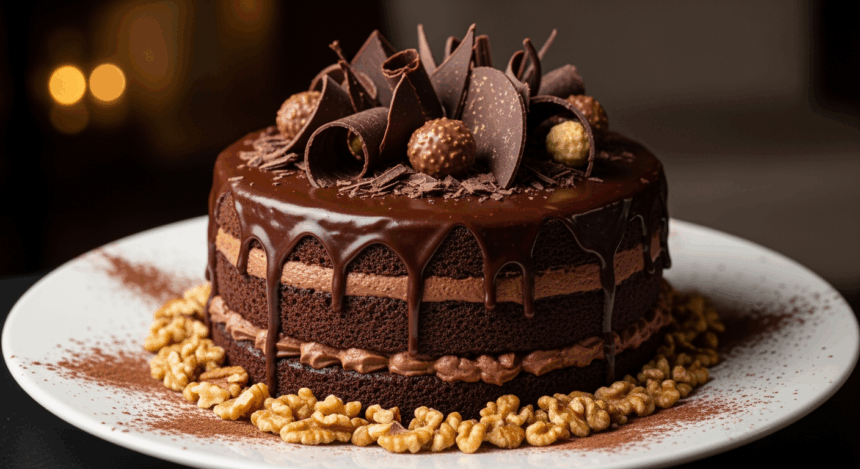
- 4 oz chocolate bar (dark, milk, or whatever makes your heart sing)
- ½ cup whole nuts for topping (the pretty ones you’ve been saving)
- Optional: edible gold dust if you’re feeling fancy AF
Step-by-Step Instructions
- Prep your battle station. Preheat your oven to 350°F (175°C) and grease two 9-inch round cake pans. Line the bottoms with parchment paper because nobody wants a cake that’s half-stuck to the pan.
- Mix the dry team. In a large bowl, whisk together flour, sugar, cocoa powder, baking powder, baking soda, and salt. Break up any cocoa lumps – nobody wants to bite into a cocoa bomb.
- Bring in the wet squad. Add eggs, buttermilk, oil, and vanilla to the dry ingredients. Beat with a mixer on medium speed for about 2 minutes. Your batter should look like a chocolate smoothie.
- Add the secret weapon. Stir in that hot coffee. Yes, the batter will be thin. No, you didn’t mess up. This is what creates that moist (there’s that word again) texture we’re after.
- Nuts, meet batter. Fold in the chopped nuts. Don’t overmix – we’re not making bread here.
- Divide and conquer. Pour the batter evenly into your prepared pans and tap them gently on the counter to release air bubbles.
- Bake it good. Pop those babies in the oven for 30-35 minutes, or until a toothpick inserted in the center comes out with just a few crumbs. If it comes out with wet batter, keep baking. If it comes out completely clean, you might be entering dry cake territory (gasp!).
- Cool your jets. Let cakes cool in pans for 10 minutes before transferring to cooling racks. Patience is a virtue, and burned fingers are not cute.
- Frosting time! Beat the softened butter until creamy, then gradually add powdered sugar and cocoa. Add milk, vanilla, and salt, beating until fluffy and spreadable. If it’s too thick, add more milk. If it’s too thin, add more sugar. Cake frosting is very forgiving that way.
- Build your masterpiece. Place one cake layer on your serving plate, spread a generous layer of frosting, top with the second cake, then frost the top and sides. No need for perfection – we’re going for “rustic chic” here.
- Get decorative. Melt your chocolate in the microwave (30-second bursts, stirring in between). Pour some onto parchment paper and spread it thin. When it’s halfway set, cut into shapes or curls with a knife. Once completely set, peel off and arrange on your cake along with whole nuts.
- Bask in the glory. Stand back and admire your work before the inevitable “I need a slice now” moment happens.
Common Mistakes to Avoid
Let’s talk about what NOT to do, because learning from my disasters will save you some tears:
- Skipping the parchment paper. Unless you enjoy serving cake chunks instead of slices, use the dang paper.
- Opening the oven every 5 minutes to “check.” Your cake needs consistent heat, not a helicopter parent.
- Frosting a warm cake. Unless your aesthetic goal is “melted snowman,” wait until the cake is completely cool.
- Going nuts with the nuts. More is not always better – too many nuts can make your cake layers fall apart faster than my plans on Friday night.
- Rushing the decorations. Chocolate work requires a smidge of patience. If you try to peel up chocolate decorations too soon, you’ll just have chocolate smears (which, to be fair, still taste good).
Alternatives & Substitutions
Let’s talk about how to make this cake your own, because rules are meant to be bent:
Nut options: Walnuts are my go-to, but hazelnuts give major Nutella vibes. Pecans bring Southern charm. Allergic to nuts? Try chocolate chips, toffee bits, or even crushed pretzels for that sweet-salty magic.
Dairy dilemmas: Plant-based milk works fine in the cake (just add a teaspoon of vinegar to make “buttermilk”). For the frosting, vegan butter substitutes will work, but they tend to be softer, so you might need extra powdered sugar.
Coffee alternatives: Not a coffee fan? Use hot chocolate instead. The goal is a hot liquid to bloom the cocoa powder and create depth of flavor. FYI, you won’t taste the coffee in the final product – it just makes the chocolate taste more chocolate-y.
Gluten concerns: A good quality 1:1 gluten-free flour blend will work. The cake might be slightly more delicate, so handle with extra care.
FAQ (Frequently Asked Questions)
Can I make this as cupcakes instead?
Absolutely! Fill cupcake liners about 2/3 full and bake for 18-22 minutes. This recipe should make about 24 cupcakes, giving you plenty to share (or not, I don’t know your life).
How do I store this cake?
At room temperature under a cake dome for 3-4 days. Any longer than that and you should probably question your self-control anyway. You can refrigerate it, but bring to room temp before serving or the texture gets weird.
Can I make this ahead for a party?
You bet! This cake actually tastes better on day 2. You can also freeze unfrosted cake layers for up to a month – just wrap them well in plastic wrap and then foil.
My chocolate decorations look like they were made by a toddler. Help?
Welcome to the club! For easier decorations, try grating chocolate over the top, or stick chocolate-covered espresso beans around the edge. Still impressive, way less fussy.
Is this cake worth the calories?
Is that really a question? Of course it is. Besides, it has nuts, which means it’s practically health food… right?
Final Thoughts
Look at you! You’ve just created a chocolate masterpiece that would make pastry chefs nod in approval (or at least not cringe). This cake isn’t just dessert—it’s an experience, a chocolatey journey that proves you’ve got skills beyond scrolling through TikTok recipe videos.
Whether you’re serving this at a dinner party or eating it straight from the fridge at midnight (we’ve all been there), this chocolate cake with its nutty crunch and fancy chocolate decorations is your new secret weapon. The best part? You can totally pretend it was way more difficult to make than it actually was.
Now go slice yourself a piece – you’ve earned it! And remember: calories consumed while standing in the kitchen definitely don’t count.
