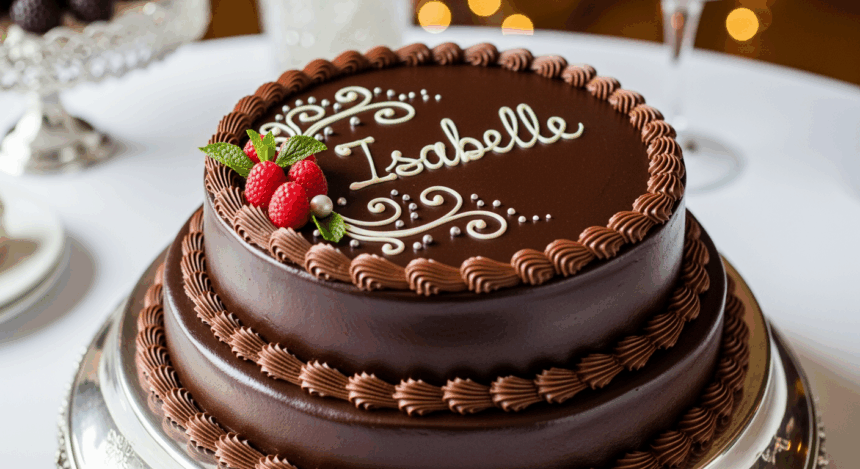
You know what’s better than a chocolate cake? A chocolate cake with someone’s name on it! It’s like saying “I care enough to bake you something delicious AND I remembered how to spell your name.” Double win! Whether it’s for a birthday, anniversary, or just because you want to show off your cake decorating skills (which, after reading this, will be pretty impressive), this personalized chocolate cake will make anyone feel special—even if that someone is yourself. No judgment here!
Why This Recipe is Awesome
Let’s be real—writing someone’s name on a cake automatically bumps you up to hero status in their eyes. But beyond the obvious wow factor, this recipe is ridiculously forgiving. Had a rough day? Take it out on the batter; this cake can handle aggressive mixing. Plus, the decoration part is actually therapeutic. Nothing says “stress relief” like squeezing frosting through a tiny hole while trying to make cursive letters that don’t look like they were written by a kindergartener.
The best part? People are so impressed by seeing their name on a dessert that they’ll overlook any imperfections. It’s basically fool-proof fame in cake form.
Ingredients You’ll Need
For the cake:
- 2 cups all-purpose flour (the regular stuff, nothing fancy)
- 2 cups sugar (because we’re not pretending this is health food)
- ¾ cup unsweetened cocoa powder (the darker, the better)
- 2 teaspoons baking powder (it’s what makes the magic happen)
- 1½ teaspoons baking soda (powder’s exciting cousin)
- 1 teaspoon salt (to make the sweet taste sweeter—science!)
- 2 eggs (room temperature, because cold eggs are party poopers)
- 1 cup milk (dairy or plant-based, we don’t discriminate)
- ½ cup vegetable oil (keeps everything moist—sorry if you hate that word)
- 2 teaspoons vanilla extract (the real stuff, not that imitation nonsense)
- 1 cup hot coffee (don’t skip this! It makes chocolate taste more chocolatey)
For the frosting and decoration:
- 1 cup unsalted butter, softened (patience is key here)
- 4 cups powdered sugar (yes, that much)
- ½ cup cocoa powder (for the chocolate frosting base)
- ¼ cup heavy cream (makes it silky smooth)
- 2 teaspoons vanilla extract (again, the real deal)
- ¼ teaspoon salt (balances the sweetness)
- Food coloring of choice (for name writing—get creative!)
- Piping bags and tips (or a ziplock bag with the corner snipped off, we’re flexible)
Step-by-Step Instructions
- Prep your workspace. Preheat oven to 350°F (175°C). Grease and flour two 9-inch round cake pans. Pro tip: put parchment paper on the bottom for easy removal. Your future self will thank you.
- Mix the dry stuff. In a large bowl, whisk together flour, sugar, cocoa, baking powder, baking soda, and salt. Try not to create a dust cloud that covers your entire kitchen.
- Add the wet ingredients. Add eggs, milk, oil, and vanilla. Beat on medium speed for about 2 minutes. The batter will look like a chocolate swamp—that’s perfect.
- Coffee time! Stir in the hot coffee. Don’t panic when the batter seems runny—it’s supposed to be that way. Trust the process.
- Bake it up. Pour the batter evenly into your prepared pans and bake for 30-35 minutes. The cake is done when a toothpick inserted in the center comes out clean, or when the cake starts to pull away from the sides slightly.
- Cool your jets. Let the cakes cool in pans for 10 minutes, then remove to wire racks to cool completely. Patience, grasshopper—frosting warm cake is a disaster waiting to happen.
- Make the frosting. Beat butter until creamy. Gradually add powdered sugar and cocoa, alternating with cream. Add vanilla and salt. Beat until fluffy and spreadable. If it’s too thick, add more cream; too thin, add more sugar.
- Assemble the cake. Place one layer on your serving plate. Spread a generous amount of frosting on top. Add the second layer and frost the top and sides. Make it as neat or rustic as you want—it’s your masterpiece.
- Prepare for name writing. Set aside about ½ cup of the frosting. Add your chosen food coloring and mix well. Transfer to a piping bag with a small round tip.
- The moment of truth. Practice writing the name on a piece of parchment paper first if you’re nervous. When ready, steadily pipe the name onto the cake. Go slow—this isn’t a race.
Common Mistakes to Avoid
Rushing the cooling process. I know you’re excited, but frosting a warm cake is like trying to put makeup on someone who’s sweating profusely—messy and pointless.
Skipping the coffee. “But I don’t like coffee!” I hear you cry. Relax, the cake won’t taste like coffee. It just enhances the chocolate flavor. Science, baby!
Making the frosting too stiff. Your decorating tip will clog, you’ll squeeze too hard, the bag will burst, and suddenly your kitchen looks like a crime scene. Add enough cream to make it smooth but still hold its shape.
Not planning the name placement. Nothing’s sadder than running out of space and ending up with “Happy Birthday Jo” when the birthday person is named Joseph. Plan ahead!
Alternatives & Substitutions
Make it dairy-free: Use plant-based milk and butter alternatives. The cake will still be delicious, just slightly different in texture.
No coffee, no problem: Use hot water instead. You’ll lose some depth of flavor, but it’ll still be chocolate-y goodness.
Gluten concerns? Substitute a 1:1 gluten-free flour blend. Most work pretty well, though the texture might be slightly different.
Feeling fancy? Add a teaspoon of espresso powder to the frosting for a mocha vibe, or mix in some mint extract for chocolate-mint deliciousness.
IMO, the best substitution is adding a splash of your favorite liqueur to the batter. Kahlúa, Grand Marnier, or Baileys can take this cake from “yum” to “WHERE HAVE YOU BEEN ALL MY LIFE?”
FAQ (Frequently Asked Questions)
Can I make this ahead of time?
Absolutely! The cake layers can be made up to two days in advance. Wrap them well and store at room temperature. The frosting can be made a day ahead and refrigerated—just bring it to room temperature before using.
What if my handwriting is terrible?
Join the club! You can print out the name, place parchment paper over it, trace with frosting, freeze it, then transfer to the cake. Or just embrace the wonky lettering and call it “artistic.”
Can I use a box mix instead?
Are you allowed? Yes. Will I judge you slightly? Also yes. But honestly, do what works for you—this is about making someone happy, not proving your baking prowess.
How do I transport this masterpiece without ruining it?
Refrigerate the cake until the frosting is firm, then carefully cover without touching the surface. For extra protection, stick toothpicks around the top edge and drape plastic wrap over them to create a tent.
What if I mess up writing the name?
Scrape off the mistake with a small spatula, smooth the frosting, and try again. Or strategically place some sprinkles, berries, or chocolate chips to cover your tracks. Worst case? Call it abstract art.
Final Thoughts
There’s something magical about seeing your name on a cake—it’s like your birthday when you were eight years old all over again, but now you can have wine with your cake! Whether you’re a baking newbie or a seasoned pro, this personalized chocolate cake is sure to bring smiles all around.
Remember, perfection is overrated. Slightly wobbly letters just prove it’s homemade with love (at least that’s what I tell myself). So go ahead, bake that cake, write that name, and bask in the glory of being the thoughtful person who went beyond just grabbing something from the bakery section. You cake wizard, you!
