Ever looked at a chocolate cake and thought, “This would be way cooler with a surprise green center”? Well, grab your apron and let’s get weird! This chocolate cake recipe with its Hulk-inspired center isn’t just a treat for your taste buds—it’s a conversation starter that’ll have everyone asking, “How did you DO that?!” Perfect for St. Patrick’s Day, Halloween, or honestly, any random Tuesday when you feel like freaking people out in the most delicious way possible.
Why This Recipe is Awesome
Let me count the ways this chocolate cake with green center rocks:
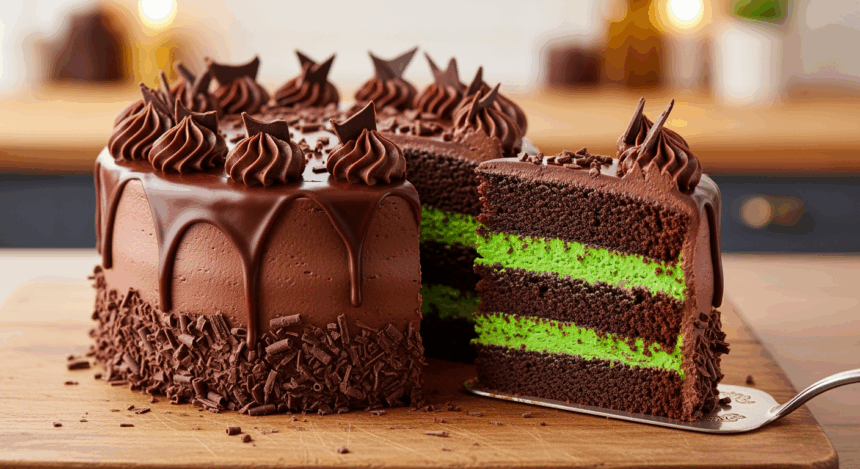
First, it’s a total showstopper. When someone cuts into what looks like a normal chocolate cake only to reveal that alien-green center? Priceless reaction faces, guaranteed.
Second, despite looking like you spent hours on some complicated baking wizardry, it’s actually super straightforward. The “wow factor” to “actual effort required” ratio is off the charts.
Third, it’s customizable! Not feeling green? Go blue, purple, or rainbow if you’re feeling particularly ambitious. The chocolate exterior is basically a blank canvas for your colorful shenanigans.
Ingredients You’ll Need
For the chocolate cake:
- 2 cups all-purpose flour (the regular stuff, nothing fancy)
- 2 cups granulated sugar (because adulting is hard enough without measuring different sugars)
- 3/4 cup unsweetened cocoa powder (not the hot chocolate mix, folks)
- 2 teaspoons baking powder (it’s what makes the magic happen)
- 1 1/2 teaspoons baking soda (yes, this is different from baking powder)
- 1 teaspoon salt (trust me on this one)
- 2 eggs (room temperature, because cold eggs are party poopers)
- 1 cup milk (dairy or plant-based, we don’t discriminate)
- 1/2 cup vegetable oil (keeps things moist without getting weird about it)
- 2 teaspoons vanilla extract (the real stuff if you’re fancy)
- 1 cup boiling water (yes, boiling—it intensifies the chocolate flavor like WHOA)
For the green center:
- 1 box white cake mix (because we’re not making EVERYTHING from scratch, we have lives)
- Green food coloring (go for gel coloring if you want that radioactive look)
- Ingredients called for on the cake mix box (usually eggs, oil, and water)
For the frosting:
- 1 cup butter, softened (please don’t try to substitute margarine, I’ll sense it)
- 4 cups powdered sugar (yes, that much)
- 1/2 cup cocoa powder (unsweetened, just like my humor)
- 4-5 tablespoons milk (add gradually unless you enjoy frosting soup)
- 2 teaspoons vanilla extract (again, the real deal if possible)
- Pinch of salt (the secret to frosting that doesn’t taste like a sugar headache)
Step-by-Step Instructions
Phase 1: The Green Surprise
- Preheat your oven to 350°F (175°C). Don’t skip this step unless you enjoy waiting around while your oven heats up.
- Prepare the white cake mix according to the package directions in a large bowl. Add green food coloring gradually until you reach your desired shade of “what on earth is THAT?” green. FYI, the color will darken slightly when baked.
- Pour the batter into a greased and floured 8-inch round cake pan and bake according to package directions (usually around 25-30 minutes).
- Let it cool completely, then remove from the pan and place in the freezer for about 30 minutes. This makes it easier to cut without crumbling.
- Once chilled, use a 3-4 inch round cookie cutter (or a glass) to cut out the center of your green cake. Set these green cake circles aside.
Phase 2: The Chocolate Disguise
- In a large mixing bowl, whisk together the flour, sugar, cocoa powder, baking powder, baking soda, and salt. Wave your hands over it like you’re casting a delicious spell.
- Add eggs, milk, oil, and vanilla to the dry ingredients and beat with an electric mixer on medium speed for about 2 minutes. The batter will be thick at this point—don’t panic.
- Carefully stir in the boiling water by hand. Yes, the batter will become very thin. This is normal and part of the plan for a super moist cake.
- Pour a thin layer of chocolate batter into two greased and floured 9-inch cake pans (about 1/4 of the batter in each).
- Place a green cake circle in the center of each pan. Make sure it doesn’t touch the sides of the pan.
- Carefully pour the remaining chocolate batter over and around the green cake circles, making sure they’re completely covered.
- Bake at 350°F for 30-35 minutes or until a toothpick inserted near the edge comes out clean.
- Cool in pans for 10 minutes, then remove to wire racks and cool completely before frosting.
Phase 3: The Frosting Finale
- Beat the softened butter in a large bowl until creamy.
- Gradually add powdered sugar, cocoa powder, milk, vanilla, and salt, beating on low speed until combined, then on medium speed until smooth and fluffy.
- Place one cake layer on a serving plate and spread a layer of frosting on top.
- Add the second cake layer and frost the top and sides of the cake.
- Decorate however you want—or don’t. The real shock factor is inside anyway!
Common Mistakes to Avoid
Going color-crazy: More food coloring doesn’t always equal better results. Add gradually or you’ll end up with cake that tastes like chemicals and stains everyone’s teeth.
Rushing the cooling process: I know you’re excited, but trying to cut or frost a warm cake is like trying to put makeup on while jogging—messy and disappointing.
Getting sloppy with alignment: Make sure your green cake circles are centered in the chocolate batter. Otherwise, you’ll cut into the cake and reveal your surprise too soon (or not at all).
Forgetting to grease and flour the pans: Unless you enjoy serving cake chunks instead of slices, don’t skip this step. Parchment paper works great too!
Opening the oven too often: Your cake is not a reality TV show that needs constant monitoring. Every time you open the oven, you lose heat and risk a sad, sunken center.
Alternatives & Substitutions
Color options: Green is just the beginning. Try blue for a “cosmic” cake, red for a bloody surprise, or multiple colors for a rainbow effect. Halloween? Go orange! Christmas? Red and green layers!
Dietary needs: Gluten-free? Use GF cake mixes for both components. Vegan? There are plenty of vegan cake mixes and frosting recipes that work perfectly here.
Flavor twists: Add mint extract to the green center for a choc-mint explosion. Or try almond extract in the chocolate portion for a subtle nutty undertone.
Shape variations: Who says the center has to be round? Use different cookie cutters to make heart, star, or even letter-shaped centers. Mind = blown.
Laziness accommodations: Seriously short on time? Use chocolate cake mix for the outer cake too. I won’t tell anyone if you don’t.
FAQ (Frequently Asked Questions)
How far in advance can I make this cake?
The cake will stay fresh for 2-3 days if stored properly in an airtight container. You can also freeze the unfrosted layers for up to a month. Just remember that nobody enjoys freezer-burned cake.
Can I use natural food coloring instead of artificial?
Feeling health-conscious, are we? You can try matcha powder or spinach puree for green, but be warned: the color will be more “earthy” than “alien invasion” and might affect the flavor.
What if I don’t have round cookie cutters?
Drinking glasses, clean tin cans, or even carefully using a knife works fine. This cake isn’t going on a magazine cover (unless your Instagram game is REALLY strong).
Can I make cupcakes instead of a full cake?
Absolutely! Bake green cupcakes first, cut out small circles, then place them in chocolate cupcake batter. It’s more work, but the “wow” factor is worth it.
My cake cracked/fell/looks nothing like yours—what happened?
First, breathe. Second, cover it with more frosting. Seriously though, baking at high altitude, opening the oven too often, or inaccurate oven temperature are common culprits. When all else fails, crumble it up and call it a “deconstructed cake.” Instant gourmet status!
Will the colors bleed into each other?
If you properly cool and slightly freeze your green center before assembly, you should get a nice clean line between colors. If there’s minor bleeding, just tell everyone it was intentional for an “ombre effect.”
Final Thoughts
There you have it—a chocolate cake with a Frankenstein-worthy green surprise that’s guaranteed to make people do a double-take. It’s the perfect combination of “looks complicated” but “actually pretty manageable” that will have your friends thinking you’ve been secretly taking professional baking classes.
The beauty of this recipe is that even if something goes wrong, you can always claim it was intentional. Cake lopsided? “It’s rustic!” Green center off-center? “It’s abstract!” Frosting melting? “It’s a glaze!”
Now go forth and create some cake-based confusion! And remember—the real joy isn’t just in eating this masterpiece, but in watching people’s faces when they cut into what they thought was just an ordinary chocolate cake. Don’t forget to have your camera ready!
