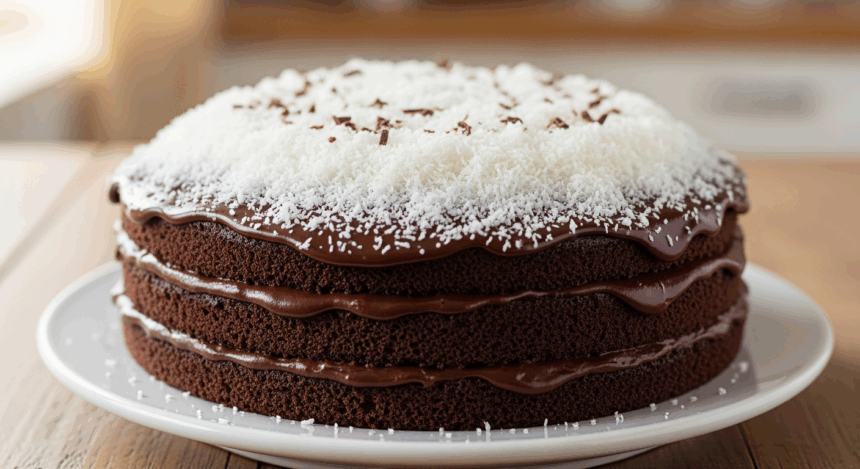
Ever had one of those days when only chocolate cake will fix your problems? Yeah, me too. Like, three times this week already. But here’s the twist – what if we jazz up that chocolate comfort with a tropical vacation vibe? That’s exactly what this chocolate cake with coconut topping delivers: it’s basically therapy in dessert form, minus the hourly rate.
Why This Recipe is Awesome
Let’s be real for a second – this cake is basically the superhero of desserts. It swoops in when you need comfort food but also works when you’re trying to impress people who think you can’t bake. The contrast between the rich, moist chocolate cake and the light, tropical coconut topping is *chef’s kiss* perfection. Plus, it’s surprisingly simple to make, which means you can be emotionally eating this masterpiece in about an hour. #SelfCareInCakeForm
The best part? When people ask where you got the recipe, you can casually mention “oh, I just threw this together” while staring mysteriously into the distance. Power move.
Ingredients You’ll Need
For the chocolate cake:
- 2 cups all-purpose flour (yes, the measuring cup actually matters here)
- 1¾ cups granulated sugar (because 2 cups would be sugar overkill, apparently)
- ¾ cup unsweetened cocoa powder (the good stuff, not the hot chocolate mix you’ve had since 2018)
- 1½ teaspoons baking powder
- 1½ teaspoons baking soda
- 1 teaspoon salt
- 2 large eggs (room temperature, not straight from the fridge, you monster)
- 1 cup milk (dairy or plant-based – we don’t discriminate)
- ½ cup vegetable oil (or any neutral oil that doesn’t taste like your last stir-fry)
- 2 teaspoons vanilla extract (real vanilla, not that imitation stuff)
- 1 cup hot coffee (or hot water if you don’t want that coffee kick)
For the coconut topping:
- 2 cups freshly grated coconut (or the bagged stuff if you’re not trying to impress anyone)
- ½ cup powdered sugar (for that snow-capped mountain look)
- 3 tablespoons butter, melted (because butter makes everything better)
- 1 teaspoon vanilla extract (to make your kitchen smell like heaven)
- Pinch of salt (to balance all that sweetness – trust me on this)
Step-by-Step Instructions
- Prep your battle station. Preheat oven to 350°F (175°C). Grease and flour a 9×13 inch cake pan or two 9-inch round pans. Pro tip: parchment paper is your friend here.
- Mix the dry ingredients. In a large bowl, whisk together flour, sugar, cocoa, baking powder, baking soda, and salt. Make a little well in the center like you’re creating a flavor volcano.
- Add the wet team. Pour in eggs, milk, oil, and vanilla. Beat with an electric mixer on medium speed for about 2 minutes. If you’re doing this by hand, congratulations on your upcoming arm workout.
- Coffee time! Stir in the hot coffee (or water). Don’t panic – the batter will be thin. This is normal, not a baking disaster.
- Bake it till you make it. Pour batter into prepared pan(s) and bake for 30-35 minutes, or until a toothpick inserted in the center comes out clean. Or with a few moist crumbs – we’re not making chocolate jerky here.
- Cool your jets. Allow the cake to cool in the pan for 10 minutes, then remove to a wire rack to cool completely. Patience is a virtue (that I personally don’t have when cake is involved).
- Coconut topping time! While the cake cools, mix together the grated coconut, powdered sugar, melted butter, vanilla, and salt in a bowl. This mixture should be slightly moist and clumpy – like snow that’s perfect for making snowballs.
- The grand finale. Once the cake is completely cool (seriously, don’t rush this), spread the coconut mixture evenly over the top. For extra pizzazz, you can toast the topping under the broiler for 1-2 minutes until golden – but watch it like a hawk because it goes from “perfect” to “charcoal” in approximately 3 seconds.
Common Mistakes to Avoid
Opening the oven too early. I know you’re excited, but your cake will sink faster than my motivation on Monday mornings if you let the cold air in too soon.
Using cold eggs. Room temperature eggs blend better with the batter. If you forgot to take them out earlier, just place them in warm water for a few minutes. Life hack!
Skipping the coffee. Even if you hate coffee, it doesn’t make the cake taste like a latte – it just enhances the chocolate flavor. Trust the process.
Putting topping on a warm cake. Unless you want a melted, gooey mess (which, honestly, still tastes good but looks like something from a horror movie).
Measuring flour incorrectly. Don’t scoop directly with the measuring cup – spoon the flour in and level it off. Baking is basically science for hungry people.
Alternatives & Substitutions
Gluten-free? Swap the all-purpose flour for a gluten-free blend. Just make sure it has xanthan gum already mixed in, or add 1 teaspoon yourself.
No coconut fan in the house? Replace the coconut topping with chocolate ganache, cream cheese frosting, or even a simple dusting of powdered sugar. Or find new friends/family who appreciate coconut. (Kidding. Sort of.)
Dairy-free needs? Use almond or oat milk instead of regular milk, and a plant-based butter substitute for the topping. The cake will still be delicious, promise.
Cutting down on sugar? Reduce the sugar in the cake by up to ¼ cup, but I wouldn’t go lower unless you enjoy disappointment. The coconut topping can work with just 1/3 cup of powdered sugar if needed.
Fancy it up: Add a teaspoon of coconut extract to the cake batter for a double coconut experience. Or mix some mini chocolate chips into the coconut topping for a chocolate-on-chocolate situation. Because too much chocolate isn’t a real thing.
FAQ (Frequently Asked Questions)
Can I make this cake ahead of time?
Absolutely! The cake actually tastes even better the next day. Just add the coconut topping right before serving to keep it fresh and crisp. Otherwise, it’s like leaving potato chips out overnight – still edible but definitely not Instagram-worthy.
How do I store leftovers? (As if there will be any…)
Cover and refrigerate for up to 5 days. Let it come to room temperature before serving, because cold cake is sad cake. Unless it’s ice cream cake, which this is not.
Can I freeze this masterpiece?
You can freeze the cake without the topping for up to 2 months. Thaw overnight in the refrigerator and add fresh topping before serving. Frozen topping gets weird – like, “what is this strange texture in my mouth” weird.
Do I have to use coffee if I don’t like coffee?
Nope! Hot water works fine, but you’ll miss out on that depth of flavor. The cake won’t taste like coffee – pinky promise. It’s like how adding salt to caramel doesn’t make it taste salty; it just makes it taste more caramel-y.
Can I make cupcakes instead of a cake?
You brilliant rebel! Yes, fill cupcake liners about 2/3 full and bake for 18-22 minutes. This recipe should make about 24 cupcakes. Top each one with a little mound of the coconut mixture for maximum cuteness factor.
Final Thoughts
Look at you, about to create a dessert that’s basically a chocolate cloud topped with tropical snow! This cake has gotten me through breakups, work disasters, and that time I tried to cut my own bangs (we don’t talk about that). It’s simple enough for baking novices but impressive enough for that neighbor who always brings “homemade” store-bought desserts to the block party.
The beauty of this recipe is that it’s forgiving – kind of like that friend who still loves you even after you drunk-texted their ex. Even if your cake isn’t picture-perfect, it’ll still taste amazing. And isn’t that what really matters? (The answer is yes, especially if you’re eating it alone in your pajamas while watching Netflix.)
Now go forth and bake! Your taste buds are waiting, and that chocolate-coconut goodness isn’t going to make itself. When people ask for the recipe, you can decide whether to share or just smile mysteriously and say it’s a family secret. I won’t tell if you don’t!
