So, you’re craving something utterly delicious, deeply chocolatey, and just a little bit fancy, but let’s be real, you’re also eyeing that couch with a serious commitment? Same, friend. Same. Forget those intimidating, multi-hour recipes that make you question all your life choices. We’re about to make a chocolate cake that tastes like you spent all day on it, but is actually, blessedly, surprisingly simple. Get ready to impress yourself (and anyone else lucky enough to be in your vicinity).
Why This Recipe is Awesome
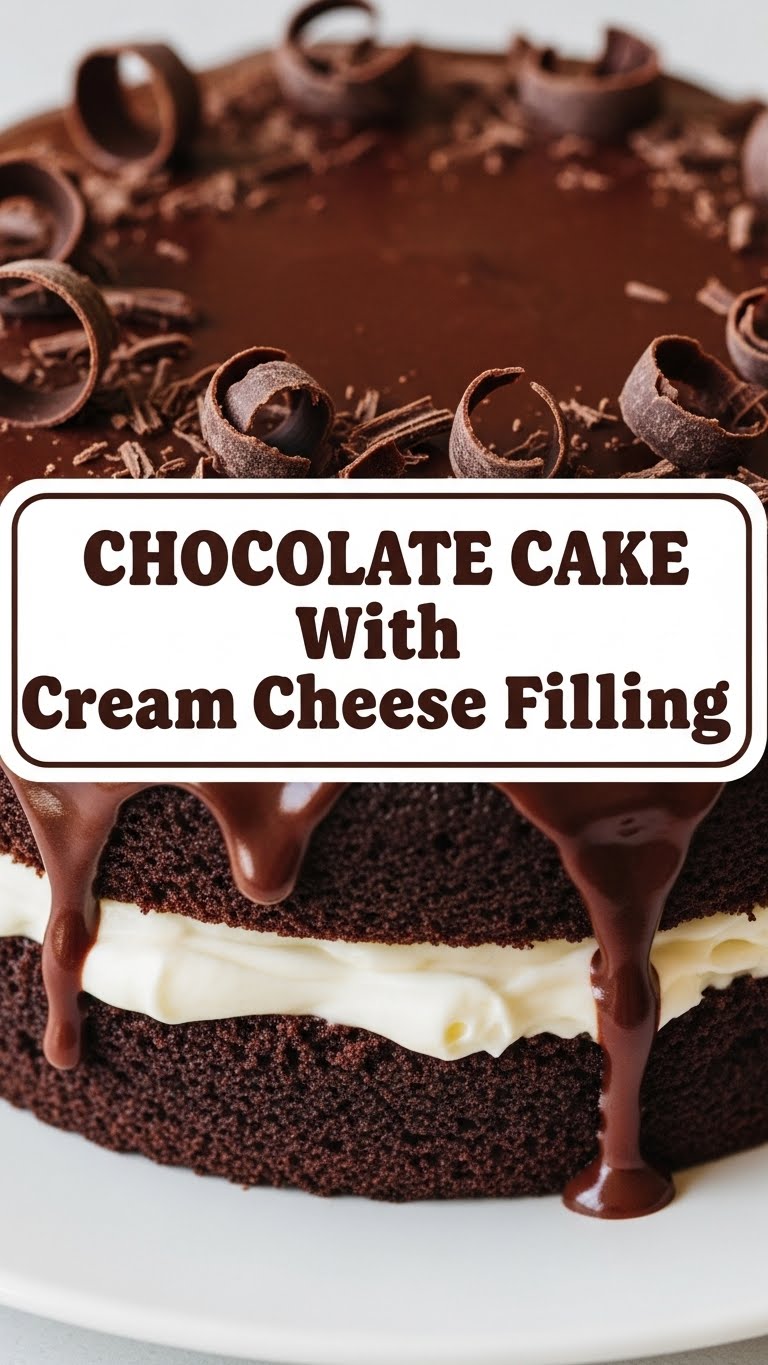
Okay, spill the tea. Why *this* chocolate cake? Because it’s the culinary equivalent of a warm hug mixed with a mic drop. Seriously. It’s got that rich, dark chocolate cake that’s so moist it practically melts on your tongue, paired with a tangy, sweet cream cheese filling that cuts through the richness like a dream. It’s idiot-proof, even I didn’t mess it up on my first try (and my track record with baking is… let’s just say *colorful*). Plus, it looks super sophisticated, making you seem like a baking wizard without actually needing a wand. High five!
Ingredients You’ll Need
Gather your troops! Here’s what you’ll need to make this magic happen. Don’t skimp on quality, especially the chocolate. Your taste buds will thank you.
For the Chocolate Cake:
- 1 ½ cups all-purpose flour: The backbone of our operation.
- 1 ½ cups granulated sugar: Sweetness is key, my friend.
- ¾ cup unsweetened cocoa powder: Go for the good stuff here. Dutch-processed is awesome for a darker cake. No, not the instant hot chocolate mix, sweetie.
- 1 ½ teaspoons baking soda: Our fluffy-maker.
- ¾ teaspoon baking powder: More fluff, because we’re extra.
- ¾ teaspoon salt: Balances everything out. Don’t skip it!
- ¾ cup buttermilk: Adds moisture and a slight tang. If you don’t have it, see the “Alternatives” section!
- ¾ cup warm water: Not hot, not cold, just a nice comforting warm.
- 6 tablespoons vegetable oil: Keeps things moist and tender.
- 2 large eggs: Room temp, please! They mix better.
- 1 teaspoon vanilla extract: A must for any good cake.
For the Cream Cheese Filling:
- 1 (8 oz) block cream cheese: Full-fat, softened to room temp. Don’t even think about low-fat. We’re here for a good time, not a diet.
- ½ cup unsalted butter: Also softened to room temp.
- 3-4 cups powdered sugar: Sifted, unless you like lumpy frosting. Start with 3, add more if you want it sweeter or stiffer.
- 1 teaspoon vanilla extract: Again, essential.
- 2-3 tablespoons heavy cream or milk: To get that perfect, spreadable consistency.
Step-by-Step Instructions
Alright, apron on, game face ready! Let’s bake this bad boy.
Making the Cake:
- Preheat & Prep: Preheat your oven to 350°F (175°C). Grease and flour two 8-inch round cake pans. You can also line the bottoms with parchment paper for extra insurance. This is not optional!
- Dry Ingredients Unite: In a large bowl, whisk together the flour, sugar, cocoa powder, baking soda, baking powder, and salt. Make sure there are no lumps lurking.
- Wet Ingredients Wake Up: In another medium bowl, whisk together the buttermilk, warm water, oil, eggs, and vanilla extract.
- Combine Forces: Pour the wet ingredients into the dry ingredients. Mix on low speed with an electric mixer (or vigorously by hand) until *just* combined. Don’t overmix! A few lumps are okay.
- Bake It Up: Divide the batter evenly between your two prepared cake pans. Bake for 28-32 minutes, or until a wooden skewer inserted into the center comes out clean.
- Cool Down: Let the cakes cool in their pans on a wire rack for about 10-15 minutes. Then, carefully invert them onto the rack to cool completely. Seriously, don’t try to frost a warm cake unless you enjoy a melty, crumbly mess. Patience, young Padawan.
Making the Cream Cheese Filling:
- Cream the Goods: In a large bowl, beat the softened cream cheese and butter together with an electric mixer until smooth and creamy. No lumps allowed!
- Sweeten the Deal: Gradually add the sifted powdered sugar, one cup at a time, mixing well after each addition. Start with 3 cups and add more if you want it thicker or sweeter.
- Flavor Burst: Beat in the vanilla extract.
- Adjust Consistency: If the filling is too thick, add heavy cream or milk, one tablespoon at a time, until you reach a smooth, spreadable consistency.
Assembly Time!
- First Layer: Place one cooled cake layer on your serving plate or cake stand. Spread about half of the cream cheese filling evenly over the top.
- Second Layer: Carefully place the second cake layer on top. Spread the remaining filling over the top of the second layer. You can make it fancy or just rustic, your call!
- Chill Out: For best results, chill the cake in the fridge for at least 30 minutes before slicing. This helps the filling set and makes for cleaner cuts.
Common Mistakes to Avoid
Let’s save you some heartache and crumbly disasters. Learn from my past (many) errors!
- Thinking you don’t need to preheat the oven: Rookie mistake! Your cake won’t rise properly, and it’ll bake unevenly. Always preheat.
- Overmixing the batter: The enemy of tender cake. Once you add the wet to the dry, mix *just* until combined. Overmixing develops gluten, leading to a tough, dense cake. No one wants a hockey puck cake.
- Not using room temperature ingredients (especially for filling): If your cream cheese and butter are cold, your filling will be lumpy and sad. Plan ahead, friend!
- Cutting corners on cooling time: Frosting a warm cake is a one-way ticket to a soupy, sliding mess. Seriously, wait. Go watch an episode of your favorite show while you wait.
- Eyeballing measurements: Baking is a science, unlike cooking where you can totally wing it. Use proper measuring cups and spoons. Your cake will thank you.
Alternatives & Substitutions
Feeling adventurous or just missing an ingredient? Here are a few swaps that won’t totally derail your cake-making mission.
- No buttermilk? No problem! Mix ¾ cup milk with 2 ¼ teaspoons of white vinegar or lemon juice. Let it sit for 5-10 minutes until it looks slightly curdled. Voila! Instant buttermilk.
- Oil choice: Vegetable oil works great, but you can also use canola oil or even melted coconut oil for a subtle flavor twist. Olive oil? Maybe skip that unless you’re feeling *really* experimental.
- Chocolate level up: For an even richer chocolate flavor, add 1 teaspoon of instant espresso powder to the dry ingredients. It won’t make it taste like coffee, just enhance the chocolate. Trust me on this one.
- Gluten-free? You can definitely try a 1:1 gluten-free baking flour blend. Just make sure it contains xanthan gum. Results might vary slightly, but it should still be yummy!
- Cream cheese filling variations: Feeling zesty? Add a teaspoon of lemon or orange zest to the filling. You could also swirl in a bit of raspberry jam for a fruity kick.
FAQ (Frequently Asked Questions)
Got questions? I’ve got (mostly) answers! Don’t be shy.
- Can I use margarine instead of butter? Well, technically yes, but why hurt your soul like that? Butter just tastes better and gives a superior texture to the filling. IMO, it’s worth the splurge.
- Can I make this cake ahead of time? Absolutely! You can bake the cake layers a day in advance, wrap them tightly in plastic wrap, and store them at room temperature. Make the filling the day you plan to assemble. The assembled cake can be stored in the fridge for up to 3-4 days.
- Why is my cake dry? A few culprits: overbaking (use a timer and check doneness carefully!), too much flour, or not enough wet ingredients. Make sure you’re measuring correctly!
- My cream cheese filling is too runny! Help! Probably too much liquid or not enough powdered sugar. Add more sifted powdered sugar, a tablespoon at a time, until it firms up. Also, make sure your butter and cream cheese weren’t too warm.
- Can I make this as cupcakes? You bet! Adjust baking time down to about 20-25 minutes, keeping an eye on them. You’ll get about 24 cupcakes.
- Is Dutch-processed cocoa powder really better? For a darker, less acidic chocolate flavor, yes. Regular unsweetened cocoa works fine too, but Dutch-processed gives it that rich, deep look and taste often found in bakery cakes.
Final Thoughts
Phew! You made it. You’ve now conquered the art of the ridiculously delicious chocolate cake with cream cheese filling. Take a bow! This cake isn’t just dessert; it’s a statement. A statement that says, “Yes, I can totally whip up something amazing, and no, I don’t take myself too seriously while doing it.” Now go impress someone—or just yourself—with your new culinary skills. You’ve earned it! Don’t forget to send me a slice (or at least a picture!).

